| Command | Operator | Value | Example | Notes |
|---|---|---|---|---|
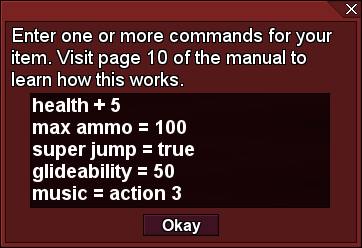
| health, hp, hearts | (Any) | (Number) | health + 5 | Changes the health of the character. This only works if the character uses limited health. The example adds five health points to the character. |
| max health, maximum health, max hp, maximum hp, max hearts, maximum hearts | (Any) | (Number) | max health = 5 | Changes the maximum health of the character. The example sets the character’s maximum health to be 5. This setting only works if the character uses limited health. You may also wish to set the character’s health to 5 so that it is maxed out to the new value. |
| lives | (Any) | (Number) | lives = 5 | Changes the lives of the character. This only works if the character uses limited lives. The example makes the character to have five lives. |
| ammo, primary ammo | (Any) | (Number) | primary ammo * 2 | Changes the primary ammo of the character. This would be the ammo for the character’s ranged attack in the character settings, not the ammo of a gun that has been picked up. This only works if the character uses limited ammo. The doubles the character’s primary ammo. |
| max ammo, maximum ammo, max primary ammo, maximum primary ammo | (Any) | (Number) | maximum ammo * 3 | Changes the maximum amount of primary ammo that the character can carry (according to the ranged weapon in the character settings). This setting only works if the character uses limited ammo. The example sets the character’s maximum ammo to triple the original amount. |
| secondary ammo | (Any) | (Number) | secondary ammo / 2 | Changes the character’s secondary ammo. This would be the ammo for a gun that is picked up by the character. This only works if the character is holding an item which uses ammo. The example divides the secondary ammo by 2. |
| money, coins | (Any) | (Number) | coins + 25 | Changes money which can be used to buy things. Note that you will not be able to exceed whatever value the maximum money is set to. The example adds 25 money. |
| max money, maximum money, max coins, maximum coins | (Any) | (Number) | maximum coins * 2 | Changes the maximum amount of money that the characters can hold. The example doubles the size of their wallet. This value can go as high as 99,999. |
| stars | (Any) | (Number) | stars = 99 | Changes the number of stars for the character. The example makes the character to have 99 stars. |
| air, breath | (Any) | (Number in seconds) | air – 3 | Changes the air time of the character while underwater. The command does not do anything if the character has unlimited air or is above water. This only works if the character uses limited air. The example removes 3 seconds from the remaining time that the character can remain underwater. |
| max air, maximum air, max breath, [or] maximum breath | (Any) | (Number in seconds) | max breath = 10 | Changes the maximum amount of seconds that the character can spend underwater before suffocating. This setting only works if the character uses limited air. The example sets the maximum time underwater to 10 seconds. |
| harm |  | (Number) | harm = 1 | Harms the character. This only works if the character uses limited health. This works similar to changing the health to a lower value, except the character will also react as if being harmed (flying back a little and being temporarily invulnerable.) The example harm the character one health point. |
| kill player | (Any) | (Optional: 1 or 2) | kill player 2 | Kills the player. You can use “kill player” on its own, or you can include “1” or “2” if you want to specifically kill player 1 or player 2. The example kills player 2. |
| kill character | (Any) | (Character ID) | kill character 3 | Kills the character with the specified character ID. See the bottom of this page for how to find the character ID. |
| defense | (Any) | (Number), [or] invincible | defense + 2 | Changes the defense of the character. The example increases the character’s defense by 2. |
| weakness | | none, fire, earth, water, ice, wind, electric, poison, darkness, light, other | weakness = wind | Changes the weakness setting of the character. The example causes the character to have a weakness for wind attacks |
| Command | Operator(s) | Value(s) | Example | Notes |
|---|---|---|---|---|
| super jump | | true, false | super jump = true | Changes the character’s ability to do a super jump. The example allows the character to do super jumps. |
| wall jump, wall slide | | true, false | wall slide = false | Changes the character’s ability to slide and jump off walls. The example makes the character unable to slide and jump off walls. |
| hover [or] float | | true, false | hover = true | Changes the character’s ability to hover. The example allows the character to hover. |
| glide | | true, false | glide = false | Changes the character’s ability to glide. The example makes the character unable to glide. |
| pound, ground pound | | true, false | pound | Changes the character’s ability to do a ground pound. The example allows the character to do ground pounds. (As with all of the other examples, leaving out the operator and value will simply enable the move. So, entering “= true” is only optional.) |
| double jump | | true, false | double jump = false | Changes the character’s ability to do a double jump. The example makes the character unable to do double jumps. |
| climb | | true, false | climb = true | Changes the character’s ability to climb ladders. The example allows the character to climb ladders. |
| hang | | true, false | HaNg = FaLsE | Changes the character’s ability to hang from bars. The example makes the character unable to hang from bars. (The command prompt is not case-sensitive, so capital letters will make no difference to the result of your commands.) |
| duck | | true, false | duck = 1 | Changes the character’s ability to duck. The example allows the character to duck. (1 is an alternative for “true” for the value of a command prompt.) |
| defend | | true, false | defend = 0 | Changes the character’s ability to defend. The example makes the character unable to defend. (0 is an alternative for “false” for the value of a command prompt.) |
| stomp attack | | true, false | stomp attack = true | Changes the character’s ability to attack by jumping on enemies. The example allows the character to attack by jumping on enemies. |
| stand attack | | true, false | stand attack = false | Changes the character’s ability to attack while standing. The example makes the character unable to attack in this way. |
| move attack, walk attack, run attack | | true, false | walk attack = true | Changes the character’s ability to attack while walking or running. The example allows the character to attack in this way. |
| jump attack | | true, false | jump attack = false | Changes the character’s ability to attack while jumping. The example makes the character unable to attack in this way. |
| attack other chars/attack other characters | | true, false | attack other chars = true | Changes the character’s ability to attack other characters (useful in 2-player mode). The example enables this feature. Play nice, everyone. |
| Command | Operator(s) | Value(s) | Example | Notes |
|---|---|---|---|---|
| ground style | | standard, athletic, runner a, runner b, custom | ground style = custom | Changes the character’s ground movement style. The example causes the character to use custom ground movements. In this case, you may want to pre-set the sliders in your character physics settings, because the default positions are the same as athletic movement. |
| swim style | | standard, top down, float, sink, drown, die | swim style = drown | Changes the character’s swim style. The example causes the character to drown in water. (That is, the character will die if the head is submerged.) |
| wall jump style | | standard, scaling | wall jump style = scaling | Changing the character’s wall jump style. Standard wall jumps are the default style where the character kicks off walls and cannot return to the original wall. With scaling, the character can return back to the same wall and continue jumping off of it. This allows the character to “climb” up the wall. The example sets the wall jump style to scaling. |
| jump higher, higher jump | (N/A) | (N/A) | jump higher | Increases the character jump delay, as if the character picked up a special jump item. |
| fly | | standard, top down, mid air jumps, none | fly = top down | Changes the character’s fly settings. The example causes the character to be able to fly using top-down movements. Use “fly = none” to disable flight. |
| Command | Operator(s) | Value(s) | Example | Notes |
|---|---|---|---|---|
| max speed, maximum speed, speed | (Any) | (Number) | speed = 50 | Changes the character’s maximum speed. The example sets the maximum speed to 50, which is half way |
| acceleration, accel | (Any) | (Number) | accel + 15 | Changes the character’s acceleration. The example adds 15 to the character acceleration, bringing the value 15% closer to the maximum. |
| ground traction, traction | (Any) | (Number) | ground traction * 2 | Changes the character’s ground traction. The example doubles the value of the character ground traction. |
| cooldown | (Any) | (Number) | cooldown = 9 | Changes how quickly the character returns to a standing position after the left and right arrow keys are released. The example sets cooldown to 9, which is the default position. |
| jump power, standard jump power | (Any) | (Number) | jump power = 100 | Changes the character’s jump power. The example sets the character’s jump power to the maximum amount. |
| double jump power | (Any) | (Number) | double jump power = 50 | Changes the power of a second of jump in a double jump of the character. The example sets the character’s double jump power to 50% of the maximum amount. |
| wall jump power | (Any) | (Number) | wall jump power = 0 | Changes the character’s jump power when jumping off walls. The example causes the character to have the minimum jump power off walls. They will be very lousy wall jumps! |
| jump off enemy power, enemy jump power | (Any) | (Number) | jump off enemy / 2 | Changes the character’s jump power when jumping off of an enemy. The example cuts the current enemy jump power in half. |
| jump delay, standard jump delay | (Any) | (Number in .02 seconds) | jump delay – 25 | Changes the jump delay of the character for all jumps except the super jump. The example removes half a second from the character’s jump delay. It would be like moving the slider 25% of the way to the left. |
| super jump delay | (Any) | (Number in .02 seconds) | super jump delay + 50 | Changes the character’s jump delay when doing a super jump. The example adds 1 second to the character’s super jump delay. This would be like moving the slider 50% of the way to the right. |
| air acceleration | (Any) | (Number) | air acceleration = 20 | Changes the acceleration for the character while in the air. The example changes the character’s air acceleration amount to 20. |
| air traction | (Any) | (Number) | air traction = 0 | Changes the traction that the character experiences in the air. The example sets the traction to 0, making it impossible for the character to reverse direction while in the air. |
| air cooldown | (Any) | (Number) | air cooldown = 25 | Changes the cooldown value for the character while in the air. The example adds 25 to the cooldown, making the character to slow down after in the air when the left and right keys are not pressed. |
| gravity | (Any) | (Number) | gravity = 75 | Changes the character’s falling gravity. In this example the character’s gravity is set to 75, which is 75% the maximum gravity. |
| ledge tolerance | (Any) | (Number) | ledge tolerance = 5 | Changes the character’s ledge tolerance. Also known as “coyote time,” this is a number of steps after falling off a ledge where the character is still able to jump. Normally this number would stay at 0 or be very small. The example sets the ledge tolerance to 5, which is 5 frames/steps of the game. |
| jump anticipation | (Any) | (Number) | jump anticipation = 4 | Changes the character’s jump anticipation. When the character is in the air and you press the jump button, the character normally won’t jump. But if you are falling and close enough to the ground, the jump anticipation can cause the character to jump again. The number is the number of frames/steps between pressing the jump key and landing that the jump key will still respond. Normally this number would stay at 0 or be very small. The example sets the jump anticipation to 4. |
| fall speed, max fall speed, maximum fall speed | (Any) | (Number) | maxfallspeed=10 | Changes the character’s maximum falling speed. In this example, the maximum falling speed is set to 10, which is quite slow. (The command prompt is not space-sensitive, so this would still work.) |
| hover time | (Any) | (Number in .1 seconds) | hover time * 2 | Changes the number of seconds that the character can hover. This example doubles the character’s hover time. The maximum hover time is 10 seconds. If you wish to hover forever, try using glide instead and set the glideability to 100. |
| glideability, glidability, glide-ability, glide time | (Any) | (Number) | glideability + 300 | Changes how strong the character’s gliding abilities are. The example adds 300 to the character’s glideability. Since all physics are maxed out at 100, the character glideability will become 100. This value causes the character to glide as though hovering. |
| wall traction | (Any) | (Number) | WALL TRACTION = 100 | Changes the character’s wall traction. The example causes the character to have maximum wall traction, which will make the character stick to walls without sliding at all. (The command prompt is not case-sensitive, so this will work fine) |
| ice acceleration | (Any) | (Number) | ice acceleration = 20 | Changes the character’s ability to speed up while walking on ice. The example sets the ice acceleration to 20. |
| ice cooldown | (Any) | (Number) | ice cooldown -15 | Changes how quickly the character naturally slows down from ice when the left and right keys are not are pressed. The example decreases the character’s ice cooldown by 15. |
| climb speed | (Any) | (Number) | climb speed / 2 | Changes the character’s climb speed. The example cuts the character’s climb speed value in half. |
| hang speed, bar speed | (Any) | (Number) | hang speed + 5 | Changes the character’s speed when hanging on bars. The example adds 5 to the total speed value. |
| max swim speed, maximum swim speed, swim max speed, swim maximum speed | (Any) | (Number) | max swim speed * 2 | Changes the maximum speed that the character can swim. The example doubles the maximum swim speed for the character. |
| swim acceleration, swim accel | (Any) | (Number) | swim acceleration = 50 | Changes the swim acceleration for the character. The example causes the swim acceleration to become 50. |
| swim traction | (Any) | (Number) | swim traction = 12 | Changes the swim traction for the character. The example causes the swim traction to become 12. |
| max fly speed, maximum fly speed, fly max speed, fly maximum speed | (Any) | (Number) | fly speed = 90 | Changes the maximum fly speed for the character. The example causes the maximum fly speed to be 90. |
| fly acceleration, fly accel | (Any) | (Number) | fly accel – 40 | Changes the fly acceleration for the character. The example causes the character fly acceleration speed to go down by 40. |
| fly traction | (Any) | (Number) | fly traction /3 | Changes the fly traction for the character. The example causes the fly traction to become one third of its current value. |
| vertical knockback | (Any) | (Number) | vertical knockback = 20 | Changes the vertical power when the character is knocked back after taking damage. A higher knockback will cause the character to fly higher into the air. The example changes the vertical knockback to 20. |
| horizontal knockback | (Any) | (Number) | horizontal knockback + 5 | Changes the horizontal power when the character is knocked back after taking damage. A higher knockback will cause the character to fly farther to the left or right. The examples adds 5 to the horizontal knockback. |
| knockback recovery | (Any) | (Number) | knockback recovery = 10 | Changes the amount of time that the character controls are temporarily disabled after taking damage. This is usually not long, but long enough for the knockback effect to take place. The example sets the knockback recovery to 10. |
| damage recovery | (Any) | (Number) | damage recovery = 25 | Changes the amount of time that the character flash and be invincible after taking damage. The example sets the damage recovery to 25. |
| Command | Operator(s) | Value(s) | Example | Notes |
|---|---|---|---|---|
| design, change design, designer, change designer, sprite, character sprite, char sprite, change character sprite, change char sprite | | (Designer ID) | character sprite = 3 | Changes the designer of a character. The example changes the character design to the design with an ID of 3. See the bottom of this page for how to find the design ID. |
| melee sprite, char melee sprite, character melee sprite, change char melee sprite, change character melee sprite | | (Designer ID) | melee sprite = 2 | Changes the melee sprite of the character using a designer ID of your choice. The example changes the character melee sprite to the melee sprite of the designer with an ID of 2. |
| ranged sprite, char ranged sprite, character ranged sprite, change char ranged sprite, change character ranged sprite | | (Designer ID) | char ranged sprite = 1 | Changes the ranged sprite of the character using a designer ID of your choice. Using “range” instead of “ranged” in your commands will also work. The example changes the character ranged sprite to the ranged sprite of the design with an ID of 1. |
| char sprite revert, character sprite revert, char sprite reset, character sprite reset | | (Sprite ID) | char sprite revert = 4 | Changes the character sprite to a sprite of the chosen Sprite ID. After the animation of that sprite has ended, the character will revert back to its normal sprites. The example changes the character sprite to a sprite ID of 4 until the animation of sprite ID 4 ends. |
| char sprite repeat, character sprite repeat | | (Sprite ID) | character sprite repeat = 2 | Changes the character sprite to a sprite of the chosen Sprite ID. The animation of the sprite will continually loop until you call a different command (reset character sprite) to return the character to its normal sprites. The example does for the uploaded sprite with an ID of 2. |
| char sprite hold, character sprite hold | | (Sprite ID) | char sprite hold = 8 | Changes the character sprite to a sprite of the chosen Sprite ID. When the animation of the sprite ends, it will remain on the final frame until you call a different command (reset character sprite) to return the character to its normal sprites. The examples does this for the character using the sprite with the ID of 8. |
| reset char sprite, reset character sprite, revert char sprite, revert character sprite | (N/A) | (N/A) | reset char sprite | If you are using any commands which change the character to a chosen Sprite (see the above commands), this will return the character back to its normal sprites. |
| character, char, change char, change character | | (Character ID) | change character = 2 | Changes the character to the specified ID. The example changes the character to the character with an ID of 2. |
| spawn player, create player, move player | | (1 or 2, then a comma, then the spawn ID) | create player 1, newSpot | Moves the specified player over an invisible spawn block that is within the view or close nearby with the specified Spawn ID. The top of the player will be positioned at the top of the spawn block, so make sure that your spawn block is lifted above the ground a little. Note that this does not create multiple players; it only move the player, and the player must already exist. The example moves player 1 to the spawn block with the Spawn ID of “newSpot” |
| character (ID) alpha | (Any) | (Number) | Character 2 alpha = 50 | Changes the transparency for the character with the selected ID. The number should be between 0 (invisible) and 100 (fully visible). The example changes the item with an ID of 2 to an alpha value of 50, which is 50% opaque, or half visible. |
| Player (1 or 2) alpha | (Any) | (Number) | player 1 alpha – 20 | Changes the transparency for player 1 or player 2. The number should be between 0 (invisible) and 100 (fully visible). The example reduces the alpha value of player 1 by 20, making the player less visible. |
| character (ID) animate, character (ID) animation | (Any) | (Number) | character 6 animate = 7 | Changes the animation speed of the character with the chosen ID. 0 is no animation, and 12 the fastest animation (Similar to animation settings in Game Setup for enemies, items, etc.). This will force a different animation speed from what automatically happens, and you can reset the animation speed to automatic with the command “character (ID) animate = reset”. The example causes the character with an ID of 6 to animate at a medium speed. |
| player (1 or 2) animate, player (1 or 2) animation | (Any) | (Number) | player 2 animate = 1 | Changes the animation speed of player 1 or 2. 0 is no animation, and 12 the fastest animation (Similar to animation settings in Game Setup for enemies, items, etc.). This will force a different animation speed from what automatically happens, and you can reset the animation speed to automatic with the command “player (ID) animate = reset”. The example causes the player 2 to freeze its animation. |
| character (ID) animate, character (ID) animation | | reset, revert | character 1 animate = reset | If a previous command has been used to change a character animation speed, this command will be needed to reset the animation speed to normal. The example causes the character with an ID of 1 to return back to its normal animation speeds. |
| player (1 or 2) animate, player (1 or 2) animation | | reset, revert | player 1 animation = revert | If a previous command has been used to change a player animation speed, this command will be needed to reset the animation speed to normal. The example causes the player 1 to return back to its normal animation speeds. |
| character (ID) frame, character (ID) image | (Any) | (Number) | character 4 frame = 2 | Changes the animation frame of the character with the specified ID. This can be useful when the animation speed is 0 and you wish to adjust the frames yourself. The example causes the character with an ID of 4 to change to its second frame. |
| player (1 or 2) frame, player (1 or 2) image | (Any) | (Number) | player 1 image = 4 | Changes the animation frame of the chosen player. This can be useful when the animation speed is 0 and you wish to adjust the frames yourself. The example causes player 1 to change to its fourth frame. |
| Command | Operator(s) | Value(s) | Example | Notes |
|---|---|---|---|---|
| stand attack power vs enemies | (Any) | (Number) | stand attack power vs enemies = 3 | Changes the character’s stand attack power against enemies. The example makes the stand attack power vs enemies to be 3. |
| stand attack power vs blocks | (Any) | (Number) | stand attack power vs blocks + 1 | Changes the character’s stand attack power against blocks (the attack power needed to trigger or destroy them from the side). The example adds 1 to the stand attack power. |
| stand attack power vs characters | (Any) | (Number) | stand attack power vs characters -= 2 | Changes the character’s stand attack power against other characters. The example removes 2 from the character’s stand attack power vs. characters. |
| stand attack style | | (any of the attack styles under character settings) | stand attack style = front | Changes the character’s stand attack style. The example makes the character to attack in front. |
| stand attack type | | (any of the attack types under character settings) | stand attack type = ice | Changes the character’s stand attack type. The example makes the character’s stand attack to be an ice type. |
| stand attack moment | | (number), always | stand attack moment = 3 | Changes the moment of the character’s stand attack. The example makes the attack to happen on the third frame of the character’s standing attack animation. |
| move attack power vs enemies | (Any) | (Number) | move attack power vs enemies = 3 | Changes the character’s move attack power against enemies. The example makes the move attack power vs enemies to be 3. |
| move attack power vs blocks | (Any) | (Number) | move attack power vs blocks + 1 | Changes the character’s stand move power against blocks (the attack power needed to trigger or destroy them from the side). The example adds 1 to the move attack power. |
| move attack power vs characters | (Any) | (Number) | move attack power vs characters -= 2 | Changes the character’s move attack power against other characters. The example removes 2 from the character’s move attack power vs. characters. |
| move attack style | | (any of the attack styles under character settings) | move attack style = melee | Changes the character’s move attack style. The example makes the character’s move attack to use a melee weapon. |
| move attack type | | (any of the attack types under character settings) | moveattacktype = light | Changes the character’s move attack type. The example makes the character’s move attack to be a light type. Light attacks also brighten up a dark area. (The command prompt is not space-sensitive, so this should work fine.) |
| move attack moment | | (number), always | move attack moment = always | Changes the moment of the character’s move attack. The example makes the attack to continually happen for every frame of the character’s move attack animation. |
| jump attack power vs enemies | (Any) | (Number) | jump attack power vs enemies = 3 | Changes the character’s jump attack power against enemies. The example makes the jump attack power vs enemies to be 3. |
| jump attack power vs blocks | (Any) | (Number) | jump attack power vs blocks + 1 | Changes the character’s stand jump power against blocks (the attack power needed to trigger or destroy them from the side). The example adds 1 to the jump attack power. |
| jump attack power vs characters | (Any) | (Number) | jump attack power vs characters -= 2 | Changes the character’s jump attack power against other characters. The example removes 2 from the character’s jump attack power vs. characters. |
| jump attack style | | (any of the attack styles under character settings) | jump attack style = long propel | Changes the character’s jump attack style. The example makes the character to propel forward when doing a jump attack. |
| jump attack type | | (any of the attack types under character settings) | jump attack type = electric | Changes the character’s jump attack type. The example makes the character’s jump attack to be an electric type. |
| jump attack moment | | (number), always | jump attack moment = 1 | Changes the moment of the character’s jump attack. The example makes the attack to happen on the first frame of the character’s jumping attack animation. |
| stomp attack power vs enemies | (Any) | (Number) | stomp attack power vs enemies = 3 | Changes the character’s stomp attack power when jumping on enemies. The example makes the stomp attack power vs enemies to be 3. |
| stomp attack power vs characters | (Any) | (Number) | stomp attack power vs characters -= 2 | Changes the character’s stomp attack power when jumping on other characters. The example removes 2 from the character’s stomp attack power vs. characters. |
| stomp attack type | | (any of the attack types under character settings) | stomp attack type = electric | Changes the character’s stomp attack type. The example makes the character’s stomp attack to be an electric type. |
| projectile | | (Projectile ID) | projectile = 3 | Changes the projectile that the character uses in the character projectile settings. See the bottom of this page for how to find the projectile ID. |
| projectile freq, projectile frequency | | standard, semi auto, auto, automatic. | projectile freq = automatic | Changes the frequency of the character’s projectile attack in character settings. Note: “auto” and “automatic” are the same. The example changes the character’s projectile attack to be automatic. |
| projectile dir | | facing, approximate enemy, exact enemy, select, cursor, user direction | projectile dir = cursor | Changes the projectile direction for the character according to how they appear in the character direction settings. If you go to the settings and right-click on the projectile direction, you can learn more about how each style works. The example causes the character to fire projectiles in the direction of the mouse cursor. |
| projectile dir up, projectile dir up right, projectile dir right, projectile dir down right, projectile dir down, projectile dir down left, projectile dir left, projectile dir up left | | true, false | projectile dir down left = true | When the character projectile settings are set to “select,” then you have additional controls for selecting which direction the character should fire projectiles. There are eight possible directions, and they can each be switched on or off independently of each other (just like in the character projectile settings), but the projectile dir must be set to “select.” The example enables a projectile to fire diagonally down and to the left. (You could also say “projectile dir left down = true” for the same result.) |
| fire x, projectile fire x | (Any) | (Number) | fire x = 5 | Changes the x starting position of where a projectile is fired from the character, either standing or ducking. This position is determined from the center of the character. So in this example, if the character is facing right, then the character’s projectile will fire from 5 pixels right from the center of the character. If the character is facing left, then the projectile will fire 5 pixels left from the center of the character. By default, this number is set to 10. |
| fire y, projectile fire y | (Any) | (Number) | fire y = 10 | Changes the y position of where a projectile is fired from the character while standing. This position is determined from the top of the character. So in this example, the projectile will fire 10 pixels below the top of the character. By default, this number is set to 14. |
| duck fire y, projectile duck fire y | (Any) | (Number) | projectile duck fire y = 18 | Changes the y position of where a projectile is fired from the character while ducking. This position is determined from the top of the character, and should normally be larger than the number while standing, because the character is lower to the ground. So in this example, the projectile will fire 18 pixels below the top of the character. By default, this number is set to 26. |
| character (ID) fire x | (Any) | (Number) | character 3 fire x + 3 | Works like the fire x command, except that you are able to select a specific character ID. This example will increase the fire x position by 12 for the character with an ID of 3. |
| character (ID) fire y | (Any) | (Number) | character 3 fire y + 12 | Works like the fire y command, except that you are able to select a specific character ID. This example will increase the fire y position by 12 for the character with an ID of 3. |
| character (ID) duck fire y | (Any) | (Number) | character 3 fire y + 12 | Works like the duck fire y command, except that you are able to select a specific character ID. This example will increase the ducking fire y position by 12 for the character with an ID of 3. |
| Command | Operator(s) | Value(s) | Example | Notes |
|---|---|---|---|---|
| shield, add shield, give shield | (N/A) | (N/A) | shield | Causes the character to have a shield on if the character doesn’t already have one. If you are calling this command from a custom item, it will only work if it is the only command in your command prompt. The example gives the character a shield. To write “shield = true” will also work. |
| invincible, invincibility | (Any) | (Number in seconds) | invincibility + 5 | Changes the time (in seconds) that the character is invincible. If you are calling this command from a custom item, it will only work if it is the only command in your command prompt. If you set this value to 0, then any invincibility (including just after the character is harmed) will be removed. The example causes the character to stay invincible for 5 seconds longer. If the character is not invincible, the example will cause the character to be invincible for five seconds. |
| no hurt, remove hurt, impervious | | true, false | remove hurt = 1 | Causes the character to no longer take damage from enemies. Unlike invincibility, the enemy is not harmed either. This command can also be set to “false” to enable hurting when you are ready to return back. The example removes hurt. (For all true and false values, “true” can be substituted for the numeric 1, and “false” can be substituted for 0.) |
| no slip, ice traction, remove slip | | true, false | ice traction = true | Gives the character the ability to walk on ice without slipping. The commands can be set to “false” to remove the effect, causing the character to slip again. The example removes slip for the character. |
| slip | | true, false | slip | Causes the character to slip on ice. This is the default setting, so this command is not necessary unless it was changed earlier. This command can also be set to “false” to cause the character not to slip on ice. The example does not use an operator or value, so Platform Builder will assume “true.” |
| repel stone, repel stones | (Any) | (Number) | repel stones + 3 | Changes the number of repel stones circling around the character. Repel stones strike nearby enemies and are destroyed in the process. The example adds 3 repel stones to the character. |
| strong repel stone, strong repel stones, tough repel stone, tough repel stones | (Any) | (Number) | strong repel stones = 2 | Changes the number of strong repel stones circling around the character. Strong repel stones are not destroyed when they strike enemies. The example causes the character to have 2 strong repel stones. |
When using the command prompt in timelines, you may wish to take control of how the character moves so that you can design interesting cut-scenes. That is what the following commands are for. They allow you to control the character in the sense that you “take over the keyboard,” telling the character to behave as if certain keys are being pressed and/or released. (Note: Although technically NPCs are also characters, these commands do not apply to NPCs. To control NPC characters, keep scrolling down!)
| Command | Operator(s) | Value(s) | Example | Notes |
|---|---|---|---|---|
| disable characters, disable players | (N/A) | (N/A) | disable players | Disables the ability for the user of your game to control the characters. This applies to Player 1 and Player 2. This can be useful when working with cut-scenes. |
| disable character | | (Character ID) | disable character = 3 | Disables the character with the specified character ID. The example disables the character with the character ID of 3. See the bottom of this page for how to find the character ID. |
| disable player | | 1, 2 | disable player 2 | Disables the character assigned to the specified player number. The example disables player 2. (Technically, the operator is only optional. This is usually the case when your only option is the equals sign.) |
| enable characters, enable players | (N/A) | (N/A) | enable characters | Enables the ability for the user of your game to control the characters. This applies to Player 1 and Player 2. Do not forget to enables your characters after you are finished controlling them manually! |
| enable character | | (Character ID) | enable character 3 | Enables the character with the specified character ID. The example disables the character with the character ID of 3. (Technically, the operator is only optional. This is usually the case when your only option is the equals sign.) |
| enable player | | 1, 2 | enable player = 2 | Enables the character assigned to the specified player number. The example enables player 2. |
| character (ID) | | left, right, up, down, [or] stop | character 1 = right | Causes the character of the specified ID to behave as if the specified movement button is being pressed down. The example with cause the character with an ID of 1 to move right, provided that nothing is blocking the character’s path. This will happen continually unless the direction is changed or the character is stopped using the value “stop”. |
| character (ID) | | hard stop | character 1 = hard stop | Causes the character of the specified ID to stop left and right movement instantly without slowing down first. The example causes the character with an ID of 1 to instantly stop. |
| character (ID) | | jump | character 2 = jump | Triggers the character with the specified ID to jump, as if the jump key has been pressed. The example causes the character with and ID of 2 to jump. |
| character (ID) | | jump release, release jump | character 2 = release jump | Triggers the same event that happens when the jump key is released. If the character is moving up in the middle of a jump, this will cause the jump to be shorter. |
| character (ID) | | attack, punch, kick, shoot, fire | character 3 = shoot | This command works as if the attack button has been pressed. Because of this, the actual attack of the character is determined by the character settings. Therefore, all of the different values (attack, punch, shoot, etc.) do the same thing. The example causes the character with an ID of 3 to attack. |
| character (ID) | | pick, pick item, grab, take | character 1 = grab | This command works as if the button was pressed for grabbing pick-up items, such as a gun. The example causes the character with an ID of 1 to attempt to grab something. |
| character (ID) | | place, put, set, drop | character 1 = drop | This command works as if the button was pressed for setting down items that have been picked up. The example causes the character with and ID of 1 to place down an item that has been picked up. |
| character (ID) | | use | character 1 = use | This command works as if the button was pressed for using items that have been picked up. The example causes the character with and ID of 1 to use an item that has been picked up. |
| character (ID) | | face left, face right, turn left, turn right | character 5 = face right | Causes the character to face in the specified direction. The example causes the character with an ID of 5 to face to the right. |
| player (1 or 2) | | (Any of the movement/action commands listed above) | player 2 = pick item | Instead of specifying the character ID, you could choose to specify either player 1 or player 2 instead. The word “character” can be substituted with the word “player” in any of the movement/action commands listed above. The example causes player 2 to attempt to pick up an item by triggering the keyboard key which is used to grab items. |
| seismic pound | | light, medium, strong | seismic pound = light | Creates a seismic pound for the character. This command can also be called from a command prompt in the enemy settings to create a seismic pound from the enemy. |
| character (ID) knockback | (N/A) | (N/A) | character 3 knockback | Simulates a knockback effect like when the character is harmed, but without actually damaging the character. The example causes the character with an ID of 3 to be knocked back. |
| Command | Operator(s) | Value(s) | Example | Notes |
|---|---|---|---|---|
| character (ID) x | (Any) | (Number) | character 1 x + 32 | Moves the x-position of your character with the specified ID. See the bottom of this page for how to find the character ID. The example makes the character with an ID of 1 to move 32 pixels to the right, which is the distance of a typical block. Be careful moving the character around; you probably don’t want him/her getting stuck in a wall! |
| character (ID) y | (Any) | (Number) | character 3 y = 0 | Changes the y-position of your character with the specified ID. Moves character 3 vertically to position 0, which is the very top of your room. |
| character (ID) x | | random view, smart random view | character 4 x = random view | This will set the x-position of a character to a randomly-selected new position within the view. Choose “random view” for a completely random position. Choose “smart random view” to find a random position while avoiding solid objects. The example finds a new random x-position for the character with an ID of 4. (It’s y-position will stay the same.) |
| character (ID) y | | random view, smart random view | character 4 y = random view | This will set the y-position of a character to a randomly-selected new position within the view. Choose “random view” for a completely random position. Choose “smart random view” to find a random position while avoiding solid objects. The example finds a new random y-position for the character with an ID of 4. (It’s x-position will stay the same.) |
| character (ID) position | | random view, smart random view | character 3 position = random view | This will set both the x- and y-position of a character to a randomly-selected new position within the view. Choose “random view” for a completely random position. Choose “smart random view” to find a random position while avoiding solid objects. The example finds a new random position for the character with an ID of 3. |
| character (ID) x snap | | (Number) | character 1 x snap = 16 | This will set the x-position of a character to the nearest position on a specified grid size (similar to how your work box by default snaps to a grid when you place things down, except that this works only with the x-value rather than both). The example moves the character with an ID of 1 to the nearest x position divisible by 16. |
| character (ID) y snap | | (Number) | character 1 y snap = 32 | This will set the y-position of a character to the nearest position on a specified grid size (similar to how your work box by default snaps to a grid when you place things down, except that this works only with the y-value rather than both). The example moves the character with an ID of 1 to the nearest y position divisible by 32. |
| character (ID) position snap | | (Number) | character 2 position snap = 48 | This sets both the x- and y-position of a character to the nearest position on a specified grid (similar to how your work box by default snaps to a grid when you place things down). The example moves the character with an ID of 2 to the nearest position on a 48 x 48 grid. |
| player (1 or 2) x | (Any) | (Number) | player 1 x = 0 | Changes the X position of the chosen player. The example moves player 1 horizontally to position 0, which is the far left side of your area. |
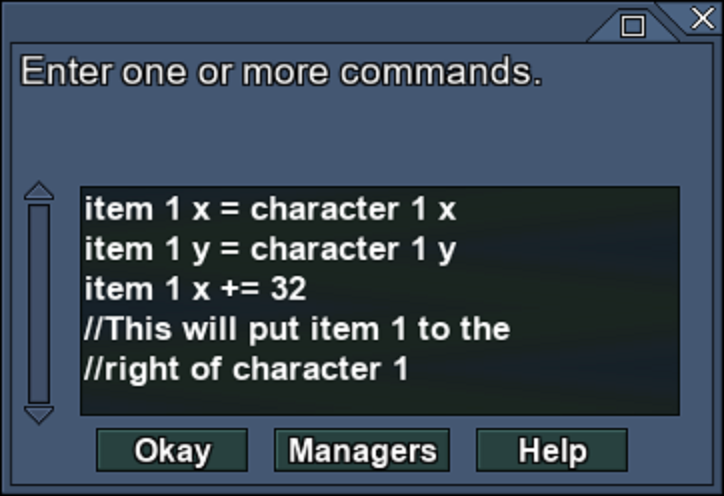
| player (1 or 2) y | (Any) | (Number) | player 2 y = [player 1 y] | Changes the Y position of the chosen player. The example causes the Y position of player 2 to be the same Y position as player 1. This is done with the use of bracketing. See below for more information about bracketing things. |
| player (1 or 2) x | | random view, smart random view | player 1 x = random view | This will set the x-position of the chosen player to a randomly-selected new position within the view. Choose “random view” for a completely random position. Choose “smart random view” to find a random position while avoiding solid objects. The example finds a new random x-position for player 1. (It’s y-position will stay the same.) |
| player (1 or 2) y | | random view, smart random view | player 2 y = random view | This will set the y-position of the chosen player to a randomly-selected new position within the view. Choose “random view” for a completely random position. Choose “smart random view” to find a random position while avoiding solid objects. The example finds a new random y-position for player 2. (It’s x-position will stay the same.) |
| player (1 or 2) position | | random view, smart random view | player 1 position = random view | This will set both the x- and y-position of a chosen player to a randomly-selected new position within the view. Choose “random view” for a completely random position. Choose “smart random view” to find a random position while avoiding solid objects. The example finds a new random position for player 1. |
| player (1 or 2) x snap | | (Number) | player 1 x snap = 16 | This will set the x-position of a chosen player to the nearest position on a specified grid size (similar to how your work box by default snaps to a grid when you place things down, except that this works only with the x-value rather than both). The example moves player 1 to the nearest x position divisible by 16. |
| player (1 or 2) y snap | | (Number) | player 1 y snap = 32 | This will set the y-position of a chosen player to the nearest position on a specified grid size (similar to how your work box by default snaps to a grid when you place things down, except that this works only with the y-value rather than both). The example moves player 1 to the nearest y position divisible by 32. |
| player (1 or 2) position snap | | (Number) | player 2 position snap = 48 | This sets both the x- and y-position of a chosen player to the nearest position on a specified grid (similar to how your work box by default snaps to a grid when you place things down). The example moves player 2 to the nearest position on a 48 x 48 grid. |
| fire x, projectile fire x | (Any) | (Number) | fire x = 5 | Changes the x starting position of where a projectile is fired from the character. This position is determined from the center of the character. So in this example, if the character is facing right, then the character’s projectile will fire from 5 pixels right from the center of the character. If the character is facing left, then the projectile will fire 5 pixels left from the center of the character. By default, this number is set to 10. |
| fire y, projectile fire y | (Any) | (Number) | fire y = 10 | Changes the y position of where a projectile is fired from the character while standing. This position is determined from the top of the character. So in this example, the projectile will fire 10 pixels below the top of the character. By default, this number is set to 14. |
| duck fire x, projectile duck fire x | (Any) | (Number) | projectile duck fire x = 18 | Changes the y position of where a projectile is fired from the character while ducking. This position is determined from the top of the character, and should normally be larger than the number while standing. So in this example, the projectile will fire 18 pixels below the top of the character. By default, this number is set to 26. |
| character (ID) fire x, character (ID) fire y, [or] character (ID) duck fire y | (Any) | (Number) | character 3 fire y + 12 | Works like the other fire x and y commands, except that you are able to select a specific character ID. This example will lower the standing fire y position by 12 for the character with an ID of 3. |
| character (ID) looping | | staggered, constant, default | character 7 looping = constant | This changes the looping speed of the looping command prompt for the character with the specified ID. You can choose to have it loop “constant” which would be every frame of the game, or “staggered” which would be 6 times per second (and is easier on the PC). Set this to “default” to make it take on whatever setting you have for looping in general (see the command “loop/loop speed”). The example causes the character with an ID of 7 to run its looping command prompt every frame of the game. |
| player (1 or 2) looping | | staggered, constant, default | player 1 looping = default | This changes the looping speed of the looping command prompt for the chosen player. You can choose to have it loop “constant” which would be every frame of the game, or “staggered” which would be 6 times per second (and is easier on the PC). Set this to “default” to make it take on whatever setting you have for looping in general (see the command “loop/loop speed”). The example causes the player 1 to run its looping command prompt at the same pace as your default looping settings. |
| character (ID) layer | | (Number) | character 3 layer = 12 | Changes the layer of the character with the chosen ID. This only works if the character is already active. The example causes characters with an ID of 3 to go to the layer with an ID of 12. |
| player (1 or 2) layer | | (Number) | player 1 layer = 4 | Changes the layer of the specified player. This only works if the player is already active. The example causes player 1 to go to the layer with an ID of 4. |
| Command | Operator(s) | Value(s) | Example | Notes | |
|---|---|---|---|---|---|
| sfx, sound, sound effect | | (Number from “Item SFX” in item settings) | sfx = 5 | Plays a sound effect from the list of sound effects in custom item settings of Game Setup. If you go to your item settings, you can give the item a sound effect. These sound effects are numbered, and you use the same number here for your value. The example plays sound effect #5, which is the sound of a whistle. | |
| sfx | | (Sound effect name from “Sound Effects” of Game Setup) | sfx = P2 Jump | Plays the sound effect with the chosen name from “Sound Effects” of Game Setup. Do not include the sound effect category. For instance, the value of the example is not “Character: P2 Jump.” It is only “P2 Jump.” This example plays the sound effect for when Player 2 jumps. | |
| extra sfx, extra sound, extra sound effect, import sfx, import sound, import sound effect | | (ID of uploaded sound effect) | extra sfx = 4 | Plays the sound effect of the specified ID that you have uploaded in game setup. The ID of the sound effect is displayed in your sound effect box when you select it from the manager in Game Setup > Sound Effects. The example plays the uploaded sound effect with an ID of 4. | |
| music | | (music name, shown in music selection settings, or “import” with the music ID) | music = happy 4 | Changes the area music to the specified music name. The example plays “Happy 4” which is the Platform Builder theme music. An example for uploaded music would be “music = upload 4”. | |
| pause music | (N/A) | (N/A) | pause music | Pauses the music currently playing for the area. | |
| stop music, end music, quit music, no music | (N/A) | (N/A) | quit music | Stops the music from playing. Unlike pausing, this will reset the music track to the beginning if you choose to resume it. | |
| loop music, looping music | | true, false |  | This lets you determine if the music to be played should loop, or if it should stop playing once the track has ended. By fault, music will loop. If you wish to change this, it is important that you call this command before playing the music. The example sets looping music to false, and then plays the music. Once “happy 4” has ended, the music will stop. | |
| resume music, unpause music | (N/A) | (N/A) | ReSuME muSIC | If the music was paused, this will resume the music from where it paused. If the music was stopped, this causes the default area music to start playing from the beginning of the music track. The command prompt is not case-sensitive, so the example will not cause any problems. | |
| music volume | (Any) | (Number from 0 to 100) | music volume / 2 | Changes the volume of the music that is playing, where 100 is the (default) full volume, and 0 is completely silent. The example turns the music to half its volume. | |
| fade out music, music fade out | (N/A) | (N/A) | fade out music | Causes the music to fade out. | |
| fade in music, music fade in | (N/A) | (N/A) | music fade in | Causes the music to fade in. | |
| background | | (Background name, shown in background selection settings, or “upload” with the background ID) | background = upload 3 | Changes the background image of the area to a background with the given name. The example causes the area to use the uploaded background with an ID of 3. An example for an included background would be “background = forest 2”. | |
| background scroll speed | (Any) | (Number between -100 and 100) | background scroll speed = -50 | Sets the scroll speed of the background with 100 as full moving speed, 0 is no speed, and -100 is full speed in reverse. The example causes the background image to scroll at half speed in the backwards direction. | |
| background scroll direction | | (Any of the 8 numpad directional numbers, like 2 for down, 9 for up-right, etc.) | background scroll direction = 7 | Sets the scroll direction for a background. The example causes the background to scroll up-left, which is the direction of 7 on a numpad. Note that for backgrounds which do not loop vertically, you can only use 4 or 6 for left and right directions. | |
| stop sfx | | (Any sound effect name from sound effects section in game setup, excluding the category name) | stop sfx = splash | Stops a sound effect of your choosing from the sound effects list in game setup. You can use any name, but be sure to exclude the category (So, instead of “Character: P1 Jump”, just say, “P1 Jump”.) The example causes the Character: Splash sound to stop playing. | |
| stop sfx, stop sound, stop sound effect | | (Number) | stop sfx = 5 | Stops an item sound effect of your choice. The number corresponds with the sound effect number in custom items. The example stops sound effect 5 from playing, which is a whistle sound. | |
| stop import sfx, stop sfx import, stop import sound, stop sound import, stop extra sound, stop extra sfx, stop extra sound effect | | (Sound effect ID) | stop sfx import = 3 | Stops the playing of an imported sound effect with the chosen ID. The example stops an imported sound effect with the ID of 3 to stop playing. | |
| stop all sounds, stop all sfx, stop all sound effects | (N/A) | (N/A) | stop all sfx | Causes all actively playing sound effects to stop. Note that does does not affect background music, and you should use “stop music” to handle that if you wish. |
| Command | Operator(s) | Value(s) | Example | Notes |
|---|---|---|---|---|
| lens | Lens settings have been replaced by “Effects” in Platform Builder 10.2. They will still mostly work in your games, but please refer to the “effects” and use the effect commands from now on. | |||
| distance, view distance | | (Number between 1 and 9) | view distance = 3 | Changes the view distance, where 1 is the closest and 9 is the farthest. The example causes the view distance to be 3. This is moderately-close, just a little closer than the default distance of your views. |
| view height, camera height, view size, camera size | (Any) | (Number) | view height -= 1 | Changes the size of the view by specifying the height. Platform Builder always displays in the standard 16×9 aspect aspect ratio, so the view width will adjust accordingly with the new height. Because of this aspect ratio, it is recommended that your view height is divisible by 9, but anything between 9 and 2160 will work. The example shrinks the view height by 1. Were this example running in a looping command with constant looping, it would result in a zoom-in effect. |
| fade out, camera fade out | | (Number in seconds) | fade out = 2.5 | Fades the screen out by the specified number of seconds (or don’t include an operator and value to have it fade at a default speed) The example causes the screen to fade out over the course of 2.5 seconds. |
| fade in, camera fade in | | (Number in seconds) | fade in = 1 | Fade the screen in. You can use this command if you have previously faded the screen out. |
| color, fade color, camera fade color | | black, white, gray, red, blue, yellow, green, orange, purple, brown, (or you can input RGB values separated by commas. ) |  | Changes the color used for things like effects and camera fades. The default color is black. You also can use this command after “blackout” or “whiteout” with any color to instantly turn the screen to the selected color. You can also set the color manually with RGB values, separated by commas. The example creates a white spark effect and fades the screen out to a color whose RGB value is 51,117, and 64 (which is a forest green color). |
| blackout, black screen, screen black, black view, view black, black camera, camera black | (N/A) | (N/A) | black screen | Instantly turns the screen black. This command also changes the fade color to black. |
| whiteout, white screen, screen white, white view, view white, white camera, camera white | (N/A) | (N/A) | camera white | Instantly turns the screen white. This command also changes the fade color to white. |
| no fade, remove fade | (N/A) | (N/A) | no fade | Instantly removes any black or white covers over the screen. |
| screen shake, shake screen, view shake, shake view, camera shake, shake camera | (Any) | (Whole number in seconds) | screen shake = 3 | Changes the number of seconds for the screen to shake. If you leave out the operator and value, it will cause the screen to shake for 1/2 second. The example causes the screen to shake for three seconds. You can also use other operators to add or subtract the shake time. |
| shake power | | very light, light, medium, strong, very strong | shake power = medium | Changes the intensity of the screen shake. Default value is light, but you can make the screen shake more violently using this command. The example causes the screen to shake with medium power. |
| Command | Operator(s) | Value(s) | Example | Notes |
|---|---|---|---|---|
| follow character, view follow character, camera follow character | (N/A) | (Character ID) | view follow character 1 | Causes the view to follow the character with the specified ID. This command works for players or NPCs. See the bottom of this page for how to find the character ID. |
| follow player, view follow player, camera follow player | (N/A) | 1, 2 | follow player = 2 | Causes the view to follow player 1 or player 2. The example causes the view to follow player 2. The operator in the example is not necessary, but it won’t hurt anything. This is often the case when the only operator to use is “=”. |
| follow characters, view follow characters, follow players, view follow players, camera follow characters, camera follow players | (N/A) | (N/A) | view follow characters | Causes the view to follow both players. Technically, the view follows a point which is exactly between both players. If there is only one player active, then the view will follow that one player. |
| follow npc, view follow npc, camera follow npc | (N/A) | (Character ID of the NPC) | follow NPC 4 | Causes the view to follow an NPC with the ID of the character. This command only works if the NPC is already within the view or closely nearby. The example causes the view to follow the NPC with the character ID of 4. The command prompt is not case-sensitive, so the capital “NPC” will not be a problem. |
| follow item, view follow item, camera follow item | (N/A) | (Item ID) | follow item 2 | Causes the view to follow an item with the specified ID. The example causes the view to follow a custom item with the ID of 2. This command only works if the NPC is already within the view or closely nearby. |
| follow enemy, view follow enemy, camera follow enemy | (N/A) | (Enemy ID) | follow enemy 5 | Causes the view to follow an enemy with the specified ID. The example causes the view to follow a custom enemy with the ID of 5. This command only works if the enemy is already within the view or closely nearby. |
| follow block, view follow block, camera follow block | (N/A) | (Block ID) | follow block 3 | Causes the view to follow a block with the specified ID. Blocks don’t move, but the view will still go to them. The example causes the view to follow a custom block with the ID of 3. This command only works if the block is already within the view or closely nearby. |
| follow sprite, view follow sprite, camera follow sprite | (N/A) | (Sprite ID) | camera follow sprite 1 | Causes the view to follow a sprite with the specified ID. Sprites don’t move, but the view will still go to them. The example causes the view to follow an uploaded sprite with the ID of 1. This command only works if the sprite is already within the view or closely nearby. |
| follow spawn, view follow spawn, camera follow spawn | (N/A) | (Spawn ID of the spawning point to move the view to) | follow spawn, hi | Causes the view to follow an invisible spawn point with the specified spawn ID separated by a comma. Spawn points are invisible blocks which are usually used to create stuff, but you can also move a view to it. The example causes the view to go to a spawn point with the spawn ID of “hi”. This command only works if the spawn point is already within the view or closely nearby. |
| view jump, camera jump | (N/A) | (N/A) | view jump | Causes the view to jump to whatever it may be following. Without this command, the view will pan (move) toward what it is following. This command can be useful to call if you just changed what the view is following, and you want the view to go there right away. |
| view center, camera center | (N/A) | (N/A) | camera center | If your view is following something, then this command will center the view on whatever it is following. The example does just that. |
| travel, view travel, camera travel | | slow, medium, fast, none | travel = medium | Causes the view to travel at the selected speed. The example causes the view to travel at a medium speed. You can also use “none” as a value to cause the view to stop completely. |
| direction, view direction, camera direction | | up, down, left, right | view direction = up | Changes the traveling direction of the view. For this to make any effect, make sure that the view travel speed is slow, medium, or fast. The example causes the travel direction of the view to go up. |
| fixed movement, view fixed movement, camera fixed movement | (N/A) | (N/A) | fixed movement | This gives fixed movement for the view when it is traveling. It will only move in the direction specified. |
| loose movement, view loose movement, camera loose movement | (N/A) | (N/A) | view loose movement | This causes loose movement for the view when it is traveling. For instance, if the view is traveling to the right, it will still follow the vertical position of whatever it is following. |
| stop view, stop camera | (N/A) | (N/A) | stop view | Causes the view to stop moving. This is an alternative to “view travel = none.” You could also do “view follow = none” for the same result. |
| view x, camera x | (Any) | (Number) | view x = 32 | Changes the x position of the view, where 0 is the far left of the area. Keep in mind that you may need to disable whatever the view is following for this to properly work. The example sets the view to 32, which is one block’s width from the very left side of the area. |
| view y, camera y | (Any) | (Number) | view y -= 500 | Changes the y position of the view, where 0 is the top of the area, and 7899 is the bottom of the area. Keep in mind that you may need to disable whatever the view is following for this to work properly. The example sets moves the view up 500 pixels. |
| Command | Operator(s) | Value(s) | Example | Notes |
|---|---|---|---|---|
| rain | | true, false | rain = true | Changes the rain setting of the area. The example causes rain to start falling in the area. |
| snow | | true, false | snow = false | Changes the snow setting of the area. The example causes snow to stop falling in the area. |
| storm, thunder, lightning | | true, false | thunder = true | Changes the storm setting of the area. The example causes the area to behave like a storm, with flashing of lightning and thunder sounds. |
| lighting, dark, darkness | | true, false | lighting = false | Toggles the lighting settings of the area. The example turns off lighting. |
| hazardous, hazard | | true, false | hazardous = true | Changes the hazard setting of the area. The example causes the area to use hazardous settings (The character will slowly take damage). |
| bonus | | true, false | bonus = false | Changes the bonus setting of the area. The example causes the bonus setting to be turned off. |
| free restarts | | true, false | free restarts | Changes whether or not you can exit an area without spending a life. The example makes this possible. It can be useful for casual games or bonus areas. |
| endless pit | | true, false | Endless PIT = False | Changes whether the bottom of the area functions as an endless pit. (The command prompt is not case-sensitive, so capital letters will make no difference to the result of your commands.) |
| enable time, enable time limit | | true, false | enable time = true | Changes where or not the area has a time limit. The example makes the area to have a time limit. |
| disable time, disable time limit | | true, false | disable time = false | An alternative to the command “enable time” except that it is opposite language. The example makes false the disabling of time. In other words, it enables the time limit for the area. |
| time | (Any) | (Number in seconds) | time + 60 | Changes the time limit of the area. The example adds 60 seconds to the time limit of the area. |
| setting | | land, underwater | setting = underwater | Changes the setting of the area between land or underwater. The example makes the area behave like everything is underwater. |
| gravity | | normal, low, very low | gravity = low | Changes the gravity of the area. Lower gravity means that things jump higher and fall slower. |
| wind | | light left, strong left, light right, strong right, none | wind = light right | Changes the wind setting of the area. The example causes the area to have a wind lightly pushing the character to the right. |
| area speed | (Any) | (Number) | area speed = 2 | Changes the target fps (frames per second) which the game will attempt to run at for the area. The default fps is 30. Anything higher than that will make the game faster, and anything lower than that will make the game go slower. Keep in mind that a faster fps means the computer has to think faster, which might be difficult for older computers. The example causes the game to run at only 2 frames per second, which is extremely slow. However, this speed can be useful when you are running tests to fine-tune a cut-scene. |
| area looping | | staggered, constant, default | area looping = constant | This changes the looping speed of the looping command prompt in your area settings. You can choose to have it loop “constant” which would be every frame of the game, or “staggered” which would be 6 times per second (and is easier on the PC). Set this to “default” to make it take on whatever setting you have for looping in general (see the command “loop/loop speed”). The example causes the current area to run its looping command prompt every frame of the game. |
| every area looping | | staggered, constant, default | every area looping = staggered | This changes the default looping speed of the looping command prompt in your area settings for all areas. You can choose to have it loop “constant” which would be every frame of the game, or “staggered” which would be 6 times per second (and is easier on the PC). Set this to “default” to make it take on whatever setting you have for looping in general (see the command “loop/loop speed”). The example causes every area looping command prompt to default with staggered looping speed. |
| layer (ID) visible | | true, false | layer 5 visible = false | This changes the visibility of a layer in the area with the chosen ID. The example causes the layer with an ID of 5 to go invisible (making everything on that layer invisible.) |
| layer (ID) active | | true, false | layer 4 active = true | This changes whether an area’s layer with the chosen ID is active. The example causes the layer with an ID of 4 to go active. |
| Command | Operator(s) | Value(s) | Example | Notes |
|---|---|---|---|---|
| area, change area | | (Area ID, then a comma, then the Spawn ID) | area = 3, Start1 | Changes the current area to the area with the specified ID, and creates the character at the specified Spawn ID. These two values must be separated by a comma. The area ID can be found by visiting the area settings of your desired area and hovering your mouse over the small button at the top which says “ID.” See below for more details. The example changes the area to the area with an ID of 3, and the the character will start at the Spawn ID “Start1”. |
| world, change world | | (Overworld ID, then a comma, then the Spawn ID) | world = 2, 1 | Goes to the overworld with the specified ID, starting at the character with the specified Spawn ID. If you wish to change the world after completing the course, see the commands below. The example causes the game to go to the world with the ID of 2, starting with the character of the Spawn ID of “1”. |
| complete course, finish course | (If not using overworlds. Optional if using overworlds.) | (new Area ID if not using overworlds. Optional comma then new World ID if using overworlds.) | complete course = 2, 1 | Completes the course. If you are not using overworlds, then you must also specify the new area and spawn ID. If you are using overworlds, then the operator and values are only needed if you plan to change the overworld. These two values must be separated by a comma. The area ID can be found by visiting the area settings of your desired area and hovering your mouse over the small button at the top which says “ID.” See below for more details. The example works differently depending if you are using overworlds. If you are using overworlds, it completes the course and changes to the overworld with an ID of 2, starting with the character of a spawn ID of “1”. If you are not using overworlds, the example completes the overworld and changes the area to the area with an ID of 2 and creates the character with the Spawn ID of “1”. |
| secret exit | (If not using overworlds) | (new Area ID if not using overworlds. Optional new World ID if using overworlds. Then a comma and the Spawn ID of new area if not using overworlds. Optional Spawn ID of new world if changing overworlds) | secret exit | Completes the course with the secret exit. The operator and values work the same for the previous command. The example completes the course with a secret exit for a games that uses overworlds. |
| instant complete course, instant finish course | (If not using overworlds) | (If you are using overworlds you can keep this blank and you will return to overworld. But you can also specify a new world ID followed by a command and then a new spawn ID if you want to change the overworld. If you are not using overworlds, you will need to specify a new area ID and a spawn ID.) | instant complete course | Works similar to the “complete course” command, but the transition is instant. There is no music or character victory animation. The example instantly completes the course. The example retuns you to the overworld. If you are not using overworlds, then you will need to say something such as “instant complete course = 4, spawn” so that Platform Builder knows the ID of the new area and the spawn ID to use in that new area. |
| instant secret exit | (If not using overworlds) | (new Area ID if not using overworlds. Optional new World ID if using overworlds. Then a comma and Spawn ID of new area if not using overworlds. Optional Spawn ID of new world if changing overworlds) | instant secret exit | Works similar to the “secret exit” command, but the transition is instant. The example completes the course and instantly returns to the overworld to activate the secret exit. |
| instant fail course | (N/A) | (N/A) | instant fail course | This causes all of the events for when the character dies, only the transition is instant. There is no music or character death animation. For example, if your game uses overworld, you will instantly return back to the overworld with one less life. |
| return to world, return to overworld | (N/A) | (N/A) | return to world | For games with overworlds, this will cause you to instantly return back to the overworld. The level will not be considered complete, but neither will a life be lost. |
| current world, current overworld | | (World ID) | current world = 5 | In games which used overworlds, this changes the world that the character will return to after completing the course. The example will cause the character to go to the overworld with the ID of 5 after completing the course. |
| complete game, finish game, win game, victory screen | (N/A) | (N/A) | complete game | This command causes the game to be completed, and goes to the victory screen. |
| game over, lose game, game over screen | (N/A) | (N/A) | lose game | This commands triggers a “game over” and goes to the game over screen. |
| title screen, main menu | (N/A) | (N/A) | title screen | This command takes you back to the title screen of your game. |
| splash screen | (N/A) | (N/A) | splash screen | This command takes you to the splash screen of your game. |
| Command | Operator(s) | Value(s) | Example | Notes |
|---|---|---|---|---|
| enemy (ID) | | left, right, up, down, stop | enemy 5 = stop | Causes the enemy with the specified ID to move in the specified way. The enemy will continually move in the specified direction until the direction is changed or the value “stop” is called. (You can adjust the speed with the enemy speed command.) Any value that includes “up” or “down” is only valid for flying enemies. You can also cause a flying enemy to move diagonally by using two directions in the value. (E.g., “Enemy 5 = up right”) The example causes the enemy with the ID of 5 to stop moving in any direction. See the bottom of this page for how to find the enemy ID. |
| enemy (ID) | | jump low, jump medium, jump high | enemy 2 jump low | Causes the enemy with the specified ID to jump with the specified height. This command will work even if the enemy is not touching the ground. The example will cause the enemy with the ID of 2 to make a small “low” jump. |
| enemy (ID) | | face left, face right, turn left, turn right | enemy 3 = face right | Causes the enemy with the specified ID to face in the chosen direction. The example causes the enemy with the ID of 3 to face right. |
| enemy (ID) | | projectile, fire, fire projectile | enemy 1 = fire | Causes the enemy with the specified ID to fire a projectile according to its projectile settings. This will work even if you have made the enemy to stop firing projectiles (see below). The different values all do the same thing. The example causes the enemy with an ID of 1 to fire a projectile. |
| enemy (ID) | | stop projectile, stop fire, cease fire | enemy 1 = stop projectile | Causes the enemy to stop firing projectiles according to its projectile settings. |
| enemy (ID) | | resume projectile, resume fire | enemy 1 = resume fire | Causes the enemy to resume firing projectiles according to its projectile settings. |
| enemy (ID) | | move | enemy 5 = move | Causes the enemy with the specified ID to resume its normal movements as if it were just created, according to the enemy’s settings. This is useful when you are done forcing the enemy to move in a particular direction for things like cutscenes. The example causes the enemy with the ID of 5 to resume normal movements. |
| enemy (ID) | | continue | enemy 5 = continue | Works similar to the “enemy move” command, but instead of resetting the enemy as if it were just created, this removes and forced movement controls and releases the enemy to continue on in whatever direction it was going. |
| enemy (ID) | | face | enemy 3 = face | Causes the enemy with the specified ID to resume its normal facing settings, according to the enemy’s settings. This is useful when you are done forcing the enemy to face a certain way for things like cutscenes. The example causes the enemy with the ID of 3 to resume normal facing settings. |
| Command | Operator(s) | Value(s) | Example | Notes |
|---|---|---|---|---|
| create enemy, spawn enemy | (N/A) | (Enemy ID, then a comma, then Spawn ID of the spawning point to create the enemy from) | spawn enemy 3, player 1 | Creates a custom enemy with the specified ID at every spawning point with the specified Spawn ID. (See also the alternative spawn locations in the notes of the command “create item” above.) These two values must be separated by a comma. The example creates an enemy with the ID of 3 over player 1. |
| change enemy | (N/A) | (Enemy ID to change, then a comma, then New Enemy ID) | change enemy 1, 58 | Changes custom enemies with the specified ID to a different enemy. This only works with enemies that are nearby. The example changes enemies with the ID of 1 to enemies with the ID of 58. |
| remove enemy, delete enemy, clear enemy | (N/A) | (Enemy ID) | clear enemy 1 | Removes custom enemies with the specified ID. This only works with enemies that are nearby. The example removes enemies with the ID of 1. |
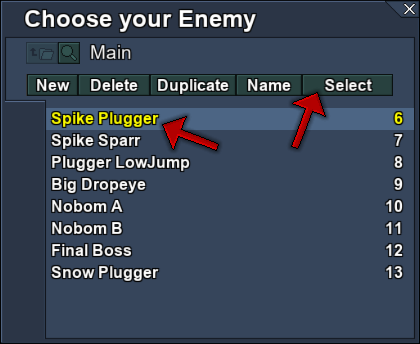
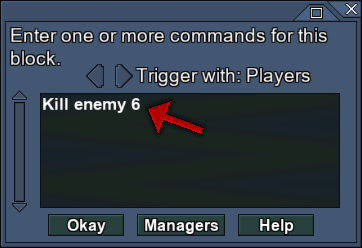
| kill enemy, destroy enemy | (N/A) | (Enemy ID) | kill enemy 13 | Causes custom enemies with the specified ID to be automatically killed. This means that any destroy animation and settings will happen for the enemy. This only works with enemies that are nearby. The example destroys enemies with the ID of 13. |
| harm enemy | (N/A) | (Enemy ID) | harm enemy 9 | Causes custom enemies with the specified ID to be automatically harmed, or killed if they have only 1 health point. This only works with enemies that are nearby. The example causes enemies with the ID of 9 to be harmed. |
| enemy | | item (ID), enemy (ID), block (ID), npc (ID), projectile (ID), sprite (ID) | enemy 5 = item 2 | Changes the enemy into an item, block, NPC, etc. with the specified ID. The Example causes enemies with an ID of 5 to transform into the item with an ID of 2. |
| enemy (ID) sprite, change enemy (ID) sprite | | (Sprite ID) | enemy 2 sprite = 2 | Changes the sprite for the specified enemy to the uploaded sprite with the specified sprite ID. The example changes the sprite for enemy 3 to sprite 2. |
| enemy (ID) visible | | true, false | enemy 5 visible = false | Makes a custom enemy with the specified ID to become visible or invisible. Note that the enemy is still active and can harm the character while invisible. The example causes the enemy with an ID of 5 to become invisible. |
| enemy (ID) alpha | (Any) | (Number) | enemy 23 alpha = 75 | Changes the transparency of an enemy with the chosen ID. The number should be between 0 (invisible) and 100 (fully visible). The example changes the enemy with an ID of 23 to an alpha value of 75, which is mostly visible. |
| enemy (ID) active | | true, false | enemy 4 active = false | Changes if an enemy with the chosen ID is active. This works the same as disabling the layer of the enemy. Note that this command only works if the layer is active. You cannot active enemies on inactive layers with this command. The example deactivates the enemy with an ID of 4. |
| enemy (ID) layer | | (Number) | enemy 3 layer = 12 | Changes the layer of the enemy with the chosen ID. This only works if the enemy is already active. The example causes enemies with an ID of 3 to go to the layer with an ID of 12. |
| enemy (ID) | | ignore environment, use environment | enemy 5 = ignore environment | Causes the custom enemy of the specified ID to ignore its environment or start using it again. When a custom enemy is ignoring its environment, then it will ignore all interactions with character, projectiles, other enemies, and explosions. But it will still interact with walls and floors. The example causes the enemy with an ID of 5 to ignore its environment. |
| enemy (ID) visible to projectiles | (N/A) | (N/A) | enemy 3 = visible to projectiles | Causes a custom enemy with the chosen ID to be “visible” to projectiles. In other words, homing projectiles will be able to see this enemy, as well as settings like “approximate enemy” for projectile directions. This is already enabled by default. |
| enemy (ID) invisible to projectiles | (N/A) | (N/A) | enemy 3 = invisible to projectiles | Causes a custom enemy with the chosen ID to be “invisible” to projectiles. In other words, homing projectiles will not be able to see this enemy, as well as settings like “approximate enemy” for projectile directions. |
| activate boss, activate bosses | (N/A) | (N/A) | activate bosses | You can use this command to activate any bosses in the view. You will need to call this command if your boss’s start distance is set to “none.” |
| enemy (ID) looping | | staggered, constant, default | enemy 7 looping = constant | This changes the looping speed of the looping command prompt for the enemy with the specified ID. You can choose to have it loop “constant” which would be every frame of the game, or “staggered” which would be 6 times per second (and is easier on the PC). Set this to “default” to make it take on whatever setting you have for looping in general (see the command “loop/loop speed”). The example causes the enemy with an ID of 7 to run its looping command prompt every frame of the game. |
| enemy (ID) face | | left, right, player, travel dir | enemy 5 face = player | Enemy face commands for left and right have already existed in previous versions of PB, but now you have all of the options available. |
| enemy (ID) animation, enemy (ID) animate | | (Number between 0 and 12) | enemy 2 animation = 6 | Changes the enemy animation speed. The example sets the animation speed for enemies with an ID of 2 to 6. |
| enemy (ID) death | | none, fall, fade, pop, fireball, explode, detonate, crumble | enemy 3 death = crumble | Changes the animation that the enemy of the specified ID will use when defeated. The examples causes the enemy with an ID of 3 to crumble when it is destroyed. |
| enemy (ID) health bar | | true, false | enemy 1 health bar = true | Toggles the display of the health bar above the enemy of the specified ID. The example causes the enemy with an ID of 1 to show its health bar. |
| enemy (ID) primary projectile | | (Projectile ID), none | enemy 5 primary projectile = 6 | Changes the primary projectile to be fired by the enemy with the specified ID. This can also be set to “none” to have the enemy not use a projectile. The examples causes the enemy with an ID of 5 to start using the projectile with an ID of 6 for firing. |
| enemy (ID) secondary projectile | | (Projectile ID), none | enemy 5 secondary projectile = 7 | Changes the secondary projectile to be fired by the enemy with the specified ID. This can also be set to “none” to have the enemy not use a secondary projectile. The examples causes the enemy with an ID of 5 to start using the projectile with an ID of 7 for firing. |
| enemy (ID) primary projectile frequency | | slow, medium, fast, very fast | enemy 2 primary projectile frequency = slow | Changes the firing speed for the primary projectile of the enemy with the specified ID. The example causes the enemy with an ID of 2 to fire its primary projectile at a slow speed. (Note: due to the complex nature of secondary projectile frequencies, there is no equivalent command for the secondary projectile at this time. But this can still be manually controlled using other commands.) |
| enemy (ID) primary projectile dir, enemy (ID) primary projectile direction | | facing, approximate character, exact character, select | enemy 3 primary projectile dir = select | Changes the direction to fire the primary projectile for the enemy of the specified ID. The example sets the direction to “select,” i.e., it causes the enemy to fire projectiles in the direction(s) selected from the enemy settings in game setup. |
| enemy (ID) secondary projectile dir, enemy (ID) primary projectile direction | | facing, approximate character, exact character, select | enemy 3 secondary projectile dir = exact character | Changes the direction to fire the secondary projectile for the enemy of the specified ID. The example sets the direction to “exact character,” i.e., it causes the enemy with an ID of 3 to fire in the precise direction of the nearest character. |
| enemy (ID) seismic pound | | none, light, medium, strong | enemy 4 seismic pound = light | Changes the seismic pound settings for the enemy of the specified ID. The example causes the enemy with an ID of 4 to have a light seismic pound whenever it lands on the ground. |
| enemy (ID) | | move across ground, follow player, avoid player, short movements, simple random movement, moderate random movement, crazy random movement | enemy 1 = avoid player | Changes the movement style for a land-type enemy of the specified ID. The example causes the enemy with an ID of 1 to avoid the player. This will only work if the enemy is a land type. |
| enemy (ID) | | follow character x, follow character y, follow character, avoid character x, avoid character y, avoid character | enemy 2 = follow character x | Changes the movement style for a air-type enemy of the specified ID. The example causes the enemy with an ID of 2 to follow the character’s x position. This will only work if the enemy is an air type. |
| enemy (ID) | | fall off ledges, reverse at ledges | enemy 7 = fall off ledges | Changes what a land-type enemy of the specified ID does when it approaches a ledge. The example causes the enemy with an ID of 7 to fall off ledges. This will only work if the enemy is a land type. |
| enemy (ID) | | reverse at walls, pass through walls | enemy 8 = pass through walls | Changes what an air-type enemy of the specified ID does when it approaches a wall. The example causes the enemy with an ID of 8 to pass through walls. This will only work if the enemy is an air type. |
| enemy (ID) special | | none, jump, bounce, hop | enemy 1 special = hop | Changes jump/bounce/hop movement for a land-type enemy of the specified ID. The example caused the enemy with an ID of 1 to begin hopping around like a frog. This will only work if the enemy is a land type. |
| enemy (ID) style | | low, medium, high, low medium, low high, medium high, random, ledges (for jump only) | enemy 1 style = medium high | Changes the jump/bounce/hop height of a land-type enemy of the specified ID. The example causes the enemy with an ID of 1 to go at a medium height and then a high height (provided that it is a land-type enemy with jump, bounce, or hop enabled). |
| enemy (ID) turning pause | | none, very short, short, medium, long, very long | enemy 5 turning pause = short | Changes the pause time between directional arrows for air-type enemies of the specified ID. The example causes enemies with the ID of 5 to have a short pause between turns. This will only work if the enemy is an air type. |
| enemy (ID) defense | (Any) | (Number), [or] invincible | enemy 2 defense * 2 | changes the defense of the enemy with the specified ID. You can set this to a number or “invincible.” The example causes enemies with an ID of 2 to double their defensive power. |
| enemy (ID) attack type | | none, fire, earth, water, ice, wind, electric, poison, darkness, light, other | enemy 7 attack type = none | changes the attack type of the enemy with the specified ID. The example changes the attack type to “none,” which is default. |
| enemy (ID) attack power vs characters | (Any) | (Number) | enemy 2 attack power vs characters = 4 | changes the attack power of the enemy with the specified ID against characters. The example makes the enemy with an ID of 2 to have an attack power vs characters to become 4. |
| enemy (ID) attack power vs enemies | (Any) | (Number) | enemy 9 attack power vs enemies +1 | changes the attack power of the enemy with the specified ID against other enemies. The example makes the enemy with an ID of 9 to increase its attack power verses enemies by 1. |
| enemy (ID) attack power vs blocks | (Any) | (Number) | enemy 1 attack power vs blocks = 2 | changes the attack power of the enemy with the specified ID against blocks (for activating or destroying blocks from the side). The example makes the enemy with an ID of 1 to have an attack power vs blocks to become 2. |
| enemy (ID) type | | land, air | enemy 3 type = air | Changes the type of an enemy of the specified ID between land or air. The example changes the enemy with an ID of 3 to become an air type. |
| enemy (ID) max hp | (Any) | (Number) | enemy 3 max hp + 1 | Changes the maximum HP of an enemy with the specified ID. The example increases the max HP of the enemy with an ID of 3 by 1. |
| enemy (ID) hp | (Any) | (Number) | enemy 2 hp + 3 | Changes the HP of an enemy with the specified ID. The example increases the HP of the enemy with an ID of 2 by 3 (provided that it does not exceed the enemy’s maximum HP). |
| enemy (ID) frame, enemy (ID) image | (Any) | (Number) | enemy 6 frame = 2 | Changes the animation frame of the enemy with the specified ID. This can be useful when the animation speed is 0 and you wish to adjust the frames yourself. The example causes the enemy with an ID of 6 to change to its second frame. |
| enemy (ID) | | vulnerable to jumps, jump proof | enemy 1 = jump proof | Changes the defense of the enemy with the specified ID when the character jumps on it. The example causes the enemy with an ID of 1 to harm the character when the character tries to jump on it. |
| enemy (ID) weakness | | none, fire, earth, water, ice, wind, electric, poison, darkness, light, other | enemy 3 weakness = wind | Changes the weakness setting of the enemy with the specified ID. The example causes the enemy with an ID of 3 to have a weakness for wind attacks |
| enemy (ID) attack blocks | | true, false | enemy 1 attack blocks = true | Change the “attack blocks” setting of the enemy with the specified ID. The example causes the enemy with an ID of 1 to attack/activate blocks that are vulnerable to enemies. |
| enemy (ID) attack other enemies | | true, false | enemy 2 attack other enemies = false | Changes what happens when the enemy of the specified ID touches another enemy. The example causes the enemy with an ID of 2 to harm enemies that it touches. |
| enemy (ID) harm character | | true, false | enemy 3 harm character = true | Changes what happens to the character when the enemy of the specified ID touches the character. The example causes the enemy with an ID of 3 to not harm characters that it touches. |
| enemy (ID) harmed by character | | true, false | enemy 4 harmed by character = false | Changes what happens to the enemy of the specified ID when it touches the character. The example causes the enemy with an ID of 4 to not be harmed by characters that it touches. |
| enemy (ID) harmed by enemies | | true, false | enemy 5 harmed by enemies = true | Changes what happens to the enemy of the specified ID when it touches other enemies. The example causes the enemy with an ID of 5 to be harmed by other enemies. |
| enemy (ID) speed | (Any) | (Number) | enemy 1 speed = 10 | Changes the speed of the enemy of the specified ID from it’s custom physics setting (between 0 and 100). The example causes the enemy with an ID of 1 to have a speed of 10. |
| enemy (ID) acceleration | (Any) | (Number) | enemy 6 acceleration + 5 | Changes the acceleration of the enemy of the specified ID from it’s custom physics setting (between 0 and 100). The example adds 5 to the acceleration of the enemy with an ID 6. |
| enemy (ID) low jump | (Any) | (Number) | enemy 4 low jump = 30 | Changes the low jump power of the enemy of the specified ID from it’s custom physics setting (between 0 and 100). The example causes the low jump to be 30 for the enemy with an ID of 4. |
| enemy (ID) low jump delay | (Any) | (Number) | enemy 1 low jump delay = 5 | Changes the low jump delay of the enemy of the specified ID from it’s custom physics setting (between 0 and 100). The example causes the low jump delay to be 5 for the enemy with an ID of 1. |
| enemy (ID) medium jump | (Any) | (Number) | enemy 2 medium jump = 60 | Changes the medium jump power of the enemy of the specified ID from it’s custom physics setting (between 0 and 100). The example causes the low jump to be 60 for the enemy with an ID of 2. |
| enemy (ID) medium jump delay | (Any) | (Number) | enemy 8 medium jump delay *= 3 | Changes the medium jump delay of the enemy of the specified ID from it’s custom physics setting (between 0 and 100). The example causes the medium jump delay for the enemy with an ID of 8 to be tripled. |
| enemy (ID) high jump | (Any) | (Number) | enemy 7 high jump – 20 | Changes the high jump power of the enemy of the specified ID from it’s custom physics setting (between 0 and 100). The example removes 20 from the high jump power of the enemy with the ID of 7. |
| enemy (ID) high jump delay | (Any) | (Number) | enemy 4 high jump delay = 15 | Changes the high jump delay of the enemy of the specified ID from it’s custom physics setting (between 0 and 100). The example causes the low jump delay to be 15 for the enemy with an ID of 4. |
| enemy (ID) gravity | (Any) | (Number) | enemy 3 gravity = 12 | Changes the gravity of the enemy of the specified ID from it’s custom physics setting (between 0 and 100). The example causes the gravity to be 12 for the enemy with an ID of 3. |
| enemy (ID) max fall speed | (Any) | (Number) | enemy 6 max fall speed = 75 | Changes the maximum fall speed of the enemy of the specified ID from it’s custom physics setting (between 0 and 100). The example causes the maximum fall speed to be 75 for the enemy with an ID of 6. |
| enemy (ID) vertical knockback | (Any) | (Number) | enemy 3 vertical knockback = 10 | Changes the vertical knockback of the enemy of the specified ID from it’s custom physics setting (between 0 and 100). The example causes the vertical knockback to be 10 for the enemy with an ID of 3. |
| enemy (ID) horizontal knockback | (Any) | (Number) | enemy 9 horizontal knockback /= 2 | Changes the horizontal knockback of the enemy of the specified ID from it’s custom physics setting (between 0 and 100). The example divides in half the horizontal knockback of the enemy with an ID of 9. |
| enemy (ID) knockback recovery | (Any) | (Number) | enemy 2 knockback recovery = 18 | Changes the knockback recovery of the enemy of the specified ID from it’s custom physics setting (between 0 and 100). The example causes the knockback recovery to be 18 for the enemy with an ID of 3. |
| enemy (ID) damage recovery | (Any) | (Number) | enemy 6 damage recovery = 40 | Changes the damage recovery of the enemy of the specified ID from it’s custom physics setting (between 0 and 100). The example causes the damage recovery to be 40 for the enemy with an ID of 6. |
| enemy (ID) invincible hit | | killed, harmed, no difference, do nothing | enemy 1 invincible hit = no difference | Changes what happens when a character with invincibility touches the enemy. The example set the enemy to respond with “no difference” when it is touched by an invincible character. In other words, it will respond as if the character did not have invincibility at all. |
| enemy (ID) | | reverse at walls, pass through walls | enemy 4 = reverse at walls | For flying enemies, this changes the setting whether the enemy of the chosen ID will reverse at walls or pass through them. The example causes enemy 4 to reverse at walls. |
| Command | Operator(s) | Value(s) | Example | Notes |
|---|---|---|---|---|
| item (ID) x | (Any) | (Number) | item 6 x -= 5 | Changes the x-position of the item with the specified ID. The example causes item 6 to move left five pixels. |
| item (ID) y | (Any) | (Number) | item 6 y + 5 | Changes the y position of the item with the specified ID. The example causes item 6 to move 5 pixels to down. |
| item (ID) x | | random view, smart random view | item 4 x = random view | This will set the x-position of an item to a randomly-selected new position within the view. Choose “random view” for a completely random position. Choose “smart random view” to find a random position while avoiding solid objects. The example finds a new random x-position for the custom item with an ID of 4. (It’s y-position will stay the same.) |
| item (ID) y | | random view, smart random view | item 4 y = random view | This will set the y-position of an item to a randomly-selected new position within the view. Choose “random view” for a completely random position. Choose “smart random view” to find a random position while avoiding solid objects. The example finds a new random y-position for the custom item with an ID of 4. (It’s x-position will stay the same.) |
| item (ID) position | | random view, smart random view | item 3 position = random view | This will set both the x- and y-position of an item to a randomly-selected new position within the view. Choose “random view” for a completely random position. Choose “smart random view” to find a random position while avoiding solid objects. The example finds a new random position for the custom item with an ID of 3. |
| item (ID) x snap | | (Number) | item 1 x snap = 16 | This will set the x-position of an item to the nearest position on a specified grid size (similar to how your work box by default snaps to a grid when you place things down, except that this works only with the x-value rather than both). The example moves an item with an ID of 1 to the nearest x position divisible by 16. |
| item (ID) y snap | | (Number) | item 1 y snap = 32 | This will set the y-position of an item to the nearest position on a specified grid size (similar to how your work box by default snaps to a grid when you place things down, except that this works only with the y-value rather than both). The example moves an item with an ID of 1 to the nearest y position divisible by 32. |
| item (ID) position snap | | (Number) | item 2 position snap = 48 | This sets both the x- and y-position of an item to the nearest position on a specified grid (similar to how your work box by default snaps to a grid when you place things down). The example moves the item with an ID of 2 to the nearest position on a 48 x 48 grid. |
| create item, spawn item | (N/A) | (Item ID, then a comma, then Spawn ID of the spawning point to create the item from) | create item 4, Spawn 1 | Creates a custom item with the specified ID at every spawning point with the specified Spawn ID. (“player 1” and “player 2” can also be used as spawn points to create over the chosen player, or you can spawn in the middle of the view with “view” or “camera”, or spawn over whatever is running the command with “self”, or spawn over the cursor with “mouse” or “cursor”. To create from the closest spawn block, use “closest spawn” or “nearest spawn”. To create from the farthest spawn block, use “farthest spawn”. To create at a randomly chosen spawn block, use “random spawn”.) These two values must be separated by a comma. The example creates an item with the ID of 4 over the invisible spawning point(s) with the Spawn ID of “Spawn 1”. See the bottom of this page for how to find the item ID. |
| change item | (N/A) | (Item ID to change, then a comma, then New Item ID) | change item 2, 3 | Changes custom items with the specified ID to a different item. This only works with items that are nearby. The example changes items with the ID of 2 to items with the ID of 3. |
| item | | item (ID), enemy (ID), block (ID), npc (ID), projectile (ID), sprite (ID) | item 5 = enemy 2 | Changes the item into an item, block, NPC, etc. with the specified ID. The Example causes items with an ID of 5 to transform into the enemy with an ID of 2. |
| remove item, kill item, destroy item, delete item, clear item | (N/A) | (Item ID) | remove item 6 | Removes custom items with the specified ID. This only works with items that are nearby. The example removes items with the ID of 6. |
| item (ID) sprite, change item (ID) sprite | | (Sprite ID) | item 5 sprite = 1 | Changes the sprite for the specified item to the uploaded sprite with the specified sprite ID. The example changes the sprite for item 5 to sprite 1. |
| item (ID) visible | | true, false | item 7 visible = false | Makes a custom item with the specified ID to become visible or invisible. Note that the item is still active and can still be collected while invisible. The example makes items with an ID of 7 become invisible. |
| item (ID) alpha | (Any) | (Number) | item 5 alpha = 50 | Changes the transparency of an item with the chosen ID. The number should be between 0 (invisible) and 100 (fully visible). The example changes the item with an ID of 5 to an alpha value of 50, which is 50% opaque, or half visible. |
| item (ID) active | | true, false | item 54 active = false | Changes if an item with the chosen ID is active. This works the same as disabling the layer of the item. Note that this command only works if the layer is active. You cannot activate items on inactive layers with this command. The example deactivates the item with an ID of 54. |
| item (ID) layer | | (Number) | item 3 layer = 17 | Changes the layer of the item with the chosen ID. This only works if the item is already active. The example causes items with an ID of 3 to go to the layer with an ID of 17. |
| item (ID) looping | | staggered, constant, default | item 7 looping = constant | This changes the looping speed of the looping command prompt for the item with the specified ID. You can choose to have it loop “constant” which would be every frame of the game, or “staggered” which would be 6 times per second (and is easier on the PC). Set this to “default” to make it take on whatever setting you have for looping in general (see the command “loop/loop speed”). The example causes the item with an ID of 7 to run its looping command prompt every frame of the game. |
| item (ID) gravity | | off, on, levitate | item 6 gravity = on | Changes the gravity for the item with the specified ID. The example turns on gravity for the item with the ID of 6. |
| item (ID) speed | | none, slow, medium, fast | item 4 speed = medium | Changing the moving speed of the item with the specified ID. The example causes the item with an ID of 4 to have a medium speed. |
| item (ID) attract | | none, toward character, away from character | item 2 attract = none | Changes if the item with the specified ID is drawn to or away from the character. The example causes item 2 to not attract or repel from the character. |
| item (ID) points | (Any) | (Number) | item 4 points += 10 | Changes the points awarded when the item is attained. The example increases the current point amount by 5 for item 4. |
| item (ID) animation, item (ID) animate | (Any) | (Number between 0 and 12) | item 1 animation + 3 | Changes the animation speed of the item’s sprite with 0 for no animation, 1 as the slowest animation, and 12 the fastest animation (Similar to animation settings in Game Setup for custom items). The example causes item 1 animation to increase by 3 (or become 12 if the result is greater than 12). |
| item (ID) frame, item (ID) image | (Any) | (Number) | item 2 frame = 3 | Changes the animation frame of the item with the specified ID. This can be useful when the animation speed is 0 and you wish to adjust the frames yourself. The example causes the item with an ID of 2 to change to its third frame. |
| item (ID) jump | | none, low, medium, high, low medium, low high, medium high, random | item 2 jump = random | Changes the jump settings for the custom item of the chosen ID. Note that this also turns on gravity for the item if it is not already enabled. The example causes item 2 to jump at random heights. |
| item (ID) bounce | | none, low, medium, high, low medium, low high, medium high, random | item 6 jump = low high | Changes the bounce settings for the custom item of the chosen ID. Note that this also turns on gravity for the item if it is not already enabled. The example causes item 2 to bounce between low and high heights. |
| item (ID) price | (Any) | (Number), free | item 1 price = 30 | When the item is used in a store, you can change the item’s price with this command. If you want to make the item free, then instead of inputing a number, you can use the “=” operator and then put “free.” The example causes item 1 to cost $30. |
| item (ID) apply | | collecting player, both players, player 1, player 2 | item 8 apply = both players | Changes which player the effects of the item apply to after it is received. The example causes item 8 effects to apply to both players after it is received. |
| item (ID) life | (Any) | (Number) seconds | item 5 life – 2 seconds | Changes how long an uncollected item with the chosen ID will remain visible in the area before it disappears. The example causes item 5 to last 2 seconds less than what is currently remaining. If the item already has less than 2 seconds, then it will disappear. |
| item (ID) life | | no limit | item 3 life = no limit | Causes the uncollected item of the chosen ID to not disappear after a period of time in the area. The example causes item 3 to remain in the area indefinitely or until a player collects it. |
| Command | Operator(s) | Value(s) | Example | Notes |
|---|---|---|---|---|
| block (ID) x | (Any) | (Number) | block 6 x -= 5 | Changes the x-position of the block with the specified ID. The example causes block 6 to move left five pixels. |
| block (ID) y | (Any) | (Number) | block 6 y + 5 | Changes the y position of the block with the specified ID. The example causes block 6 to move 5 pixels to down. |
| block (ID) x | | random view, smart random view | block 4 x = random view | This will set the x-position of a block to a randomly-selected new position within the view. Choose “random view” for a completely random position. Choose “smart random view” to find a random position while avoiding solid objects. The example finds a new random x-position for the custom block with an ID of 4. (It’s y-position will stay the same.) |
| block (ID) y | | random view, smart random view | block 4 y = random view | This will set the y-position of a block to a randomly-selected new position within the view. Choose “random view” for a completely random position. Choose “smart random view” to find a random position while avoiding solid objects. The example finds a new random y-position for the custom block with an ID of 4. (It’s x-position will stay the same.) |
| block (ID) position | | random view, smart random view | block 3 position = random view | This will set both the x- and y-position of a block to a randomly-selected new position within the view. Choose “random view” for a completely random position. Choose “smart random view” to find a random position while avoiding solid objects. The example finds a new random position for the custom block with an ID of 3. |
| block (ID) x snap | | (Number) | block 1 x snap = 16 | This will set the x-position of a block to the nearest position on a specified grid size (similar to how your work box by default snaps to a grid when you place things down, except that this works only with the x-value rather than both). The example moves the block with an ID of 1 to the nearest x position divisible by 16. |
| block (ID) y snap | | (Number) | block 1 y snap = 32 | This will set the y-position of a block to the nearest position on a specified grid size (similar to how your work box by default snaps to a grid when you place things down, except that this works only with the y-value rather than both). The example moves the block with an ID of 1 to the nearest y position divisible by 32. |
| block (ID) position snap | | (Number) | block 2 position snap = 48 | This sets both the x- and y-position of a block to the nearest position on a specified grid (similar to how your work box by default snaps to a grid when you place things down). The example moves the block with an ID of 2 to the nearest position on a 48 x 48 grid. |
| create block, spawn block | (N/A) | (Block ID, then a comma, then Spawn ID of the spawning point to create the block from) | create block 2, Derp! | Creates a custom block with the specified ID at every spawning point with the specified Spawn ID. (See also the alternative spawn locations in the notes of the command “create item” above.) These two values must be separated by a comma. The example creates an enemy with the ID of 2 over the invisible spawning point(s) with the Spawn ID of “Derp!”. |
| change block | (N/A) | (Block ID to change, then a comma, then New Block ID) | change block 10, 4 | Changes custom block with the specified ID to a different block. This only works with block that are nearby. The example changes block with the ID of 10 to blocks with the ID of 4. |
| block (ID) | “=” | item (ID), enemy (ID), block (ID), npc (ID), projectile (ID), sprite (ID) | block 5 = item 2 | Changes the block into an item, block, NPC, etc. with the specified ID. The Example causes block with an ID of 5 to transform into the item with an ID of 2. |
| remove block, delete block, clear block | (N/A) | (Block ID) | delete block 3 | Removes custom blocks with the specified ID. This only works with blocks that are nearby. The example removes blocks with the ID of 3. |
| kill block, destroy block | (N/A) | (Block ID) | destroy block 4 | Causes custom blocks with the specified ID to be automatically destroyed. This means that any destroy animation and settings will be activated for the block. This only works with blocks that are nearby. The example destroys blocks with the ID of 4. |
| activate block, trigger block | (N/A) | (Block ID) | trigger block 2 | Causes a custom block with the specified ID to be triggered, as if the character bumped it from below. The example triggers a custom block with the ID of 2. |
| block (ID) sprite, change block (ID) sprite | | (Sprite ID) | block 1 sprite = 6 | Changes the sprite for the specified block to the uploaded sprite with the specified sprite ID. The example changes the sprite for block 1 to sprite 6. |
| block (ID) visible | | true, false | block 1 visible = true | Makes a custom block with the specified ID to become visible or invisible. Note that the block is still active and responsive while invisible. The example causes the block with an ID of 1 to become visible. |
| block (ID) alpha | (Any) | (Number) | block 2 alpha = 0 | Changes the transparency of a block with the chosen ID. The number should be between 0 (invisible) and 100 (fully visible). The example changes the block with an ID of 2 to an alpha value of 0, which is completely see-through or invisible. |
| block (ID) active | | true, false | block 4 active = false | Changes if a block with the chosen ID is active. This works the same as disabling the layer of the block. Note that this command only works if the layer is active. You cannot activate blocks on inactive layers with this command. The example deactivates the block with an ID of 4. |
| block (ID) layer | | (Number) | block 3 layer = 12 | Changes the layer of the block with the chosen ID. This only works if the block is already active. The example causes blocks with an ID of 3 to go to the layer with an ID of 12. |
| block (ID) looping | | staggered, constant, default | block 7 looping = constant | This changes the looping speed of the looping command prompt for the block with the specified ID. You can choose to have it loop “constant” which would be every frame of the game, or “staggered” which would be 6 times per second (and is easier on the PC). Set this to “default” to make it take on whatever setting you have for looping in general (see the command “loop/loop speed”). The example causes the block with an ID of 7 to run its looping command prompt every frame of the game. |
| block (ID) animation, block (ID) animate | (Any) | (Number between 0 and 12) | block 1 animation + 3 | Changes the animation speed of the block’s sprite with 0 for no animation, 1 as the slowest animation, and 12 the fastest animation (Similar to animation settings in Game Setup for custom blocks). The example causes block 1 animation to increase by 3 (or become 12 if the result is greater than 12). |
| block (ID) frame, block (ID) image | (Any) | (Number) | block 2 frame = 3 | Changes the animation frame of the block with the specified ID. This can be useful when the animation speed is 0 and you wish to adjust the frames yourself. The example causes the block with an ID of 2 to change to its third frame. |
| block (ID) destroy | | none, crumble, fall, fade, pop, fireball, explode, detonate | block 2 hit = fade | Changes what happens to the block of the chosen ID when it is destroyed. The example causes block 2 to fade out after it is destroyed. |
| block (ID) destroy top | | no weakness, ground pound, walk over, run over, step on | block 6 destroy top = walk over | Changes the weakness setting for the top of the block with the chosen ID. The example causes block 6 to be destroyed shortly after it is walked over. |
| block (ID) destroy bottom | | no weakness, bump | block 8 destroy bottom = bump | Changes the weakness setting for the bottom of the block with the chosen ID. The example causes block 8 to be destroyed when it is bumped from the bottom. |
| block (ID) destroy defense | (Any) | (Number), [or] invincible | block 8 destroy defense = 2 | Changes the destroy defense of the block with the specified ID. The example sets the destroy defense to 2 for the block with an ID of 8. |
| block (ID) destroy weakness | | none, fire, earth, water, ice, wind, electric, poison, darkness, light, other, enemy, explosion, invincibility | block 1 destroy weakness = explosion | Changes the weakness setting of a block with the chosen ID when attacked from the side. The example causes block 1 to have a weakness to explosions. |
| block (ID) destroy with | | characters, enemies, anyone | block 3 destroy with = anyone | Changes whether characters, enemies, or both can be the cause of destroying the block with the chosen ID according to its various destroy settings on the top, bottom, or sides. The example causes block 3 to be destroyed by either characters or enemies. |
| block (ID) trigger top | | no weakness, ground pound, walk over, run over, step on | block 6 destroy top = walk over | Changes the weakness setting for the top of the block with the chosen ID. The example causes block 6 to be destroyed shortly after it is walked over. |
| block (ID) trigger bottom | | no weakness, bump | block 8 trigger bottom = bump | Changes the trigger setting for the bottom of the block with the chosen ID. The example causes block 8 to be triggered when it is bumped from the bottom. |
| block (ID) destroy defense | (Any) | (Number), [or] invincible | block 8 destroy defense = 2 | Changes the destroy defense of the block with the specified ID. The example sets the destroy defense to 2 for the block with an ID of 8. |
| block (ID) trigger weakness | | none, fire, earth, water, ice, wind, electric, poison, darkness, light, other, enemy, explosion, invincibility | block 1 trigger weakness = explosion | Changes the trigger setting of a block with the chosen ID when attacked from the side. The example causes block 1 to have a trigger weakness to explosions. |
| block (ID) trigger with | | characters, enemies, anyone | block 3 trigger with = anyone | Changes whether characters, enemies, or both can be the cause of triggering the block with the chosen ID according to its various trigger settings on the top, bottom, or sides. The example causes block 3 to be triggered by either characters or enemies. |
| block (ID) type | | visible, invisible, secret | block 5 type = secret | Changes the type of the block with the chosen ID. The example causes block 5 to be a secret block. |
| block (ID) destroy setting | | none, leave item, trigger, change (new block ID) | block 3 destroy setting = change 5 | Changes what happens to a block with the chosen ID when it is destroyed. If you tell it to “leave item,” then it will drop whatever item was set in the block settings of Game Setup. The example causes block 3 to become block 5 when it is destroyed. |
| block (ID) spawn | | standard, auto, none | block 1 spawn = auto | Changes the spawn settings of the block with the chosen ID. The example causes block 1 to automatically give a spawned item when it is triggered. |
| block (ID) give item | | none, (item ID) | block 3 give item = 7 | Causes a block with the chosen ID to give a custom item when it is triggered. The example causes block 3 to give item 7 when it is triggered. |
| block (ID) limit | (Any) | (Number), unlimited | block 4 limit * 3 | Changes the number of items that can be spawned from the block with the chosen ID. You can also make the number of items unlimited by using the “=” operator and then “unlimited.” The example causes block 4 to triple the number of items that it can give. |
| block (ID) timer | (Any) | (Number in seconds. Decimals are okay), none | block 4 timer = 5 | Changes the number of seconds that a block with the chosen ID has for it to be continuously triggered once it is triggered the first time. To not use a timer, you can use the “=” operator and then “none.” Note that the number works differently if the timer is currently running. If it’s running, the number affects the running timer. If not, the number affects what the timer will start at once it’s triggered. The example causes block 4 to have 5 seconds on its timer. |
| block (ID) timer | | start, stop | block 3 timer = start | Starts or stops the countdown on the timer of a block with the chosen ID. Normally the timer begins when the block is first trigger, but it can begin using this command as well. Likewise, you can use this command to stop the timer on a block. If it is triggered again, the timer will resume where it left off. The example causes block 3 to begin its timer. |
| block (ID) finish | | nothing, destroy | block 4 finish = destroy | Changes what happens when a block has expired all of its items (either by running out of items, or the timer has run out). The example causes block 4 to be destroyed after it is finished spawning items. |
| Operator(s) | Value(s) | Example | Notes | |
|---|---|---|---|---|
| projectile (ID) x | (Any) | (Number) | projectile 6 x -= 5 | Changes the x-position of the projectile with the specified ID. The example causes projectile 6 to move left five pixels. |
| projectile (ID) y | (Any) | (Number) | projectile 6 y + 5 | Changes the y position of the projectile with the specified ID. The example causes projectile 6 to move 5 pixels to down. |
| projectile (ID) x | | random view, smart random view | projectile 4 x = random view | This will set the x-position of a projectile to a randomly-selected new position within the view. Choose “random view” for a completely random position. Choose “smart random view” to find a random position while avoiding solid objects. The example finds a new random x-position for the projectile with an ID of 4. (It’s y-position will stay the same.) |
| projectile (ID) y | | random view, smart random view | projectile 4 y = random view | This will set the y-position of a projectile to a randomly-selected new position within the view. Choose “random view” for a completely random position. Choose “smart random view” to find a random position while avoiding solid objects. The example finds a new random y-position for the projectile with an ID of 4. (It’s x-position will stay the same.) |
| projectile (ID) position | | random view, smart random view | projectile 3 position = random view | This will set both the x- and y-position of a projectile to a randomly-selected new position within the view. Choose “random view” for a completely random position. Choose “smart random view” to find a random position while avoiding solid objects. The example finds a new random position for the projectile with an ID of 3. |
| projectile (ID) x snap | | (Number) | projectile 1 x snap = 16 | This will set the x-position of a projectile to the nearest position on a specified grid size (similar to how your work box by default snaps to a grid when you place things down, except that this works only with the x-value rather than both). The example moves the projectile with an ID of 1 to the nearest x position divisible by 16. |
| projectile (ID) y snap | | (Number) | projectile 1 y snap = 32 | This will set the y-position of an projectile to the nearest position on a specified grid size (similar to how your work box by default snaps to a grid when you place things down, except that this works only with the y-value rather than both). The example moves the projectile with an ID of 1 to the nearest y position divisible by 32. |
| projectile (ID) position snap | | (Number) | projectile 2 position snap = 48 | This sets both the x- and y-position of a projectile to the nearest position on a specified grid (similar to how your work box by default snaps to a grid when you place things down). The example moves the projectile with an ID of 2 to the nearest position on a 48 x 48 grid. |
| create char projectile, create character projectile, spawn char projectile, spawn character projectile | (N/A) | (Projectile ID, then a comma, then Spawn ID of the spawning point to create the projectile from) | spawn char projectile 1, A | Creates a custom projectile with the specified ID at every spawning point with the specified Spawn ID. (See also the alternative spawn locations in the notes of the command “create item” above.) The projectile will work as it if was fired from the character. These two values must be separated by a comma. The example creates a character projectile with the ID of 1 over the invisible spawning point(s) with the Spawn ID of “A”. |
| create projectile, create enemy projectile, spawn projectile, spawn enemy projectile | (N/A) | (Projectile ID, then a comma, then Spawn ID of the spawning point to create the projectile from) | create projectile 2, atk | Creates a custom projectile with the specified ID at every spawning point with the specified Spawn ID. (See also the alternative spawn locations in the notes of the command “create item” above.) The projectile will work as it if was fired from an enemy. These two values must be separated by a comma. The example creates an enemy projectile with the ID of 2 over the invisible spawning point(s) with the Spawn ID of “atk”. |
| projectile (ID) | | item (ID), enemy (ID), block (ID), npc (ID), projectile (ID), sprite (ID) | projectile 5 = item 2 | Changes the projectile into an item, block, NPC, etc. with the specified ID. The Example causes projectiles with an ID of 5 to transform into the item with an ID of 2. |
| projectile direction | | up, down, left, right, up right, up left, down right, down left, approximate, exact, (or a number representing a direction on a keyboard numpad) | projectile direction = 7 | By default, spawned projectiles will start traveling in the exact direction of its target (a character projectile to the nearest enemy, or an enemy projectile to the nearest character). But you can change that with this command. Many different values can be given like “left” or “up” or “approximate” or “user” (as described in projectile settings of custom enemies and characters) or a number that relates to a directional value on a keyboard numpad. The example sets the spawning projectile direction to 7, which is up-left on a numpad. |
| projectile direction | (Any) | (Number in degrees) | projectile direction + 90 degrees | This sets a specific direction for spawned projectiles to go, with 0 degrees being to the right, increasing counterclockwise (90 degrees is up, 180 is to the left, 270 is down, and so forth. The example add 90 degrees to whatever the starting angle is for projectiles, so if the direction is set for straight up, it will change to the left. |
| remove projectile, kill projectile, destroy projectile, delete projectile, clear projectile | (N/A) | (Projectile ID) | clear projectile 5 | Removes projectiles with the specified ID. This only works with projectiles that are nearby. The example removes projectiles with the ID of 5. |
| projectile (ID) sprite, change projectile (ID) sprite | | (Sprite ID) | projectile 3 = sprite = 1 | Changes the sprite for the specified projectile to the uploaded sprite with the specified sprite ID. The example changes the sprite for projectile 3 to sprite 1. |
| projectile (ID) visible | | true, false | projectile 10 visible = false | Makes a projectile with the specified ID to become visible or invisible. Note that projectiles are still active when they are invisible. The example causes the projectile with an ID of 10 to become invisible. |
| projectile (ID) alpha | (Any) | (Number) | projectile 14 alpha = 50 | Changes the transparency of a projectile with the chosen ID. The number should be between 0 (invisible) and 100 (fully visible). The example changes the projectile with an ID of 14 to an alpha value of 50, which is half-transparent. |
| projectile (ID) active | | true, false | projectile 14 active = true | Changes if a projectile with the chosen ID is active. This works the same as disabling the layer of the projectile. Note that this command only works if the layer is active. You cannot activate projectiles on inactive layers with this command. The example activates the projectile with an ID of 14. |
| projectile (ID) layer | | (Number) | projectile 4 layer = 6 | Changes the layer of the projectile with the chosen ID. This only works if the projectile is already active. The example causes projectiles with an ID of 4 to go to the layer with an ID of 6. |
| projectile (ID) looping | | staggered, constant, default | projectile 7 looping = constant | This changes the looping speed of the looping command prompt for the projectile with the specified ID. You can choose to have it loop “constant” which would be every frame of the game, or “staggered” which would be 6 times per second (and is easier on the PC). Set this to “default” to make it take on whatever setting you have for looping in general (see the command “loop/loop speed”). The example causes the projectile with an ID of 7 to run its looping command prompt every frame of the game. |
| projectile (ID) face | | no change, travel, horizontal travel, vertical travel, cursor | projectile 4 face = cursor | Changes the settings that the projectile sprite should face of the chosen ID. The options are the same as in Game Setup of a projectile. The example causes the projectile to face the mouse cursor. |
| projectile (ID) animate, projectile (ID) animation | (Any) | (Number between 0 and 12) | projectile 1 animation + 3 | Changes the animation speed of the projectile’s sprite with 0 for no animation, 1 as the slowest animation, and 12 the fastest animation (Similar to animation settings in Game Setup for custom projectiles). The example causes projectile 1 animation to increase by 3 (or become 12 if the result is greater than 12). |
| projectile (ID) frame, projectile (ID) image | (Any) | (Number) | projectile 2 frame = 3 | Changes the animation frame of the projectile with the specified ID. This can be useful when the animation speed is 0 and you wish to adjust the frames yourself. The example causes the projectile with an ID of 2 to change to its third frame. |
| projectile (ID) hit | | none, fade, pop, fireball, explode, detonate | projectile 2 hit = fade | Changes what happens to the projectile of the chosen ID when it is removed after it hits a target. The example causes projectile 2 to fade out after it hits a target. |
| projectile (ID) life out | | none, fade, pop, fireball, explode, detonate | projectile 2 life out = pop | Changes what happens to the projectile of the chosen ID when it is removed after it times out in the area. The example causes projectile 2 to pop after it times out. |
| projectile (ID) speed | (Any) | (Number) | projectile 6 speed + 30 | Changes the speed of a moving projectile of the chosen ID. The numbers are the same for the moving speed slider in custom projectile settings. Note that if you go higher then 100, there may be issues with the projectile passing through objects for games with slower frame rates. The example causes the projectile with an ID of 6 to go 30 units faster. |
| projectile (ID) thrust | | normal, accelerate, decelerate | projectile 2 thrust = accelerate | Changes the thrust type of the projectile with the chosen ID. The command sets projectile 2 to have an acceleration. |
| projectile (ID) accelerate, projectile (ID) decelerate | (Any) | (Number) | projectile 6 decelerate = 80 | Changes the power of the acceleration or deceleration of the projectile with the chosen ID. The number corresponds to the slider in the custom projectile settings. The example sets the accelerate/decelerate power to be 80, which is quite high. |
| projectile (ID) path | | straight, homing, fall | projectile 8 path = homing | Changing the type of path that the projectile with the chosen ID will take. Note that reverse, boomerang, and return paths are not available and must be set in the projectile settings of Game Setup. The example causes projectile 8 to take a homing path. |
| projectile (ID) homing, projectile (ID) reverse, projectile (ID) boomerang, projectile (ID) fall, projectile (ID) return | (Any) | (Number) | projectile (4) reverse = 10 | Changes the strength of the homing, reverse, boomerang, etc., path of the projectile. The number corresponds to the number of the slider in the custom projectile settings. The example changes the projectile path strength of projectile 4 to be 10, which is quite low. |
| projectile (ID) | | stop at walls targets, pass through walls, pass through targets, pass through everything, bounce stop at targets, bounce pass through targets | projectile 3 = bounce pass through targets | Changes how the projectile with the chosen ID will respond when striking walls and targets. The example causes projectile 3 to bounce against walls and pass through targets. |
| projectile (ID) hp, projectile (ID) health | (Any) | (Number) | projectile 2 hp = 8 | Allows you to change the HP of a projectile with the chosen ID. The example causes projectile 2 to have 8 health points. |
| projectile (ID) max hp, projectile (ID) max health | (Any) | (Number) | projectile 3 max hp *= 1 | Changes the amount of maximum hp that the projectile with the chosen ID will have. The example causes projectile 3 to multiply its max hp by w. |
| projectile (ID) defense | (Any) | (Number), [or] invincible | projectile 8 defense = 2 | Changes the defense of the projectile with the specified ID. The example sets the defense to 2 for the projectile with an ID of 8. |
| projectile (ID) attack power vs target | (Any) | (Number) | projectile 5 attack power vs target = 6 | Changes the attack power vs targets of the projectile with the specified ID. For a projectile fired by the character, the “target” would be enemies, and visa versa. The example sets the projectile attack power to 6. |
| projectile (ID) attack power vs friend | (Any) | (Number) | projectile 1 attack power vs friend = 3 | Changes the attack power vs friends of the projectile with the specified ID. For a projectile fired by the character, the “friend” would be other characters. If fired by an enemy, the “friend” woudl be other enemies. The example sets the projectile attack power to 3. |
| projectile (ID) | | jump proof, vulnerable to jumps | projectile 6 = jump proof | Changes whether or not the projectile with the chosen ID is vulnerable to jumps. The example makes projectile 6 not vulnerable to jumps. |
| projectile (ID) weakness | | none, fire, earth, water, ice, wind, electric, poison, darkness, light, other | projectile 3 weakness = wind | Changes the weakness setting of the projectile with the specified ID. The example causes the projectile with an ID of 3 to have a weakness for wind attacks. |
| projectile (ID) harmful | | true, false | projectile 9 harmful = false | Changes whether or not a projectile with the specified ID is harmful to characters. The example causes projectile 9 to not be harmful to characters. |
| projectile (ID) grab items | | true, false | projectile 5 grab items = true | Changes whether or not a projectile with the specified ID will collect items that it touches. The example causes projectile 5 to collect items. |
| projectile (ID) friendly fire | | true, false | projectile 4 friendly fire = true | Changes if a projectile with the chosen ID has friendly fire turned on (that is, enemy projectiles harm other enemies, and character projectiles harm other characters). The example causes projectile 4 to have friendly fire. |
| projectile (ID) affect item blocks | | true, false | projectile 7 affect item blocks = false | Changes if a projectile of the specified ID will affect item blocks that is touches. The example causes projectile 7 to affect item blocks. |
| projectile (ID) attack type | | none, fire, earth, water, ice, wind, electric, poison, darkness, light, other, enemy | projectile 5 type = fire | Changes the type of the projectile of the specified ID, which may come in handy for character projectiles against enemies that have a certain weakness. The example changes the projectile with an ID of 5 to become a fire type. |
| projectile (ID) life | (Any) | (Number, then “seconds”) | projectile 8 life + 5 seconds | Changes the number of seconds that a projectile with the chosen ID will remain active in an area before it disappears. The example causes projectile 8 to have 5 more seconds to its life. |
| Command | Operator(s) | Value(s) | Example | Notes |
|---|---|---|---|---|
| sprite (ID) x | (Any) | (Number) | sprite 6 x -= 5 | Changes the x-position of the sprite with the specified ID. The example causes sprite 6 to move left five pixels. |
| sprite (ID) y | (Any) | (Number) | sprite 6 y + 5 | Changes the y position of the sprite with the specified ID. The example causes sprite 6 to move 5 pixels to down. |
| sprite (ID) x | | random view, smart random view | sprite 4 x = random view | This will set the x-position of a sprite to a randomly-selected new position within the view. Choose “random view” for a completely random position. Choose “smart random view” to find a random position while avoiding solid objects. The example finds a new random x-position for the custom sprite with an ID of 4. (It’s y-position will stay the same.) |
| sprite (ID) y | | random view, smart random view | sprite 4 y = random view | This will set the y-position of a sprite to a randomly-selected new position within the view. Choose “random view” for a completely random position. Choose “smart random view” to find a random position while avoiding solid objects. The example finds a new random y-position for the custom sprite with an ID of 4. (It’s x-position will stay the same.) |
| sprite (ID) position | | random view, smart random view | sprite 3 position = random view | This will set both the x- and y-position of a sprite to a randomly-selected new position within the view. Choose “random view” for a completely random position. Choose “smart random view” to find a random position while avoiding solid objects. The example finds a new random position for the imported sprite with an ID of 3. |
| sprite (ID) x snap | | (Number) | sprite 1 x snap = 16 | This will set the x-position of a block to the nearest position on a specified grid size (similar to how your work box by default snaps to a grid when you place things down, except that this works only with the x-value rather than both). The example moves the block with an ID of 1 to the nearest x position divisible by 16. |
| sprite (ID) y snap | | (Number) | sprite 1 y snap = 32 | This will set the y-position of a sprite to the nearest position on a specified grid size (similar to how your work box by default snaps to a grid when you place things down, except that this works only with the y-value rather than both). The example moves the sprite with an ID of 1 to the nearest y position divisible by 32. |
| sprite (ID) position snap | | (Number) | sprite 2 position snap = 48 | This sets both the x- and y-position of a block to the nearest position on a specified grid (similar to how your work box by default snaps to a grid when you place things down). The example moves the block with an ID of 2 to the nearest position on a 48 x 48 grid. |
| create sprite, spawn sprite, create background sprite, spawn background sprite | | (Sprite ID, then a comma, then Spawn ID of the spawning point to create the sprite from) | spawn sprite 3, spwn | Creates a custom sprite behind objects with the specified ID at every spawning point with the specified Spawn ID. (See also the alternative spawn locations in the notes of the command “create item” above.) These two values must be separated by a comma. The example creates a sprite with the ID of 3 over the invisible spawning point(s) with the Spawn ID of “spwn”. |
| create foreground sprite, spawn foreground sprite | | (Sprite ID, then a comma, then Spawn ID of the spawning point to create the sprite from) | create foreground sprite 3, spwn | Works the same as creating a background sprite, only this time the sprite will appear in the foreground. |
| change sprite | (N/A) | (Sprite ID to change, then a comma, then new sprite ID) | change sprite 5, 4 | Changes custom sprites with the specified ID to a different sprite. This only works with sprites that are nearby. The example changes sprites with the ID of 5 to sprites with the ID of 4. |
| sprite (ID) | | item (ID), enemy (ID), block (ID), npc (ID), projectile (ID), sprite (ID) | sprite 5 = item 2 | Changes the sprite into an item, block, NPC, etc. with the specified ID. The Example causes sprites with an ID of 5 to transform into the item with an ID of 2. |
| remove sprite, kill sprite, destroy sprite, delete sprite, clear sprite | (N/A) | (Sprite ID) | remove sprite 4 | Removes uploaded sprites with the specified ID. This only works with sprites that are nearby. The example removes sprites with the ID of 4. |
| sprite (ID) visible | | true, false | sprite 12 visible = false | Makes a custom sprite with the specified ID to become visible or invisible. The example makes the sprite with an ID of 12 to become invisible. |
| sprite (ID) alpha | (Any) | (Number) | sprite 6 alpha = 25 | Changes the transparency of a sprite with the chosen ID. The number should be between 0 (invisible) and 100 (fully visible). The example changes the sprite with an ID of 6 to an alpha value of 25, which is mostly see-through. |
| sprite (ID) active | | true, false | sprite 1 active = true | Changes if a sprite with the chosen ID is active. This works the same as disabling the layer of the sprite. Note that this command only works if the layer is active. You cannot activate sprites on inactive layers with this command. The example activates the sprite with an ID of 1. |
| sprite (ID) layer | | (Number) | sprite 4 layer = 6 | Changes the layer of the sprite with the chosen ID. This only works if the sprite is already active. The example causes sprites with an ID of 4 to go to the layer with an ID of 6. |
| sprite (ID) animate, sprite (ID) animation | (Any) | (Number) | sprite 3 animate = 0 | Changes the animation speed of the custom sprite with 0 for no animation, 1 as the slowest animation, and 12 the fastest animation (Similar to animation settings in Game Setup for imported sprites). The example causes sprite 3 animation to become 0, stopping all animation. |
| sprite (ID) frame, sprite (ID) image | (Any) | (Number) | sprite 3 image = 12 | Changes the animation frame of the custom sprite with the specified ID. This can be useful when the animation speed is 0 and you wish to adjust the frames yourself. The example causes the sprite with an ID of 3 to change to its twelfth frame. |
| sprite (ID) looping | | staggered, constant, default | sprite 7 looping = constant | This changes the looping speed of the looping command prompt for the sprite with the specified ID. You can choose to have it loop “constant” which would be every frame of the game, or “staggered” which would be 6 times per second (and is easier on the PC). Set this to “default” to make it take on whatever setting you have for looping in general (see the command “loop/loop speed”). The example causes the sprite with an ID of 7 to run its looping command prompt every frame of the game. |
| Command | Operator(s) | Value(s) | Example | Notes |
|---|---|---|---|---|
| npc (ID) | | left, right, run left, run right, stop | npc 3 = run left | Causes the NPC with the specified character ID to move in the specified way. The NPC will continually move in the specified direction until the direction is changed or the value “stop” is called. The example causes the NPC with the character ID of 3 to “run left.” This is faster than normal “left.” See the bottom of this page for how to find the NPC ID. |
| npc (ID) | | jump | NPC 2 = jump | Causes the NPC with the specified character ID to jump. This command will work even if the NPC is not touching the ground. The example will cause the NPC with the character ID of 2 to jump. (The command prompt is not case-sensitive, so the capital “NPC” will not cause any problems.) |
| npc (ID) | | face left, face right, turn left, turn right | npc 1 = face left | Causes the NPC with the specified character ID to face in the chosen direction. The example causes the NPC with the character ID of 1 to face left. |
| npc (ID) | | move | npc 3 = move | Causes the NPC with the specified character ID to resume its normal movements, according to the NPC’s settings. This is useful when you are done forcing the NPC to move in a particular direction for things like cutscenes. The example causes the NPC with the character ID of 3 to resume normal movements. |
| npc (ID) | | face | npc 1 = face | Causes the NPC with the specified character ID to resume its normal facing settings, according to the NPC’s settings. This is useful when you are done foring the NPC to face a certain way for things like cutscenes. The example causes the NPC with the character ID of 1 to resume normal facing settings. |
| Command | Operator(s) | Value(s) | Example | Notes |
|---|---|---|---|---|
| npc (ID) x | (Any) | (Number) | npc 6 x -= 5 | Changes the x-position of the npc with the specified ID. The example causes npc 6 to move left five pixels. |
| npc (ID) y | (Any) | (Number) | npc 6 y + 5 | Changes the y position of the npc with the specified ID. The example causes item 6 to move 5 pixels to down. |
| npc (ID) x | | random view, smart random view | npc 4 x = random view | This will set the x-position of a npc to a randomly-selected new position within the view. Choose “random view” for a completely random position. Choose “smart random view” to find a random position while avoiding solid objects. The example finds a new random x-position for the npc with an ID of 4. (It’s y-position will stay the same.) |
| npc (ID) y | | random view, smart random view | npc 4 y = random view | This will set the y-position of a npc to a randomly-selected new position within the view. Choose “random view” for a completely random position. Choose “smart random view” to find a random position while avoiding solid objects. The example finds a new random y-position for the npc with an ID of 4. (It’s x-position will stay the same.) |
| npc (ID) position | | random view, smart random view | npc 3 position = random view | This will set both the x- and y-position of an npc to a randomly-selected new position within the view. Choose “random view” for a completely random position. Choose “smart random view” to find a random position while avoiding solid objects. The example finds a new random position for the npc with an ID of 3. |
| npc (ID) x snap | | (Number) | npc 1 x snap = 16 | This will set the x-position of a npc to the nearest position on a specified grid size (similar to how your work box by default snaps to a grid when you place things down, except that this works only with the x-value rather than both). The example moves the npc with an ID of 1 to the nearest x position divisible by 16. |
| npc (ID) y snap | | (Number) | npc 1 y snap = 32 | This will set the y-position of a npc to the nearest position on a specified grid size (similar to how your work box by default snaps to a grid when you place things down, except that this works only with the y-value rather than both). The example moves the npc with an ID of 1 to the nearest y position divisible by 32. |
| npc (ID) position snap | | (Number) | npc 2 position snap = 48 | This sets both the x- and y-position of a npc to the nearest position on a specified grid (similar to how your work box by default snaps to a grid when you place things down). The example moves the npc with an ID of 2 to the nearest position on a 48 x 48 grid. |
| create npc, spawn npc | (N/A) | (NPC ID, then a comma, then Spawn ID of the spawning point to create the NPC from) | create npc 3, place4 | Creates an NPC item with the specified character ID at every spawning point with the specified Spawn ID. (See also the alternative spawn locations in the notes of the command “create item” above.) These two values must be separated by a comma. The example creates an NPC with the Character ID of 3 over the invisible spawning point(s) with the Spawn ID of “place4”. Note: the top of the NPC will be the top of the spawning point. Make sure that there is room below so that the NPC does appear stuck in the ground! |
| change npc | (N/A) | (NPC ID to change, then a comma, then New NPC ID) | change NPC 5, 6 | Changes custom NPCs with the specified ID to a different NPC. This only works with NPCs that are nearby. The example changes NPCs with the ID of 5 to NPCs with the ID of 6. |
| npc (ID) | | item (ID), enemy (ID), block (ID), npc (ID), projectile (ID), sprite (ID) | enemy 5 = item 2 | Changes the enemy into an item, block, NPC, etc. with the specified ID. The Example causes enemies with an ID of 5 to transform into the item with an ID of 2. |
| remove npc, kill npc, destroy npc, delete npc, clear npc | (N/A) | (NPC ID) | destroy npc 12 | Removes NPCs with the specified ID. This only works with NPCs that are nearby. The example removes NPCs with the ID of 12. |
| npc (ID) visible | | true, false | npc 4 visible = true | Makes an NPC with the specified ID to become visible or invisible. Note that an NPC is still active if it is invisible, and it can still be interacted with. The examples causes the NPC with an ID of 4 to become visible. |
| npc (ID) alpha | | (Number) | npc 4 alpha = 100 | Changes the transparency of an NPC with the chosen ID. The number should be between 0 (invisible) and 100 (fully visible). The example changes the NPC with an ID of 4 to an alpha value of 100, which is completely visible. |
| NPC (ID) active | | true, false | NCP 1 active = true | Changes if a NPC with the chosen ID is active. This works the same as disabling the layer of the NPC. Note that this command only works if the layer is active. You cannot activate NPCs on inactive layers with this command. The example activates the NPC with an ID of 1. |
| NPC (ID) layer | | (Number) | NPC 4 layer = 6 | Changes the layer of the NPC with the chosen ID. This only works if the NPC is already active. The example causes NPCs with an ID of 4 to go to the layer with an ID of 6. |
The following are a couple commands which you can use when handling timelines and menus. If you are looking for commands which would be useful to use within timelines, look to view movements, controls for character/enemy/NPC movements, and displaying text.
| Command | Operator(s) | Value(s) | Example | Notes |
|---|---|---|---|---|
| timeline, start timeline, begin timeline | | (Timeline ID) | timeline = 3 | Begins running a timeline of the specified ID. See the bottom of this page for how to find the timeline ID. |
| timeline (ID) location | | (Number in seconds) | timeline 3 location = 65.5 | Changes the position of the running timeline with the specified ID to the value in seconds. If any commands are in that new position, they will also be run. Since Platform Builder can run multiple timelines at the same time, you will need to specify which timeline to change, even if only one timeline is active. The example will cause the timeline with an ID of 3 to jump to 65.5 seconds, or 1 minute and 5.5 seconds. This command can be useful to create timelines which loop themselves. |
| stop timeline, end timeline, quit timeline | | (Timeline ID) | stop timeline = 3 | Stops a timeline from running. This can be useful if you need to end a looping timeline. The example causes a timeline with the ID of 3 to stop running. |
| cancel my timelines | (N/A) | (N/A) | cancel my timelines | Cancels any active timelines for the item, enemy, etc., that called them. So, if you have a custom enemy that works with timelines, but you want to prevent those timelines from finishing if the enemy is killed, you can put “cancel my timelines” in the “defeated” command prompt of the enemy. |
| menu, show menu | | (Menu ID) | show menu 5 | Pauses the game to display a custom menu with the specified ID. The example puts up a menu with the ID of 5 (Many commands with only = as the operator may not require the operator.) |
| pause menu | | (Menu ID), 0 (with an optional comma and menu name) | pause menu = 3, Special | Adds a menu of the specified ID as an option to the regular pause menu. This allows the user to access a custom menu at any point in the game when the pause menu is enabled. By default, the menu will be displayed as “More…”, but this can be changed by adding a comma with a new name (under 20 characters) after the command. Set the value to 0 to remove the custom menu from the pause menu. The example adds “Special” as a selection in the pause menu, which open up menu 3. |
| replace pause menu | | (Menu ID), default | replace pause menu = 3 | Changes the standard pause menu of Platform Builder to a custom menu with the specified ID. To return to using a the standard pause menu, set this to “default.” The example causes your Platform Builder game to open the custom menu with an ID of 3 whenever you pause the game. |
 map player 1 jump map player 1 jump map player 2 attacketc. map player 2 attacketc. | N/A | (Text for when you are mapping the control) | (Click here to see an example of this command) | This is a special type of command that only works in custom menus, and you will use it to create your own custom key mapping (that is, your own custom ability for the user of your game to set his/her own control keys). From the custom menu, within the sideways carats, you put “map player” and then 1 or 2 (for which player you are key mapping), and then the control name (up, down, left, right, jump, attack, pick, use, button a, button b, button c, button d). After that, enter the text to display when the menu item is selected. The text should say something like “Press a Key.” At that point, Platform Builder will wait for the user to select a key, and that key will be mapped onto the selected control. If you make a custom menu with a menu item for each control key, you can have your own way to map keys. The example lets the user set a key for player 1 jump and player 1 attack. The menu selection uses brackets to show what the keys are currently set at. |
| spawn pause sprite, spawn pausing sprite, create pause sprite, create pausing sprite | | (Sprite ID) | spawn pause sprite = 8 | Spawns a custom sprite in the center of the view and pauses the game after the rest of the command prompt has finished running. This command does not use a spawn ID, but the sprite can be repositioned with the “sprite x” and “sprite y” commands. After a pausing sprite is created, you can left-click or right-click on the sprite. When you do this, the sprite will run its left/right click commands (if any) and then unpause the game. The purpose of this command is so you can build your own sprite-based menus. The example spawns a custom sprite with the ID of 8 and then pauses the game. (If any other pausing sprites are spawned after this one, they will appear on top.) |
| Command | Operator(s) | Value(s) | Example | Notes |
|---|---|---|---|---|
| key | | (any key color) | key = blue | Gives the character the ability to unlock a door or chest of the given color. Note that yellow keys unlocks all chests except for black, gray, and white ones. The example allows the character to unlock blue doors and chests. |
| key | | all, all colors, all colours | key = all colors | Gives the character the ability to unlock all locked doors and chests. |
| unlock | | (any key color) | unlock = gray | Unlocks all doors and chests in the area so that the character can use them without needing a key. The example unlocks all gray doors and chests in the area. |
| unlock | | all, all colors, all colours | unlock = all | Unlocks all doors and chests in the area so that the character does not need a key to use them. |
| Command | Operator(s) | Value(s) | Example | Notes |
|---|---|---|---|---|
| + | (N/A) | (Your popup message) | +Hello World! | Any command that starts with a + will be used as a popup message which pauses the game. The example will create a popup message that says “Hello World!” |
| _ | (N/A) | (Your real-time message) | _Hello World! | Any command that starts with a _ will be used as a real-time message. This is the kind of message which displays at the bottom of your status box without pausing the game. The example will create a real-time message that says “Hello World!” |
| ^ | (N/A) | (Your large overhead message) | ^Meanwhile… | Any command that starts with a ^ will be used as a large overhead message that will display near the top of the screen. This should only be a few words, and it can be used to provide some narration for cut-scenes. Leave the value blank to remove the text. The example causes the text “Meanwhile…” to be displayed at the top of the screen. |
| overhead, align overhead, overhead align, overhead alignment, overhead display, [or] overhead message | | (Numpad number) | overhead = 3 | Changes the position of the large overhead message (called by the ^ symbol). The position corresponds with a computer numpad, so think of your screen divided into 9 squares with each numpad key representing one of those squares. Just like on a numpad, 1 is bottom-left, 2 is bottom, 3 is bottom-right, 4 if left, 5 is middle, 6 is right, 7 is top-left, 8 is top, and 9 is top-right. The default position is 7. The example causes the overhead message to display in the bottom-right side of the screen. |
| overhead size | | small, medium, large, extra large | overhead size = medium | changes the size of the large overhead message (called by the ^ symbol). The default size is small, but you can increase the size using these commands. The example causes the overhead text to be a medium size. |
| character (ID) | (N/A) | (Your character message) | character 1Hello World! | Creates a text to briefly appear above the head of a character with the specified ID. This will make it seem like the character is talking. This command is only for playable characters. (there is a different command for talking NPCs. See below.) The example will cause the character with an ID of 1 to say “Hello World!” See the bottom of this page for how to find the character ID. |
| player (1 or 2) | (N/A) | (Your player message) | player 1Hello World! | This works like the previous command, but you specify player 1 or player 2 instead of the Character ID. The example causes Player 1 to say “Hello World!” |
| npc (ID) | (N/A) | (Your NPC message) | npc 4TingThing is awesome! | Creates a text to briefly appear above the head of a NPC with the specified character ID. This will make it seem like the NPC is talking. The example will cause the NPC with the character ID of 4 to compliment the developer of Platform Builder. |
| enemy (ID) | (N/A) | (Your enemy message) | enemy 6? | Creates a text to briefly appear above the head of a custom enemy with the specified ID. This will make it seem like the enemy is talking. Or, in the case of this example, the enemy will only have a question mark above its head and it will appear to be confused about something. |
| item (ID) | (N/A) | (Your item message) | item 3Because I can!! | Works the same for when you give messages to characters, NPCs, or enemies. You may wonder why a custom item would want to talk. That’s a good question. You better ask the item. |
| block (ID) | (N/A) | (Your block message) | block 8I’m a talking block! | I think you get it by now… |
| hud [1-20] | (N/A) | (Your HUD text) | hud 14Carrots: [var carrots] | Platform Builder allows displaying up to 20 texts to go over your HUD. With this command, you are able to change what those texts say. The position of the text can be changed using the “hud text [1-20]” command (See Hud Controls). The example uses [var carrots] to display the value of a custom variable named “carrots.” (See Other Syntax to learn about custom variables) So, if the variable “carrots” is equal to 5, the example will cause the HUD text #14 to say “Carrots: 5” (For variables which change around a lot, you will likely want to put this in a looping command, so that the HUD text stays updated.) |
| very slow jump,slow jump,medium jump,fast jump, [or] very fast jump | (N/A) | (Your jumping text message) | fast jump$10! | Creates a text that jumps upward and disappears. This would be quick, although you can use the different commands to determine how quick. This would typically be used for very short messages, like for showing the number of points or money collected from an item. |
| jump [steps] | (N/A) | (Your jumping text message) | jump 601,000 points! | This is similar to the other jump commands, but you can set the amount of time that the message stays visible. 30 steps is one second, regardless of your fps settings. So, the example creates a jumping text that will last for 60 steps, or two seconds. |
| area name | (N/A) | (Your new area name) | area nameThe Ruins | This changes the area name which is displayed at the top of the screen for the current area. The example causes the current area to be named “The Ruins.” |
| Command | Operator(s) | Value(s) | Example | Notes |
|---|---|---|---|---|
| reveal items, unhide items, show items | (N/A) | (N/A) | show items | This will reveal any items which may be hidden by an invisible hide block (hidden enemies will stay hidden). |
| hide items | (N/A) | (N/A) | hide items | If hidden items (not including enemies) have been revealed, you can re-hide them using this command. |
| reveal enemies, unhide enemies, show enemies | (N/A) | (N/A) | reveal enemies | This will reveal any enemies which may be hidden by an invisible hide block. |
| hide enemies | (N/A) | (N/A) | hide enemies | If hidden enemies have been revealed, you can re-hide them using this command. |
| reveal all, unhide all, show all, reveal everything, unhide everything, show everything | (N/A) | (N/A) | unhide everything | This will reveal any items and enemies which may be hidden by an invisible hide block. |
| hide all, hide everything | (N/A) | (N/A) | hide all | If hidden items or enemies have been revealed, you can re-hide them using this command. This does not include characters. |
| hide characters hide players | (N/A) | (N/A) | hide characters | This makes the characters invisible. This can be useful for cut-scenes where you don’t want to see the characters. Keep in mind that the characters can still be controlled unless you disable them using the command “disable characters”. |
| hide character (ID) | (N/A) | (N/A) | hide character 7 | This makes the characters with the chosen ID invisible. This can be useful for cut-scenes where you don’t want to see the character. Keep in mind that the characters can still be controlled unless you disable them using the command “disable characters”. |
| unhide character (ID) | (N/A) | (N/A) | unhide character 3 | This makes the character with the chosen ID visible after it was previously hidden. The example unhides the character with an ID of 3. |
| hide player | (N/A) | 1, 2 | hide player 2 | This works the same way as “hide characters” except that you specify specifically whether to hide player 1 or player 2. The example causes player 2 to be invisible. |
| unhide characters, unhide players, reveal characters, reveal players, show characters, show players | (N/A) | (N/A) | show players | This makes the characters visible after they have been hidden. |
| unhide player, reveal player, show player | (N/A) | 1, 2 | show player 1 | This works the same way as “unhide characters” except that you specify specifically whether or unhide player 1 or player 2. The example reveals player 1 after being hidden. |
| Command | Operator(s) | Value(s) | Example | Notes |
|---|---|---|---|---|
| effect [or] fx | | (effect name or ID) |  | Creates an effect with the effect name (from custom items) or the effect ID, which is the number next to the effect name in custom items. The effect will appear over the character or whatever is calling the command (like an enemy or item). The effect color is determined by the color command (see View Settings and Movements). In the example, the color is set to red, and then a red “diamond out” effect is created. |
| spawn effect, spawn fx, create effect, [or] create fx | (N/A) | (effect ID, then a comma, then Spawn ID of the spawning point to create the item from) | spawn effect 26, spwn | Creates an effect at the specified spawn block. This command does not take effect names, but only the effect ID (the number next to the effect name in custom item settings). Make sure to include a comma between the effect and the spawn ID. The example creates effect 26, which is the firework, at spawn blocks with a spawn ID of “spwn”. |
| enemy [ID] effect [or] enemy [ID] fx | | (effect name or effect ID) | enemy 2 effect = sparkle | Creates an effect over enemies with the specified ID. The example creates a sparkle effect over enemies with the ID of 2. |
| projectile [ID] effect [or] projectile [ID] fx | | (effect name or effect ID) | projectile 4 effect = 6 | Creates an effect over projectiles with the specified ID. The example creates effect 6 (star) over projectiles with the ID of 4. |
| item [ID] effect [or] item [ID] fx | | (effect name or effect ID) | item 3 fx = cannon smoke | Creates an effect over items with the specified ID. The example creates a cannon smoke effect over items with the ID of 3. |
| block [ID] effect [or] block [ID] fx | | (effect name or effect ID) | block 2 effect = 22 | Creates an effect over blocks with the specified ID. The example creates effect 22 (ellipse) over blocks with the ID of 2. |
| npc [ID] effect [or] npc [ID] fx | | (effect name or effect ID) | npc 12 effect = 5 | Creates an effect over NPCs with the specified ID. The example creates effect 5 (circle in) over NPCs with the ID of 12. |
| character [ID] effect [or] character [ID] fx | | (effect name or effect ID) | character 3 effect = explosion | Creates an effect over the character with the specified ID. The example creates an explosion over the character with an ID of 3. |
| player [1 or 2] effect [or] player [1 or 2] fx | | (effect name or effect ID) | player 2 fx = 12 | Creates an effect over player 1 or player 2. The example creates effect 12 (explosion) over player 2. |
| invincible effects [or] invincible effect | | true, false | invincible effects = false | When a character is invincible, by default there is music and flashing colors. These effects and be turned off or back on using this command. The example disables the visual effects of being invincible. |
| fly effects [or] fly effect | | true, false | fly effect = 1 | When a character is flying, by default there are sparkle effects that surround the character. These effects can be turned off or back on using this command. The example turns on the fly effects. (In the command prompt, “True” can be substituted for 1) |
| wind effects [or] wind effect | | true, false | wind effects = true | In windy courses, there are gusts of wind and dust bunnies that fly across the screen. This visual effect can be turned off or back on using this command. The example turns on the wind effect. |
| water effects, underwater effects, water effect, [or] underwater effect | | true, false | underwater effect = 0 | In underwater courses, the screen is blueish to help give the underwater effect. This visual effect can be turned off or back on using this command. The example turns off the blue overlay in underwater courses (In the command prompt, “false” can be substituted with 0.) |
| harm effects, harm effect, hurt effects, [or] hurt effect. | | true, false | harm effects = false | When a character is harmed, there will be a sound effect and the character will “blink.” This command will turn those effects off. The character will still be hurt, will still fly back some, and will still be temporarily invulnerable. The example disables the effects. |
| weak lightning, medium lightning, [or] strong lightning | (N/A) | (N/A) | medium lightning | When you enable thunder in your areas, you will see flashing of lightning happen as part of the effect. But you can create your own lightning strikes manually using these commands. The example creates a lighting strike of medium power. |
| brightness effect [or] brightness fx | (Any) | (Number) | brightness fx – 10 | Changes the brightness of an area. The minimum value is -50 and the maximum value is 50. The example reduces the overall brightness by 10, or 10% of the total range available. |
| visibility effect [or] visibility fx | | no effect [or] none, blur, edge blur, mirror, noise, heat haze, water [or] underwater | visibility fx = water | Changes the visibility effect as seen in the area settings. The example enables an underwater effect. |
| visibility effect strength [or] visibility fx strength | (Any) | (Number) | visibility fx strength = 50 | Changes the effect strength of the effect applied for visibility in the area settings. The value must be between 0 and 100, where 0 is no effect power (and not noticed), and 100 is full effect power. The example causes the visibility effect to have a strength of 50, which is at half power. |
| color effect [or] color fx | | no effect [or] none, saturation, sepia, night vision, thermal | color effect = none | Changes the color effect as seen in the area settings. The example disables any color effect that may have been applied. |
| color effect strength [or] color fx strength | (Any) | (Number) | color fx strength = 10 | Changes the effect strength of the effect applied for color in the area settings. The value must be between 0 and 100, where 0 is no effect power (and not noticed), and 100 is full effect power. The example causes the color effect to have a strength of 10, which which give a subtle effect. |
| special effect [or] special fx | | no effect [or] none, vignette, fog, old movie, chalkboard, sketch | special fx = vignette | Changes the “special” effect as seen in the area settings. The example enables the vignette effect, which darkens the edges of the view. |
| special effect strength [or] special fx strength | (Any) | (Number) | special fx strength * 2 | Changes the effect strength of the effect applied for “special” in the area settings. The value must be between 0 and 100, where 0 is no effect power (and not noticed), and 100 is full effect power. The example doubles whatever value the special effect strength was at. If the result is over 100, it will be brought down to 100. |
In video games, HUD stands for “Heads-Up Display” and it is everything displayed on the screen that gives information about the state of the game (such as score, level name, or health). In most cases, failing to provide a HUD ID will cause Platform Builder to assume your default HUD. Also, if you are using separate controls between P1 and P2 HUDs, then use the “with” or “for” commands to select Player 1 or Player 2 first, then run the HUD command you wish to use,
| Command | Operator(s) | Value(s) | Example | Notes |
|---|---|---|---|---|
| create hud, spawn hud | (N/A) | (HUD ID) | create hud 2 | Adds a HUD with the chosen ID to the screen. Note that you can not have more than one HUD with the same ID in use, but you can use multiple different HUDs at the same time. The example adds HUD 2 to the screen. |
| hide hud, remove hud | (N/A) | (HUD ID) | hide hud 3 | Prevents the HUD with the chosen ID from displaying. This can be useful when you don’t need to see the HUD during cutscenes. |
| unhide hud, reveal hud, show hud | (N/A) | (HUD ID) | show HUD 2 | If you hide the HUD, you can unhide it using this command. The command prompt is not case-sensitive, so this example will work fine. |
| Hide huds, hide all huds, remove huds, remove all huds | (N/A) | (N/A) | hide all huds | Causes all of the HUDs to no longer display on the screen. This may be useful for cut-scenes. |
| unhide huds, reveal huds, show huds, unhide all huds, reveal all huds, show all huds | (N/A) | (N/A) | show huds | If you hide one or more HUDs, this command will reveal all of the HUDs. |
| hud text (then 1-20) | | (x position, then a comma, then y position) | hud text 18 = 10, 25 | Sets the position for a hud text, relative to the top-left corner of your view. Platform Builder allows 20 different texts to display over your screen for the HUD, and you can change them with the command (see Displaying Text and Messages). The example causes HUD text # 18 to be positioned 10 pixels over and 25 pixels down from the top-left corner of your screen. Note that this command does not modify the text of any particular HUD, so no ID is needed. |
| hud (ID) sprite | | dynamic, none, (sprite ID) | hud 1 sprite = 3 | Changes the HUD sprite to either dynamic, none, or an imported sprite of your choosing. The example causes the HUD sprite to become the imported sprite with an ID of 3. Other elements of the HUD will then appear on top of that sprite. |
| hud (ID) lives | | visible, invisible, dynamic | hud 5 lives = invisible | Changes life visibility settings on the HUD with the chosen ID. The example prevents the lives from displaying in the HUD. |
| hud (ID) health | | visible, invisible, dynamic | hud 4 health = dynamic | Changes health visibility settings on the HUD with the chosen ID. The example makes the lives display to be dynamic. |
| hud (ID) stars | | visible, invisible, dynamic | hud 2 stars = visible | Changes star visibility settings on the HUD with the chosen ID. The example makes stars display to always display. |
| hud (ID) money | | visible, invisible, dynamic | hud 1 money = dynamic | Changes money visibility settings on the HUD with the chosen ID. The example makes the money display to be dynamic. |
| hud (ID) pick up | | visible, invisible, dynamic | hud 2 pick up = invisible | Changes pick up item visibility settings on the HUD with the chosen ID. The example makes the pick up display to never display. |
| hud (ID) air | | visible, invisible, dynamic | hud 6 air = visible | Changes remaining air visibility settings on the HUD with the chosen ID. The example makes the air display to always be visible. |
| hud (ID) ammo | | visible, invisible, dynamic | hud 1 ammo = visible | Changes ammo visibility settings on the HUD with the chosen ID. The example makes the ammo display to always be visible. |
| spawn hud sprite, create hud sprite, spawn background hud sprite, create background hud sprite | | (sprite ID) | spawn hud sprite = 2 | Creates a sprite for the HUD which will appear behind other elements of your HUD. The sprite is created in the left-left corner of the view. You can use sprite x and sprite y controls to move the sprite around where it needs to go in respect to that corner. Note that hiding the HUD will also hide the sprite, and disable any mouse commands of that sprite. Also note that the sprite is not linked to any particular HUD, so no HUD ID is necessary. |
| spawn foreground hud (ID) sprite, spawn background hud (ID) sprite | | (sprite ID) | spawn foreground hud 1 sprite = 5 | Creates a sprite for the HUD which will appear in front of other elements of your HUD. The sprite is created in the left-left corner of the view. You can use sprite x and sprite y controls to move the sprite around where it needs to go in respect to that corner. Note that hiding the hud will also hide the sprite, and disable any mouse commands of that sprite. |
| hud (ID) position | | edge, center, custom | hud 2 position = center | Changes the position setting of the HUD with the chosen ID. If you change it to “custom,” you can use “hud position x” and “hud position y” to for further controls. The example changes the HUD position to the center of the screen. |
| hud (ID) position x, hud (ID) x | (Any) | (Number) | hud 3 position x + 5 | When a HUD’s position is set to “custom,” you can change the x position using this command. The example causes the HUD with an ID of 3 to move 5 pixels to the right. |
| hud (ID) position y, hud (ID) y | (Any) | (Number) | hud 1 position y = 20 | When a HUD’s position is set to “custom,” you can change the y position using this command (from the top of the screen). The example causes the HUD with an ID of 1 to become 20, which is 20 pixels from the top of the screen. |
| hud (ID) player (1 or 2) lives | | (x position, then a comma, then y position) | hud 3 player 1 lives = 5, 8 | Changes the x and y position of the lives display for player 1 or player 2 over the HUD sprite. This is relative to the top-left corner of the HUD sprite. The example causes the player 1 lives of the HUD to display 5 pixels to the right and 8 pixels down from the top-left corner of your custom HUD sprite. |
| hud hp (ID) display | | icons, health bar, number | hud hp 3 display = number | Changes how the HUD with the chosen ID displays health. The example causes the HUD to display the player’s health with numbers. |
| hud (ID) player (1 or 2) health | | (x position, then a comma, then y position) | hud 1 player 2 health = 50, 40 | Changes the x and y position of the health display for player 1 or player 2 over the HUD sprite. This is relative to the top-left corner of the HUD sprite. The example causes the player 2 health of the HUD to display 50 pixels to the right and 40 pixels down from the top-left corner of your custom HUD sprite. |
| hud (ID) stars, hud player stars | | (x position, then a comma, then y position) | hud 1 player stars = 12, 15 | Changes the x and y position of the stars display for the players over the HUD sprite. This is relative to the top-left corner of the HUD. The example causes the stars of the HUD to display 12 pixels to the right and 15 pixels down from the top-left corner of your custom HUD sprite. |
| hud (ID) player (1 or 2) money | | (x position, then a comma, then y position) | hud 3 player 1 money = 0, 0 | Changes the x and y position of the money display for player 1 or player 2 over the HUD sprite. This is relative to the top-left corner of the HUD sprite. The example causes the player 1 money of the HUD to display in the top-left corner of the HUD sprite. |
| hud (ID) player (1 or 2) ammo | | (x position, then a comma, then y position) | hud 2 player 2 ammo = 40, 40 | Changes the x and y position of the ammo display for player 1 or player 2 over the HUD sprite. This is relative to the top-left corner of the HUD sprite. The example causes the player 2 ammo of the HUD to display 40 pixels to the right and down from the top-left corner of the HUD sprite. |
| hud (ID) player (1 or 2) pick up | | (x position, then a comma, then y position) | hud 1 player 1 pick up = 1, 5 | Changes the x and y position of the pick up item displayed for player 1 or player 2 over the HUD sprite. This is relative to the top-left corner of the HUD sprite. The example causes the player 1 pick up item in the HUD to display 1 pixel to the right and 5 pixels down from the top-left corner of the HUD sprite. |
| hud (ID) player (1 or 2) air, hud player (1 or 2) breath | | (x position, then a comma, then y position) | hud 2 player breath = 23, 41 | Changes the x and y position of the air remaining for player 1 or player 2 over the HUD sprite, when the player is underwater. This is relative to the top-left corner of the HUD sprite. The example causes the player 1 air bar in the HUD to display 23 pixels to the right and 41 pixels down from the top-left corner of the HUD sprite. |
| split hud controls | | true, false | split hud controls = true | Changes whether player 1 and player 2 HUDs use split controls. When controls are split, then use the “with player 1” and “with player 2” commands with these HUD commands to select which player’s HUD you wish to change. |
When you start playing a game made with Platform Builder, you typically have buttons have buttons in the Title Screen which can save and load from five different game files of your game. However, you can use these commands to work with game files yourself, and you can use as many game slots as you would like. Keep in mind that many of these commands will not work unless you are doing a test run or playing the game. They are also not available to use in Sandbox levels. If you plan to use these commands to save and load manually, you may wish to disable any kind of automatic saving in “Other Settings” of Game Settings.
| Command | Operator(s) | Value(s) | Example | Notes |
|---|---|---|---|---|
| new game | | (Number of game File) | new game = 3 | Creates a new game using the specified save slot. This will take you to the starting world/course that is set in the title screen settings. The example launches a new game with save slot 3. |
| save game | | (Number of game File) | save game | Saves the game with the specified save slot, or do not use a value to save the game to the currently open save slot. This does not save the exact state of everything, but it will save the character’s x and y position, the current area, player stats, etc. |
| load game | | (Number of game File) |  | Loads the game with the specified load slot. If the game does not exist, the command will do nothing. The example uses a conditional “if game exists” to check if game slot 3 exists. If it does, it will load from slot 3. |
| delete game | | (Number of game File) | delete game = 3 | Deletes a game of the specified save slot. This command will not work if you try to delete a game which is currently open. The example deletes the save data for the game in slot 3. |
| copy game | | (Game File to Copy From, then a comma, then Game File to Copy to) | copy game 3, 4 | Copies the save data from the first game file to the second game file. This command will not work if you try copying to the game file which is currently open. The example takes the save data from Game 3 and copies it over Game 4. |
| Command | Operator(s) | Value(s) | Example | Notes |
|---|---|---|---|---|
| health, hp, hearts | | limited, unlimited, none | hp = unlimited | Changes the limitation settings of health. The example gives the character unlimited health. |
| lives | | limited, unlimited, none | lives = none | Changes the life limitation. The example causes the character to not use lives. So once the character dies, you go straight to the Game Over Screen. |
| ammo, primary ammo | | limited, unlimited | ammo = unlimited | Changes the ammo limitation for the ammo according to the character’s ranged weapon settings. The example causes the character’s primary ammo to be unlimited. |
| air, breath | | limited, unlimited | air = limited | Changes the air limitation for when the character is underwater. The example makes it so that the character cannot spend forever underwater. |
| points, score | (Any) | (Number) | points + 50 | Changes the score in the game. The example adds fifty points to the game’s score. |
| co op | | true, false | co op = true | Use this to enable or disable 2-player co-op mode for your game. The changes will take effect the next time you switch to a different area or overworld. The example enables co-op mode. |
| loop, looping, loop speed, looping speed | | staggered, constant | loop speed = constant | When you are running looping commands, the default looping speed is every 5 frames. This is considered “staggered looping speed.” It is more efficient on the PC and works for most cases. However, you can change this to “constant” if you want the looping commands to be run every frame. This may be useful if you are changing the X and Y position of things, and you want smooth movements every frame. The example changes all looping commands to run in constant looping speed. |
| disable pause, disable pause menu, disable pausing | (N/A) | (N/A) | disable pause menu | Disables the pause menu so that the user can not access it for the rest of the area, typically for cut-scenes in your games. Be careful with this, as the pause menu may be the only way to exit an area if necessary. |
| enable pause, enable pause menu, enable pausing, allow pause, allow pause menu, allow pausing | (N/A) | (N/A) | Enable Pausemenu | Enables the pause menu if it has been previously disabled. The example enables the pause menu. (The command prompt is not case-sensitive or space-sensitive so the example should work fine.) |
| window size [or] screen size | | 1, 1.5, 1.72, 2, full | screen size = 1.5 | Changes the size of the game window to the specified factor. This works similar to changing the window size in the Platform Builder settings, and may be useful if you plan to build out your own custom menu. You can also go full screen by using “full” instead of one of the possible numbers. |
| target fps | | 30, 45, 60, 90, 120 | target fps = 60 | Sets the target FPS for your game to be used the next time there is a change of area. You can learn more about FPS by right-clicking on the fps settings in game setup. (You cannot instantly change the FPS because each area loads with special settings according to the FPS, so the change will only take effect next time you load an area.) |
Platform Builder lets you use your own variables. Variables are used for storing numbers that can later be checked with conditionals. There are already a bunch of built-in variables like health and ammo, but you can also create your own variables and have them store your own numbers. The first time you use a variable, it must be initialized. This means typing “area var” or “course var” etc. followed by the variable name you wish to use, and then the operator and finally the number you wish to store inside the variable. After that, you can use just the variable name to check its value using a conditional, or change its value to something else. For several practical examples of how variables could be used in Platform Builder, go here.
Make sure that your variable names are distinct from all other commands and conditionals in Platform Builder. For example, don’t say “var health = 4” because “health” is already a command of Platform Builder. Also, avoid using special characters in your variable names, and do not start a variable name with a number.
Since you are creating your own variable names, Platform Builder may not recognize your command when you right-click on the command prompt. However, whenever you right-click on a command prompt which initializes the variable with “area var,” “course var,” etc., the variable name will be stored in memory, and Platform Builder will recognize that variable when you right-click on other command prompts which only use the variable name. You can access this memory bank from “Other Settings” in Game Setup.
| Command | Operator(s) | Value(s) | Example | Notes |
|---|---|---|---|---|
| variable (name), var (name), area var (name), area variable (name) | (Any) | (Number) | var myVariable = 25 | Area variables are reset to 0 every time you leave or change an area. The example creates an area variable called “myVariable” and sets is to 25 |
| course var (name), course variable (name) | (Any) | (Number) | course var feature + 1.5 | Course variables are reset to 0 after the course is finished. The example causes course variable “feature” to increase by 1.5. If “feature” does not exist as a variable, it will make “feature” and set it to 0 (the default value) and then add 1.5 to it. |
| game var (name), game variable (name) | (Any) | (Number) | game var Cash * 2 | The value of game variables are never reset. They last for the entire game. The example causes game variable “Cash” to double. |
| local var (name), local variable (name) | (Any) | (Number) | local var myJump += 1 | Local variables are specific to whatever happens to be calling the command. This means that each player, enemy, item, etc. can have a local variable of the same name but have different values. The local variable is removed when whatever hosting the variable is removed, destroyed, killed, etc. For instance, you may put the example in an enemy jump command. This way you can keep track of how many times each enemy has jumped. |
By default, a command will apply to whatever is calling the command. So if player 2 has a command prompt that adds 1 health point, that health point will be added to player 2. Likewise, suppose an enemy-related command with a missing enemy ID (e.g., “enemy alpha = 1”) is run from the enemy command prompt. In that case, Platform Builder will know to apply that command to the enemy calling the command. The commands below allow you to change where any subsequent commands are applied.
| Command | Operator(s) | Value(s) | Example | Notes |
|---|---|---|---|---|
| for player, with player | (N/A) | 1, 2 | for player 2 | All commands below this line will be applied to the new player unless you change the player again. Note that this only works if the desired player is currently present in the game, so you may want to check if a player exists using a conditional before you use it. The example causes any following commands to apply to player 2. |
| for closest enemy, for nearest enemy, with closest enemy, for closest enemy | (N/A) | (Enemy ID or leave blank) | for closest enemy 4 | This allows you to use enemy-based commands so that they apply only to the closest enemy of whatever is calling the command (Basically, it allows enemy commands to work as if they were called from an enemy command prompt). If you include an enemy ID, then the command will search for the closest enemy that matches the enemy ID. If you do not include an ID, then the command will search for the closest custom enemy, whatever it might be. There are three things to keep in mind: (1) This only works if the nearest enemy is within the view or closely nearby. (2) This will only work as long as you do NOT include the enemy ID with the enemy command. (3) This will replace the information for whatever originally called the command. So, if the command is called from a custom block, you will no longer be able to use block-based commands without specifying the block ID. The example causes following enemy-related commands to apply for the closest enemy with an ID of 4. |
| for closest item, for nearest item, with closest item, for closest item | (N/A) | (Item ID or leave blank) | with nearest item | This works similar to “for closet enemy” but it searches for the closet item instead. The example find the closet custom item to whatever is calling the command, and any item-related commands following will apply to it. |
| for closest block, for nearest block, with closest block, for closest block | (N/A) | (Block ID or leave blank) | for closest block 5 | This works similar to “for closet enemy” but it searches for the closet block instead. The example finds the closet custom block with an ID of 5. |
| for closest character projectile, for nearest character projectile, with closest character projectile, for closest character projectile | (N/A) | (Projectile ID or leave blank) | for closest character projectile | This works similar to “for closet enemy” but it searches for the closet projectile fired by the character instead. The example finds the closet character projectile. |
| for closest enemy projectile, for nearest enemy projectile, with closest enemy projectile, for closest enemy projectile | (N/A) | (Projectile ID or leave blank) | with nearest enemy projectile 4 | This works similar to “for closet enemy” but it searches for the closet projectile fired by an enemy instead. The example finds the closet enemy projectile with an ID of 4. |
| for closest sprite, for nearest sprite, with closest sprite, for closest sprite | (N/A) | (Sprite ID or leave bank) | with closest sprite | This works similar to “for closet enemy” but it searches for the closet sprite instead. The example finds the closet custom sprite. |
| for farthest enemy/item/block/character/enemy projectile/sprite/character projectile | (N/A) | (ID) | with farthest enemy | As you can see, the same idea from above can be applied to the farthest item/enemy/sprite etc., just like you can for the closest. |
| for random enemy/item/block/character/enemy projectile/sprite/character projectile | (N/A) | (ID) | for random block 5 | Instead of selecting the closest or farthest item/enemy/block etc., you can select one randomly. The example randomly finds a custom block with an ID of 5 that is within the view or nearby, and causes further commands to come from that block. |
| for spawned, with spawned, for spawn, with spawn | (N/A) | (N/A) | for spawn | This causes the commands to be run from whatever item/enemy/projectile etc. was created most recently. This could mean something which was created using commands, or it could mean an item that just came out of a block, or an enemy projectile that an enemy just launched, etc. |
| for other/with other | (N/A) | (N/A) | for other | Some commands prompts in Platform Builder involve the interaction of two things. For example, custom enemies have a command prompt for “touching character.” While commands in that command prompt will apply to the enemy by default, you can use “for other” to make commands apply to the “other” thing involved (in the case, the character it touches.) Other command prompts which can use “with other” would commands for characters, enemies, or projectiles attacking something else, or when they are harmed or defeated by something else, and the “step on” and “triggered” and “destroyed,” commands for custom blocks. |
| for self/with self | (N/A) | (N/A) | with self | This causes commands to be applied to whatever is calling the command. This is true by default, but if you change this with a with/for command, you can change it back using this command. |
A conditional is something which has to be true in order for your command(s) to execute. Conditionals are powerful tools to use with your commands to make Platform Builder behave in special ways. To learn more about conditionals and how to use them, visit the Conditionals Page. On that page you will discover that many of the commands we have already seen can be converted into conditionals. Below is a list of conditionals which do not come from any other commands.
| Command | Operator(s) | Value(s) | Example | Notes |
|---|---|---|---|---|
| if item exists, if character has item, if player has item | , ! | (Item ID) | if item exists = 5 | Checks if the character has an item of the given item ID. Note that this does not check for permanent items that have been collected (you could use a game var instead.) The example checks if the player has an item with the ID of 5. |
| if player exists | , ! | 1, 2 | if player exists = 2 | Checks if the specified player is currently active. The example checks if player 2 is currently in the area. |
| if character exists | , ! | (Character ID) | if character exists != 4 | Checks if the character with the specified ID currently exists as one of the two players. The example checks if character 4 does not exist. |
| if chance percent [or] if percent chance | | (Number from 1-100) | if percent chance = 25 | Randomly results in “true” according to the percent given. The example is a conditional which will return “true” 25 percent of the time, or 1 in 4 chance. In other words, the command or set of bracketed commands below this conditional have a 25 percent chance to occur. |
| if random (number) | (Any) | (Number) | if random 9 < 3 | The conditional starts with a random whole number between 0 and what you specify. Then is checks that number with the rest of your command. The example generates a random whole number between 0 and 9, and then checks if that number is less than 3. The conditional passes if the random number is 0, 1, or 2, which means that this conditional will have a 3 in 10 (30%) chance of passing. |
| if enemy (ID) number, if enemy (ID)count | (Any) | (Number) | if enemy 2 number < 5 | Checks the number of enemies of the specified ID within the view and nearby. The example checks if there are less than 5 enemies with the ID of 2. |
| if item (ID) number, if item (ID) count | (Any) | (Number) | if item 6 count = 3 | Checks the number of items of the specified ID within the view and nearby. The example checks if there are 6 items with the ID of 3. |
| if projectile (ID) number, if projectile (ID) count | (Any) | (Number) | if projectile 1 number != 0 | Checks the number of projectiles of the specified ID within the view and nearby. The example checks if there are not 0 projectiles with the ID of 1. |
| if block (ID) number, if block (ID) count | (Any) | (Number) | if block 3 count = 4 | Checks the number of blocks of the specified ID within the view and nearby. The example checks if there are 4 blocks with the ID of 3. |
| if hud exists | , ! | (HUD ID) | if hud exists = 3 | Checks if a HUD with the chosen ID exists, or has been created to display on the screen. The example checks if the HUD with an ID of 3 exists. |
| if key, if keyboard | , ! | up, down, left, right, jump, attack, pick, use | if key = jump | Checks if a movement or action key is pressed down. The example checks if the key for jumping is being pressed. If you want to run commands only once when the key is pressed down, you can use variables. An example is given here on our forums. |
| if key press | , ! | up, down, left, right, jump, attack, pick, use, button a, button b, button c, button d | if key press = jump | Checks if a key has been pressed down on the frame that the command is run. You select any of the standard Platform Builder keys or extra buttons (a-d) if you are using them (see “map” commands). Note that since this conditional is checking for a very specific moment of when a key is being pressed down, you will want to use this in a looping command prompt with a constant looping speed (see “loop” commands). Also, there are a few alternatives to these values. For instance, you could use “grab” or “pickup” instead of “pick” and it will work the same. The example checks if the jump button has been pressed in the current frame of the game. Lastly, “key press” can also be used as a non-conditional to cause the character act as if the key was pressed down. |
| if key release | , ! | up, down, left, right, jump, attack, pick, use, button a, button b, button c, button d | if key release = button a | Checks if a key has been released on the frame that the command is run. You select any of the standard Platform Builder keys or extra buttons (a-d) if you are using them (see “map” commands). Note that since this conditional is checking for a very specific moment of when a key is being released, you will want to use this in a looping command prompt with a constant looping speed (see “loop” commands). Also, there are a few alternatives to these values. For instance, you could use “grab” or “pickup” instead of “pick” and it will work the same. The example checks if button a (one of the four extra keys that you can map in your game) has been released in the current frame of the game. |
| if mouse, if mouse button | , ! | left, right | if mouse button != right | Check if a mouse button is being pressed or not. The example checks if the mouse right button is not being pressed. |
| if standing, walking, running, skidding, full speed, jumping, falling, standing attack, moving attack, jumping attack, hovering, gliding, ducking, defending, defended, pounding, pounded, wall sliding, climbing, hanging, swimming, using pick up gun, using pick up melee | , ! | true, false | if pounded = true | Checks the current action state of the character. Note that “full speed” returns true when the character is running at the maximum running speed. “defending” is when the character is in defensive stance, but has not blocked any attack. “defended” means that the character has blocked an attack while in defensive stance. “pounding” checks if the character is going down into a ground pound. The example checks if the character has “pounded,” that is, when the character has landed a ground pound. |
| if ID | | (Number) | if id = 5 | Checks the ID number of the item, enemy, etc. which is running the command. This may be useful when using invisible command blocks which are triggered by items, enemies, etc. Here, you can check if the item, enemy, etc., is the proper one before continuing. |
| if testing | | true, false | if testing = true | Checks if you are currently testing a level or doing a test run of the game. This can be useful to create your own “debug mode” to help you get around your game more easily as you test. |
| if testing area | | true, false | if testing area = true | Checks if you are currently testing a level (full-game test runs are not checked). |
| if test run, testing run, test game, testing game | | true, false | if test run = true | Check if you are currently doing a test run of the game (testing an area is not checked.) |
| if distance to player (1, 2, or leave blank) | (Any) | (Number) | if distance to player > 64 | Check the distance to a player. You can specify player 1, player 2, or don’t specify (like in the example) to check for whatever player is running the command. The example checks if the distance to the player is greater than 64, which is the length of two blocks. |
| if distance to character (ID) | (Any) | (Number) | if distance to char 2< 50. | Checks the distance to the character of the specified ID. The distance is measured in pixels. The example checks if the object calling the commands is less than 50 pixels away from the character. |
| if distance to enemy (ID) | (Any) | (Number) | if distance to enemy 3 > 50. | Checks the distance to the enemy of the specified ID. The distance is measured in pixels. The example checks if the object calling the commands is more than 50 pixels away from the enemy 3. |
| if distance to projectile (ID) | (Any) | (Number) | if distance to projectile 2< 10 | Checks the distance to the projectile of the specified ID. The distance is measured in pixels. The example checks if the object calling the commands is less than 10 pixels away from the projectile with an ID of 2. |
| if distance to character projectile (ID) | (Any) | (Number) | if distance to character projectile 2< 10 | Checks the distance to the enemy projectile of the specified ID. (It won’t check for that projectile if it was launched from the character) The distance is measured in pixels. The example checks if the object running the commands is less than 10 pixels away from a projectile with an ID of 2 that was launched from an enemy. |
| if distance to enemy projectile (ID) | (Any) | (Number) | if distance to enemy projectile 2< 10 | Checks the distance to the character projectile of the specified ID. (It won’t check for that projectile if it was launched from an enemy) The distance is measured in pixels. The example checks if the object running the commands is less than 10 pixels away from a projectile with an ID of 2 that was launched from the character. |
| if distance to item (ID) | (Any) | (Number) | if distance to item 9> 40 | Checks the distance to the item of the specified ID. The distance is measured in pixels. The example checks if the object running the commands is more than 40 pixels away from item 9. |
| if distance to block (ID) | (Any) | (Number) | if distance to block 6 >= 10 | Checks the distance to the block of the specified ID. The distance is measured in pixels. The example checks if the object running the commands is 10 or more pixels away from block 6. |
| if distance to npc (ID) | (Any) | (Number) | if distance to npc 3 <= 30 | Checks the distance to the NPC of the specified ID. The distance is measured in pixels. The example checks if the object running the commands is 30 or less pixels away from NPC 3. |
| if distance to sprite (ID) | (Any) | (Number) | if distance to sprite 4 < 25 | Checks the distance to the sprite of the specified ID. The distance is measured in pixels. The example checks if the object running the commands is less than 25 pixels away from a sprite with an ID of 4. |
| if character (ID) | , ! | inside view, in view, outside view, out view | if character 2 = in view | Checks if the character with the specified ID is inside or outside the current view. The example checks if the character with an ID of 2 is inside the view. |
| if player (1 or 2) | , ! | inside view, in view, outside view, out view | if player 2 = inside view | Checks if the player 1 or payer 2 is inside or outside the current view. The example checks if player 2 is inside the view. |
| if enemy (ID) | , ! | inside view, in view, outside view, out view | if enemy 6 = inside view | Checks if the enemy with the specified ID is inside or outside the current view. The example checks if the enemy with an ID of 6 is inside the view. |
| if item (ID) | , ! | inside view, in view, outside view, out view | if item 2 != out view | Checks if the item with the specified ID is inside or outside the current view. The example checks if the item with an ID of 2 is not outside the view (in other words, if it’s inside the view) |
| if npc (ID) | , ! | inside view, in view, outside view, out view | if npc 10 = in view | Checks if the NPC with the specified ID is inside or outside the current view. The example checks if the NPC with an ID of 10 is inside the view. |
| if projectile (ID) | , ! | inside view, in view, outside view, out view | if projectile 6 = in view | Checks if the projectile with the specified ID is inside or outside the current view. The example checks if the projectile with an ID of 6 is inside the view |
| if block (ID) | , ! | inside view, in view, outside view, out view | if block 1 = outside view | Checks if the block with the specified ID is inside or outside the current view. Check example checks if the block with an ID of 1 is outside the view. |
| if collision character, if touching character | (N/A) | (Character ID) | if touching character 2 | Checks if whatever is calling the command is in contact with the specified character. So, if this command comes from an enemy command prompt, the example checks if the enemy is currently touching a character with an ID of 2. |
| if collision player, if touching player | (N/A) | 1, 2 | if collision player 1 | Checks if whatever is calling the command is in contact with the specified player. So, if this command comes from an enemy command prompt, the example checks if the enemy is currently touching player 1. |
| if collision enemy, if touching enemy | (N/A) | (Enemy ID) | if touching enemy 5 | Checks if whatever is calling the command is in contact with the specified enemy. So, if this command comes from an enemy command prompt, the example checks if the enemy is currently touching a custom enemy with an ID of 5. |
| if collision item, if touching item | (N/A) | (Item ID) | if collision item 7 | Checks if whatever is calling the command is in contact with the specified item. So, if this command comes from an enemy command prompt, the example checks if the enemy is currently touching a custom item with an ID of 7. |
| if collision block, if touching block | (N/A) | (Block ID) | if collision block 1 | Checks if whatever is calling the command is in contact with the specified block. So, if this command comes from an enemy command prompt, the example checks if the enemy is currently touching a custom block with an ID of 1. |
| if collision character projectile, if touching character projectile | (N/A) | (Projectile ID) | if collision character projectile 1 | Checks if whatever is calling the command is in contact with the specified character projectile. So, if this command comes from an enemy command prompt, the example checks if the enemy is currently touching a character projectile with an ID of 1. |
| if collision enemy projectile, if touching enemy projectile | (N/A) | (Projectile ID) | if touching enemy projectile 9 | Checks if whatever is calling the command is in contact with the specified enemy projectile. So, if this command comes from an enemy command prompt, the example checks if the enemy is currently touching an enemy projectile with an ID of 9. |
| if collision sprite, if touching sprite | (N/A) | (Sprite ID) | if touching sprite 6 | Checks if whatever is calling the command is in contact with the specified sprite. So, if this command comes from an enemy command prompt, the example checks if the enemy is currently touching an imported sprite with an ID of 6. |
| if game (Number of game file) exists | (N/A) | (N/A) | if game 3 exists | Checks if a game exists with the specified game number. The example check if game 3 exists. |
| Command | Operator(s) | Value(s) | Example | Notes |
|---|---|---|---|---|
| vibrate light | | (Seconds. decimals are okay) | vibrate light = 1.5 | When using a gamepad controller with rumble support, you can cause the controller to rumble lightly with this command. If you don’t specify the number of seconds, then it will default to 1 second. The example causes the controller to rumble lightly for 1.5 seconds. |
| vibrate medium | | (Seconds. decimals are okay) | vibrate medium | When using a gamepad controller with rumble support, you can cause the controller to rumble with medium power with this command. If you don’t specify the number of seconds, then it will default to 1 second. The example causes the controller to rumble with medium power for 1 second. |
| vibrate strong | | (Seconds. decimals are okay) | vibrate strong = 2 | When using a gamepad controller with rumble support, you can cause the controller to rumble strongly with this command. If you don’t specify the number of seconds, then it will default to 1 second. The example causes the controller to rumble strongly for 2 seconds. |
| give character (ID) item | (N/A) | (Item ID) | give character 2 item 5 | Gives an item with the specified ID to the character of the specified ID. (See Below for how to find IDs of characters and items) The example gives an item with the ID of 5 to the character with an ID of 2. |
| give player (1 or 2) item | (N/A) | (Item ID) | give player 2 item 1 | Works the same as the previous command except that you specify the player number (1 or 2) instead of the Character ID. The example gives an item with the ID of 1 to player 2. |
| take player (1 or 2) item, remove player (1 or 2) item | (N/A) | (Item ID) | take player 1 item 3 | Removes an item of the specified ID from the player’s inventory. The example causes player 1 to no longer have possession of the item with the ID of 3. |
| options, open options, display options, show options | (N/A) | (N/A) | display options | This opens the options of the pause menu for your game. |
| go to checkpoint, jump to checkpoint, return to checkpoint | (N/A) | (N/A) | jump to checkpoint | If you have a checkpoint active, you can use this command to return back to the checkpoint. Note: This command does not remove any lives. Also, this command does not work when testing an area. |
| checkpoint, set checkpoint, make checkpoint | | (Area ID, then a comma, then Spawn ID) | checkpoint = 3, spwn | Creates and sets a checkpoint using an area ID and spawn ID of characters in the area. In this example, if the character dies, the character will return to the area with an ID of 3, and the spawn ID will be spwn. |
| remove checkpoint | (N/A) | (N/A) | remove checkpoint | If a checkpoint is set inside an area, it will be unset. |
| freeze game, pause game | | (Number In frames) | freeze game = 30 | Completely freezes the game. The number you put is the time for the game to be frozen in frames. So if your game is set to 60 frames per second (see “Other Settings” in Game Setup) then the example will freeze the game for half a second (30 frames at 60 frames per second). |
| trigger goal, area goal, finish goal, complete goal | | 1, 2 | finish goal = 2 | Causes the area goal 1 or goal 2 to be completed, and the goal reward to be awarded. The example completes the second area goal. |
| permanent | | true, false | permanent = true | Some commands (such as max health) can be applied permanently for the entire game. By enabling “permanent,” you can cause all further commands in the command prompt to be treated as permanent unless you disable it again. The default value is 0 (false) unless the commands are being run from an item with a permanent duration. |
| spawn layer, spawning layer, create layer, creating layer | | (Layer ID or “auto” or “default”) | spawn layer = auto | This changes the layer that items, enemies, etc. are created on with commands. You can enter a layer ID. You can also cause the spawning go on default layers by using “auto” or “default.” The example causes all spawned things to go on their default or auto layer. |
| exit, stop, exit commands, stop commands, exit command prompt, stop command prompt | (N/A) | (N/A) | exit | If this command is run, then the command prompt stops running and no more commands following will occur. This can be useful with conditionals when you wish to stop running commands if certain conditionals are or are not met. |
| delay | | (Number in 1/10th seconds) | delay = 5 | This command will make the next command delayed, saving you the hassle creating a timeline to accomplish the same thing. The number is in 1/10th seconds, the same as for timelines. In this example, whatever command is written after “delay = 5” will happen 1/2 second after the command was initially run. If you want multiple commands delayed, you can group them inside straight brackets [ ] on their own separate lines. |
| delay seconds | (N/A) | (Number in seconds) | delay 2.5 seconds | This works like the regular “delay” command, except your number is now in full seconds. The example also shows something else you can do with delays. If you want multiple commands delayed, you can group them inside straight brackets [ ] on their own separate lines. |
| delay frames, delay steps | (N/A) | (Number in game frames) | delay 60 frames | This works like the regular “delay” command, except your number is now in game frames or steps. So if you game is running at 60 fps (frames per second), then the example will cause the delay to last for one second. This is the most precise way to work with delays, but the result will change if you change the game’s frame rate! |
| cancel my delays | (N/A) | (N/A) | cancel my delays | Cancels any active delays for the item, enemy, etc., that called them. So, if you have a custom enemy that works with delays, but you want to prevent those delays from happening if the enemy is killed, you can put “cancel my delays” in the “defeated” command prompt of the enemy. |
| seed | | (Number), random | seed = 113 | In programming, a “seed” is a reference point for generating “randomness.” So, if a seed is set to 123, and then 10 random numbers are generated, and then the seed it reset to 123, and ten more random numbers are generated, the first batch of 10 numbers will be the same batch the second time because the seed was the same. Some commands in Platform Builder use randomness, so using them alongside a seed can give more control if you want to repeat random events. Just realize that the sequence of random events may still get out of sync because of other functions which utilize the seed, so don’t expect that the random outcomes will be the same over longer periods of gameplay when you reset the seed. If you want to randomize the seed itself, you can say “seed = random” as a command instead of using a number. |
| graphics | | standard, no outlines, legacy, palette 1, palette 2, [or] palette 3 | graphics = palette 1 | Changes the graphics setting of the game. Note that this will only work on 1x game size, and it is a huge performance hit, so we recommend you only use it during a level transition. Also, this change will be permanent for your game unless you change it again later. The example changes the game graphics to palette 1. |
Below is a full list of all the commands listed above, collected in a single place with a search feature.
| hide character (ID) | (N/A) | (N/A) | hide character 7 | This makes the characters with the chosen ID invisible. This can be useful for cut-scenes where you don’t want to see the character. Keep in mind that the characters can still be controlled unless you disable them using the command “disable characters”. |
|---|---|---|---|---|
| unhide character (ID) | (N/A) | (N/A) | unhide character 3 | This makes the character with the chosen ID visible after it was previously hidden. The example unhides the character with an ID of 3. |
| character (ID) animate, character (ID) animation | (Any) | (Number) | character 6 animate = 7 | Changes the animation speed of the character with the chosen ID. 0 is no animation, and 12 the fastest animation (Similar to animation settings in Game Setup for enemies, items, etc.). This will force a different animation speed from what automatically happens, and you can reset the animation speed to automatic with the command “character (ID) animate = reset”. The example causes the character with an ID of 6 to animate at a medium speed. |
| player (1 or 2) animate, player (1 or 2) animation | (Any) | (Number) | player 2 animate = 1 | Changes the animation speed of player 1 or 2. 0 is no animation, and 12 the fastest animation (Similar to animation settings in Game Setup for enemies, items, etc.). This will force a different animation speed from what automatically happens, and you can reset the animation speed to automatic with the command “player (ID) animate = reset”. The example causes the player 2 to freeze its animation. |
| character (ID) animate, character (ID) animation | reset, revert | character 1 animate = reset | If a previous command has been used to change a character animation speed, this command will be needed to reset the animation speed to normal. The example causes the character with an ID of 1 to return back to its normal animation speeds. | |
| player (1 or 2) animate, player (1 or 2) animation | reset, revert | player 1 animation = revert | If a previous command has been used to change a player animation speed, this command will be needed to reset the animation speed to normal. The example causes the player 1 to return back to its normal animation speeds. | |
| character (ID) frame, character (ID) image | (Any) | (Number) | character 4 frame = 2 | Changes the animation frame of the character with the specified ID. This can be useful when the animation speed is 0 and you wish to adjust the frames yourself. The example causes the character with an ID of 4 to change to its second frame. |
| player (1 or 2) frame, player (1 or 2) image | (Any) | (Number) | player 1 image = 4 | Changes the animation frame of the chosen player. This can be useful when the animation speed is 0 and you wish to adjust the frames yourself. The example causes player 1 to change to its fourth frame. |
| character (ID) alpha | (Any) | (Number) | Character 2 alpha = 50 | Changes the transparency for the character with the selected ID. The number should be between 0 (invisible) and 100 (fully visible). The example changes the item with an ID of 2 to an alpha value of 50, which is 50% opaque, or half visible. |
| Player (1 or 2) alpha | (Any) | (Number) | player 1 alpha – 20 | Changes the transparency for player 1 or player 2. The number should be between 0 (invisible) and 100 (fully visible). The example reduces the alpha value of player 1 by 20, making the player less visible. |
| health, hp, hearts | (Any) | (Number) | health + 5 | Changes the health of the character. This only works if the character uses limited health. The example adds five health points to the character. |
| max health, maximum health, max hp, maximum hp, max hearts, maximum hearts | (Any) | (Number) | max health = 5 | Changes the maximum health of the character. The example sets the character’s maximum health to be 5. This setting only works if the character uses limited health. You may also wish to set the character’s health to 5 so that it is maxed out to the new value. |
| lives | (Any) | (Number) | lives = 5 | Changes the lives of the character. This only works if the character uses limited lives. The example makes the character to have five lives. |
| ammo, primary ammo | (Any) | (Number) | primary ammo * 2 | Changes the primary ammo of the character. This would be the ammo for the character’s ranged attack in the character settings, not the ammo of a gun that has been picked up. This only works if the character uses limited ammo. The doubles the character’s primary ammo. |
| max ammo, maximum ammo, max primary ammo, maximum primary ammo | (Any) | (Number) | maximum ammo * 3 | Changes the maximum amount of primary ammo that the character can carry (according to the ranged weapon in the character settings). This setting only works if the character uses limited ammo. The example sets the character’s maximum ammo to triple the original amount. |
| secondary ammo | (Any) | (Number) | secondary ammo / 2 | Changes the character’s secondary ammo. This would be the ammo for a gun that is picked up by the character. This only works if the character is holding an item which uses ammo. The example divides the secondary ammo by 2. |
| money, coins | (Any) | (Number) | coins + 25 | Changes money which can be used to buy things. Note that you will not be able to exceed whatever value the maximum money is set to. The example adds 25 money. |
| max money, maximum money, max coins, maximum coins | (Any) | (Number) | maximum coins * 2 | Changes the maximum amount of money that the characters can hold. The example doubles the size of their wallet. This value can go as high as 99,999. |
| stars | (Any) | (Number) | stars = 99 | Changes the number of stars for the character. The example makes the character to have 99 stars. |
| air, breath | (Any) | (Number in seconds) | air – 3 | Changes the air time of the character while underwater. The command does not do anything if the character has unlimited air or is above water. This only works if the character uses limited air. The example removes 3 seconds from the remaining time that the character can remain underwater. |
| max air, maximum air, max breath, [or] maximum breath | (Any) | (Number in seconds) | max breath = 10 | Changes the maximum amount of seconds that the character can spend underwater before suffocating. This setting only works if the character uses limited air. The example sets the maximum time underwater to 10 seconds. |
| harm | | (Number) | harm = 1 | Harms the character. This only works if the character uses limited health. This works similar to changing the health to a lower value, except the character will also react as if being harmed (flying back a little and being temporarily invulnerable.) The example harm the character one health point. |
| kill player | (Any) | (Optional: 1 or 2) | kill player 2 | Kills the player. You can use “kill player” on its own, or you can include “1” or “2” if you want to specifically kill player 1 or player 2. The example kills player 2. |
| kill character | (Any) | (Character ID) | kill character 3 | Kills the character with the specified character ID. See the bottom of this page for how to find the character ID. |
| super jump | | true, false | super jump = true | Changes the character’s ability to do a super jump. The example allows the character to do super jumps. |
| wall jump, wall slide | | true, false | wall slide = false | Changes the character’s ability to slide and jump off walls. The example makes the character unable to slide and jump off walls. |
| hover [or] float | | true, false | hover = true | Changes the character’s ability to hover. The example allows the character to hover. |
| glide | | true, false | glide = false | Changes the character’s ability to glide. The example makes the character unable to glide. |
| pound, ground pound | | true, false | pound | Changes the character’s ability to do a ground pound. The example allows the character to do ground pounds. (As with all of the other examples, leaving out the operator and value will simply enable the move. So, entering “= true” is only optional.) |
| double jump | | true, false | double jump = false | Changes the character’s ability to do a double jump. The example makes the character unable to do double jumps. |
| climb | | true, false | climb = true | Changes the character’s ability to climb ladders. The example allows the character to climb ladders. |
| hang | | true, false | HaNg = FaLsE | Changes the character’s ability to hang from bars. The example makes the character unable to hang from bars. (The command prompt is not case-sensitive, so capital letters will make no difference to the result of your commands.) |
| duck | | true, false | duck = 1 | Changes the character’s ability to duck. The example allows the character to duck. (1 is an alternative for “true” for the value of a command prompt.) |
| defend | | true, false | defend = 0 | Changes the character’s ability to defend. The example makes the character unable to defend. (0 is an alternative for “false” for the value of a command prompt.) |
| stomp attack | | true, false | stomp attack = true | Changes the character’s ability to attack by jumping on enemies. The example allows the character to attack by jumping on enemies. |
| stand attack | | true, false | stand attack = false | Changes the character’s ability to attack while standing. The example makes the character unable to attack in this way. |
| move attack, walk attack, run attack | | true, false | walk attack = true | Changes the character’s ability to attack while walking or running. The example allows the character to attack in this way. |
| jump attack | | true, false | jump attack = false | Changes the character’s ability to attack while jumping. The example makes the character unable to attack in this way. |
| ground style | | standard, athletic, runner a, runner b, custom | ground style = custom | Changes the character’s ground movement style. The example causes the character to use custom ground movements. In this case, you may want to pre-set the sliders in your character physics settings, because the default positions are the same as athletic movement. |
| swim style | | standard, top down, float, sink, drown, die | swim style = drown | Changes the character’s swim style. The example causes the character to drown in water. (That is, the character will die if the head is submerged.) |
| wall jump style | | standard, scaling | wall jump style = scaling | Changing the character’s wall jump style. Standard wall jumps are the default style where the character kicks off walls and cannot return to the original wall. With scaling, the character can return back to the same wall and continue jumping off of it. This allows the character to “climb” up the wall. The example sets the wall jump style to scaling. |
| jump higher, higher jump | (N/A) | (N/A) | jump higher | Increases the character jump delay, as if the character picked up a special jump item. |
| fly | | standard, top down, mid air jumps, none | fly = top down | Changes the character’s fly settings. The example causes the character to be able to fly using top-down movements. Use “fly = none” to disable flight. |
| max speed, maximum speed, speed | (Any) | (Number) | speed = 50 | Changes the character’s maximum speed. The example sets the maximum speed to 50, which is half way |
| acceleration, accel | (Any) | (Number) | accel + 15 | Changes the character’s acceleration. The example adds 15 to the character acceleration, bringing the value 15% closer to the maximum. |
| ground traction, traction | (Any) | (Number) | ground traction * 2 | Changes the character’s ground traction. The example doubles the value of the character ground traction. |
| cooldown | (Any) | (Number) | cooldown = 9 | Changes how quickly the character returns to a standing position after the left and right arrow keys are released. The example sets cooldown to 9, which is the default position. |
| jump power, standard jump power | (Any) | (Number) | jump power = 100 | Changes the character’s jump power. The example sets the character’s jump power to the maximum amount. |
| double jump power | (Any) | (Number) | double jump power = 50 | Changes the power of a second of jump in a double jump of the character. The example sets the character’s double jump power to 50% of the maximum amount. |
| wall jump power | (Any) | (Number) | wall jump power = 0 | Changes the character’s jump power when jumping off walls. The example causes the character to have the minimum jump power off walls. They will be very lousy wall jumps! |
| jump off enemy power, enemy jump power | (Any) | (Number) | jump off enemy / 2 | Changes the character’s jump power when jumping off of an enemy. The example cuts the current enemy jump power in half. |
| jump delay, standard jump delay | (Any) | (Number in .02 seconds) | jump delay – 25 | Changes the jump delay of the character for all jumps except the super jump. The example removes half a second from the character’s jump delay. It would be like moving the slider 25% of the way to the left. |
| super jump delay | (Any) | (Number in .02 seconds) | super jump delay + 50 | Changes the character’s jump delay when doing a super jump. The example adds 1 second to the character’s super jump delay. This would be like moving the slider 50% of the way to the right. |
| gravity | (Any) | (Number) | gravity = 75 | Changes the character’s falling gravity. In this example the character’s gravity is set to 75, which is 75% the maximum gravity. |
| ledge tolerance | (Any) | (Number) | ledge tolerance = 5 | Changes the character’s ledge tolerance. Also known as “coyote time,” this is a number of steps after falling off a ledge where the character is still able to jump. Normally this number would stay at 0 or be very small. The example sets the ledge tolerance to 5, which is 5 frames/steps of the game. |
| jump anticipation | (Any) | (Number) | jump anticipation = 4 | Changes the character’s jump anticipation. When the character is in the air and you press the jump button, the character normally won’t jump. But if you are falling and close enough to the ground, the jump anticipation can cause the character to jump again. The number is the number of frames/steps between pressing the jump key and landing that the jump key will still respond. Normally this number would stay at 0 or be very small. The example sets the jump anticipation to 4. |
| fall speed, max fall speed, maximum fall speed | (Any) | (Number) | maxfallspeed=10 | Changes the character’s maximum falling speed. In this example, the maximum falling speed is set to 10, which is quite slow. (The command prompt is not space-sensitive, so this would still work.) |
| hover time | (Any) | (Number in .1 seconds) | hover time * 2 | Changes the number of seconds that the character can hover. This example doubles the character’s hover time. The maximum hover time is 10 seconds. If you wish to hover forever, try using glide instead and set the glideability to 100. |
| glideability, glidability, glide-ability, glide time | (Any) | (Number) | glideability + 300 | Changes how strong the character’s gliding abilities are. The example adds 300 to the character’s glideability. Since all physics are maxed out at 100, the character glideability will become 100. This value causes the character to glide as though hovering. |
| wall traction | (Any) | (Number) | WALL TRACTION = 100 | Changes the character’s wall traction. The example causes the character to have maximum wall traction, which will make the character stick to walls without sliding at all. (The command prompt is not case-sensitive, so this will work fine) |
| climb speed | (Any) | (Number) | climb speed / 2 | Changes the character’s climb speed. The example cuts the character’s climb speed value in half. |
| hang speed, bar speed | (Any) | (Number) | hang speed + 5 | Changes the character’s speed when hanging on bars. The example adds 5 to the total speed value. |
| max swim speed, maximum swim speed, swim max speed, swim maximum speed | (Any) | (Number) | max swim speed * 2 | Changes the maximum speed that the character can swim. The example doubles the maximum swim speed for the character. |
| swim acceleration, swim accel | (Any) | (Number) | swim acceleration = 50 | Changes the swim acceleration for the character. The example causes the swim acceleration to become 50. |
| swim traction | (Any) | (Number) | swim traction = 12 | Changes the swim traction for the character. The example causes the swim traction to become 12. |
| max fly speed, maximum fly speed, fly max speed, fly maximum speed | (Any) | (Number) | fly speed = 90 | Changes the maximum fly speed for the character. The example causes the maximum fly speed to be 90. |
| fly acceleration, fly accel | (Any) | (Number) | fly accel – 40 | Changes the fly acceleration for the character. The example causes the character fly acceleration speed to go down by 40. |
| fly traction | (Any) | (Number) | fly traction /3 | Changes the fly traction for the character. The example causes the fly traction to become one third of its current value. |
| vertical knockback | (Any) | (Number) | vertical knockback = 20 | Changes the vertical power when the character is knocked back after taking damage. A higher knockback will cause the character to fly higher into the air. The example changes the vertical knockback to 20. |
| horizontal knockback | (Any) | (Number) | horizontal knockback + 5 | Changes the horizontal power when the character is knocked back after taking damage. A higher knockback will cause the character to fly farther to the left or right. The examples adds 5 to the horizontal knockback. |
| knockback recovery | (Any) | (Number) | knockback recovery = 10 | Changes the amount of time that the character controls are temporarily disabled after taking damage. This is usually not long, but long enough for the knockback effect to take place. The example sets the knockback recovery to 10. |
| damage recovery | (Any) | (Number) | damage recovery = 25 | Changes the amount of time that the character flash and be invincible after taking damage. The example sets the damage recovery to 25. |
| design, change design, designer, change designer, sprite, character sprite, char sprite, change character sprite, change char sprite | | (Designer ID) | character sprite = 3 | Changes the designer of a character. The example changes the character design to the design with an ID of 3. See the bottom of this page for how to find the design ID. |
| melee sprite, char melee sprite, character melee sprite, change char melee sprite, change character melee sprite | | (Designer ID) | melee sprite = 2 | Changes the melee sprite of the character using a designer ID of your choice. The example changes the character melee sprite to the melee sprite of the designer with an ID of 2. |
| ranged sprite, char ranged sprite, character ranged sprite, change char ranged sprite, change character ranged sprite | | (Designer ID) | char ranged sprite = 1 | Changes the ranged sprite of the character using a designer ID of your choice. Using “range” instead of “ranged” in your commands will also work. The example changes the character ranged sprite to the ranged sprite of the designer with an ID of 1. |
| char sprite revert, character sprite revert | | (Sprite ID) | char sprite revert = 4 | Changes the character sprite to a sprite of the chosen Sprite ID. After the animation of that sprite has ended, the character will revert back to its normal sprites. The example changes the character sprite to a sprite ID of 4 until the animation of sprite ID 4 ends. |
| char sprite repeat, character sprite repeat | | (Sprite ID) | character sprite repeat = 2 | Changes the character sprite to a sprite of the chosen Sprite ID. The animation of the sprite will continually loop until you call a different command (reset character sprite) to return the character to its normal sprites. The example does for the uploaded sprite with an ID of 2. |
| char sprite hold, character sprite hold | | (Sprite ID) | char sprite hold = 8 | Changes the character sprite to a sprite of the chosen Sprite ID. When the animation of the sprite ends, it will remain on the final frame until you call a different command (reset character sprite) to return the character to its normal sprites. The examples does this for the character using the sprite with the ID of 8. |
| reset char sprite, reset character sprite, revert char sprite, revert character sprite | (N/A) | (N/A) | reset char sprite | If you are using any commands which change the character to a chosen Sprite (see the above commands), this will return the character back to its normal sprites. |
| character, char, change char, change character | | (Character ID) | change character = 2 | Changes the character to the specified ID. The example changes the character to the character with an ID of 2. |
| spawn player, create player, move player | | (1 or 2, then a comma, then the spawn ID) | create player 1, newSpot | Moves the specified player over an invisible spawn block that is within the view or close nearby with the specified Spawn ID. The top of the player will be positioned at the top of the spawn block, so make sure that your spawn block is lifted above the ground a little. Note that this does not create multiple players; it only move the player, and the player must already exist. The example moves player 1 to the spawn block with the Spawn ID of “newSpot” |
| stand attack style | | (any of the attack styles under character settings) | stand attack style = front | Changes the character’s stand attack style. The example makes the character to attack in front. |
| stand attack type | | (any of the attack types under character settings) | stand attack type = ice | Changes the character’s stand attack type. The example makes the character’s stand attack to be an ice type. |
| stand attack moment | | (number), always | stand attack moment = 3 | Changes the moment of the character’s stand attack. The example makes the attack to happen on the third frame of the character’s standing attack animation. |
| move attack style | | (any of the attack styles under character settings) | move attack style = melee | Changes the character’s move attack style. The example makes the character’s move attack to use a melee weapon. |
| move attack type | | (any of the attack types under character settings) | moveattacktype = light | Changes the character’s move attack type. The example makes the character’s move attack to be a light type. Light attacks also brighten up a dark area. (The command prompt is not space-sensitive, so this should work fine.) |
| move attack moment | | (number), always | move attack moment = always | Changes the moment of the character’s move attack. The example makes the attack to continually happen for every frame of the character’s move attack animation. |
| jump attack style | | (any of the attack styles under character settings) | jump attack style = long propel | Changes the character’s jump attack style. The example makes the character to propel forward when doing a jump attack. |
| jump attack type | | (any of the attack types under character settings) | jump attack type = electric | Changes the character’s jump attack type. The example makes the character’s jump attack to be an electric type. |
| jump attack moment | | (number), always | jump attack moment = 1 | Changes the moment of the character’s jump attack. The example makes the attack to happen on the first frame of the character’s jumping attack animation. |
| projectile | | (Projectile ID) | projectile = 3 | Changes the projectile that the character uses in the character projectile settings. See the bottom of this page for how to find the projectile ID. |
| projectile freq, projectile frequency | | standard, semi auto, auto, automatic. | projectile freq = automatic | Changes the frequency of the character’s projectile attack in character settings. Note: “auto” and “automatic” are the same. The example changes the character’s projectile attack to be automatic. |
| projectile dir | | facing, approximate enemy, exact enemy, select, cursor, user direction | projectile dir = cursor | Changes the projection direction for the character according to how they appear in the character direction settings. If you go to the settings and right-click on the projectile direction, you can learn more about how each style works. The example causes the character to fire projectiles in the direction of the mouse cursor. |
| projectile dir up, projectile dir up right, projectile dir right, projectile dir down right, projectile dir down, projectile dir down left, projectile dir left, projectile dir up left | | true, false | projectile dir down left = true | When the character projectile settings are set to “select,” then you have additional controls for selecting which direction the character should fire projectiles. There are eight possible directions, and they can each be switched on or off independently of each other (just like in the character projectile settings), but the projectile dir must be set to “select.” The example enables a projectile to fire diagonally down and to the left. (You could also say “projectile dir left down = true” for the same result.) |
| fire x, projectile fire x | (Any) | (Number) | fire x = 5 | Changes the x starting position of where a projectile is fired from the character, either standing or ducking. This position is determined from the center of the character. So in this example, if the character is facing right, then the character’s projectile will fire from 5 pixels right from the center of the character. If the character is facing left, then the projectile will fire 5 pixels left from the center of the character. By default, this number is set to 10. |
| fire y, projectile fire y | (Any) | (Number) | fire y = 10 | Changes the y position of where a projectile is fired from the character while standing. This position is determined from the top of the character. So in this example, the projectile will fire 10 pixels below the top of the character. By default, this number is set to 14. |
| duck fire y, projectile duck fire y | (Any) | (Number) | projectile duck fire y = 18 | Changes the y position of where a projectile is fired from the character while ducking. This position is determined from the top of the character, and should normally be larger than the number while standing, because the character is lower to the ground. So in this example, the projectile will fire 18 pixels below the top of the character. By default, this number is set to 26. |
| character (ID) fire x | (Any) | (Number) | character 3 fire x + 3 | Works like the fire x command, except that you are able to select a specific character ID. This example will increase the fire x position by 12 for the character with an ID of 3. |
| character (ID) fire y | (Any) | (Number) | character 3 fire y + 12 | Works like the fire y command, except that you are able to select a specific character ID. This example will increase the fire y position by 12 for the character with an ID of 3. |
| character (ID) duck fire y | (Any) | (Number) | character 3 fire y + 12 | Works like the duck fire y command, except that you are able to select a specific character ID. This example will increase the ducking fire y position by 12 for the character with an ID of 3. |
| shield, add shield, give shield | (N/A) | (N/A) | shield | Causes the character to have a shield on if the character doesn’t already have one. If you are calling this command from a custom item, it will only work if it is the only command in your command prompt. The example gives the character a shield. To write “shield = true” will also work. |
| invincible, invincibility | (Any) | (Number in seconds) | invincibility + 5 | Changes the time (in seconds) that the character is invincible. If you are calling this command from a custom item, it will only work if it is the only command in your command prompt. If you set this value to 0, then any invincibility (including just after the character is harmed) will be removed. The example causes the character to stay invincible for 5 seconds longer. If the character is not invincible, the example will cause the character to be invincible for five seconds. |
| no hurt, remove hurt, impervious | | true, false | remove hurt = 1 | Causes the character to no longer take damage from enemies. Unlike invincibility, the enemy is not harmed either. This command can also be set to “false” to enable hurting when you are ready to return back. The example removes hurt. (For all true and false values, “true” can be substituted for the numeric 1, and “false” can be substituted for 0.) |
| no slip, ice traction, remove slip | | true, false | ice traction = true | Gives the character the ability to walk on ice without slipping. The commands can be set to “false” to remove the effect, causing the character to slip again. The example removes slip for the character. |
| slip | | true, false | slip | Causes the character to slip on ice. This is the default setting, so this command is not necessary unless it was changed earlier. This command can also be set to “false” to cause the character not to slip on ice. The example does not use an operator or value, so Platform Builder will assume “true.” |
| repel stone, repel stones | (Any) | (Number) | repel stones + 3 | Changes the number of repel stones circling around the character. Repel stones strike nearby enemies and are destroyed in the process. The example adds 3 repel stones to the character. |
| strong repel stone, strong repel stones, tough repel stone, tough repel stones | (Any) | (Number) | strong repel stones = 2 | Changes the number of strong repel stones circling around the character. Strong repel stones are not destroyed when they strike enemies. The example causes the character to have 2 strong repel stones. |
| disable characters, disable players | (N/A) | (N/A) | disable players | Disables the ability for the user of your game to control the characters. This applies to Player 1 and Player 2. This can be useful when working with cut-scenes. |
| disable character | | (Character ID) | disable character = 3 | Disables the character with the specified character ID. The example disables the character with the character ID of 3. See the bottom of this page for how to find the character ID. |
| disable player | | 1, 2 | disable player 2 | Disables the character assigned to the specified player number. The example disables player 2. (Technically, the operator is only optional. This is usually the case when your only option is the equals sign.) |
| enable characters, enable players | (N/A) | (N/A) | enable characters | Enables the ability for the user of your game to control the characters. This applies to Player 1 and Player 2. Do not forget to enables your characters after you are finished controlling them manually! |
| enable character | | (Character ID) | enable character 3 | Enables the character with the specified character ID. The example disables the character with the character ID of 3. (Technically, the operator is only optional. This is usually the case when your only option is the equals sign.) |
| enable player | | 1, 2 | enable player = 2 | Enables the character assigned to the specified player number. The example enables player 2. |
| character (ID) | | left, right, up, down, [or] stop | character 1 = right | Causes the character of the specified ID to behave as if the specified movement button is being pressed down. The example with cause the character with an ID of 1 to move right, provided that nothing is blocking the character’s path. This will happen continually unless the direction is changed or the character is stopped using the value “stop”. |
| character (ID) | | hard stop | character 1 = hard stop | Causes the character of the specified ID to stop left and right movement instantly without slowing down first. The example causes the character with an ID of 1 to instantly stop. |
| character (ID) | | jump | character 2 = jump | Triggers the character with the specified ID to jump, as if the jump key has been pressed. The example causes the character with and ID of 2 to jump. |
| character (ID) | | jump release, release jump | character 2 = release jump | Triggers the same event that happens when the jump key is released. If the character is moving up in the middle of a jump, this will cause the jump to be shorter. |
| character (ID) | | attack, punch, kick, shoot, fire | character 3 = shoot | This command works as if the attack button has been pressed. Because of this, the actual attack of the character is determined by the character settings. Therefore, all of the different values (attack, punch, shoot, etc.) do the same thing. The example causes the character with an ID of 3 to attack. |
| character (ID) | | pick, pick item, grab, take | character 1 = grab | This command works as if the button was pressed for grabbing pick-up items, such as a gun. The example causes the character with an ID of 1 to attempt to grab something. |
| character (ID) | | place, put, set, drop | character 1 = drop | This command works as if the button was pressed for setting down items that have been picked up. The example causes the character with and ID of 1 to place down an item that has been picked up. |
| character (ID) | | use | character 1 = use | This command works as if the button was pressed for using items that have been picked up. The example causes the character with and ID of 1 to use an item that has been picked up. |
| character (ID) | | face left, face right, turn left, turn right | character 5 = face right | Causes the character to face in the specified direction. The example causes the character with an ID of 5 to face to the right. |
| player (1 or 2) | | (Any of the movement/action commands listed above) | player 2 = pick item | Instead of specifying the character ID, you could choose to specify either player 1 or player 2 instead. The word “character” can be substituted with the word “player” in any of the movement/action commands listed above. The example causes player 2 to attempt to pick up an item by triggering the keyboard key which is used to grab items. |
| seismic pound | | light, medium, strong | seismic pound = light | Creates a seismic pound for the character. This command can also be called from a command prompt in the enemy settings to create a seismic pound from the enemy. |
| character (ID) knockback | (N/A) | (N/A) | character 3 knockback | Simulates a knockback effect like when the character is harmed, but without actually damaging the character. The example causes the character with an ID of 3 to be knocked back. |
| character (ID) x | (Any) | (Number) | character 1 x + 32 | Moves the x-position of your character with the specified ID. See the bottom of this page for how to find the character ID. The example makes the character with an ID of 1 to move 32 pixels to the right, which is the distance of a typical block. Be careful moving the character around; you probably don’t want him/her getting stuck in a wall! |
| character (ID) y | (Any) | (Number) | character 3 y = 0 | Changes the y-position of your character with the specified ID. Moves character 3 vertically to position 0, which is the very top of your room. |
| character (ID) x | | random view, smart random view | character 4 x = random view | This will set the x-position of a character to a randomly-selected new position within the view. Choose “random view” for a completely random position. Choose “smart random view” to find a random position while avoiding solid objects. The example finds a new random x-position for the character with an ID of 4. (It’s y-position will stay the same.) |
| character (ID) y | | random view, smart random view | character 4 y = random view | This will set the y-position of a character to a randomly-selected new position within the view. Choose “random view” for a completely random position. Choose “smart random view” to find a random position while avoiding solid objects. The example finds a new random y-position for the character with an ID of 4. (It’s x-position will stay the same.) |
| character (ID) position | | random view, smart random view | character 3 position = random view | This will set both the x- and y-position of a character to a randomly-selected new position within the view. Choose “random view” for a completely random position. Choose “smart random view” to find a random position while avoiding solid objects. The example finds a new random position for the character with an ID of 3. |
| character (ID) x snap | | (Number) | character 1 x snap = 16 | This will set the x-position of a character to the nearest position on a specified grid size (similar to how your work box by default snaps to a grid when you place things down, except that this works only with the x-value rather than both). The example moves the character with an ID of 1 to the nearest x position divisible by 16. |
| character (ID) y snap | | (Number) | character 1 y snap = 32 | This will set the y-position of a character to the nearest position on a specified grid size (similar to how your work box by default snaps to a grid when you place things down, except that this works only with the y-value rather than both). The example moves the character with an ID of 1 to the nearest y position divisible by 32. |
| character (ID) position snap | | (Number) | character 2 position snap = 48 | This sets both the x- and y-position of a character to the nearest position on a specified grid (similar to how your work box by default snaps to a grid when you place things down). The example moves the character with an ID of 2 to the nearest position on a 48 x 48 grid. |
| player (1 or 2) x | (Any) | (Number) | player 1 x = 0 | Changes the X position of the chosen player. The example moves player 1 horizontally to position 0, which is the far left side of your area. |
| player (1 or 2) y | (Any) | (Number) | player 2 y = [player 1 y] | Changes the Y position of the chosen player. The example causes the Y position of player 2 to be the same Y position as player 1. This is done with the use of bracketing. See below for more information about bracketing things. |
| player (1 or 2) x | | random view, smart random view | player 1 x = random view | This will set the x-position of the chosen player to a randomly-selected new position within the view. Choose “random view” for a completely random position. Choose “smart random view” to find a random position while avoiding solid objects. The example finds a new random x-position for player 1. (It’s y-position will stay the same.) |
| player (1 or 2) y | | random view, smart random view | player 2 y = random view | This will set the y-position of the chosen player to a randomly-selected new position within the view. Choose “random view” for a completely random position. Choose “smart random view” to find a random position while avoiding solid objects. The example finds a new random y-position for player 2. (It’s x-position will stay the same.) |
| player (1 or 2) position | | random view, smart random view | player 1 position = random view | This will set both the x- and y-position of a chosen player to a randomly-selected new position within the view. Choose “random view” for a completely random position. Choose “smart random view” to find a random position while avoiding solid objects. The example finds a new random position for player 1. |
| player (1 or 2) x snap | | (Number) | player 1 x snap = 16 | This will set the x-position of a chosen player to the nearest position on a specified grid size (similar to how your work box by default snaps to a grid when you place things down, except that this works only with the x-value rather than both). The example moves player 1 to the nearest x position divisible by 16. |
| player (1 or 2) y snap | | (Number) | player 1 y snap = 32 | This will set the y-position of a chosen player to the nearest position on a specified grid size (similar to how your work box by default snaps to a grid when you place things down, except that this works only with the y-value rather than both). The example moves player 1 to the nearest y position divisible by 32. |
| player (1 or 2) position snap | | (Number) | player 2 position snap = 48 | This sets both the x- and y-position of a chosen player to the nearest position on a specified grid (similar to how your work box by default snaps to a grid when you place things down). The example moves player 2 to the nearest position on a 48 x 48 grid. |
| fire x, projectile fire x | (Any) | (Number) | fire x = 5 | Changes the x starting position of where a projectile is fired from the character. This position is determined from the center of the character. So in this example, if the character is facing right, then the character’s projectile will fire from 5 pixels right from the center of the character. If the character is facing left, then the projectile will fire 5 pixels left from the center of the character. By default, this number is set to 10. |
| fire y, projectile fire y | (Any) | (Number) | fire y = 10 | Changes the y position of where a projectile is fired from the character while standing. This position is determined from the top of the character. So in this example, the projectile will fire 10 pixels below the top of the character. By default, this number is set to 14. |
| duck fire x, projectile duck fire x | (Any) | (Number) | projectile duck fire x = 18 | Changes the y position of where a projectile is fired from the character while ducking. This position is determined from the top of the character, and should normally be larger than the number while standing. So in this example, the projectile will fire 18 pixels below the top of the character. By default, this number is set to 26. |
| character (ID) fire x, character (ID) fire y, [or] character (ID) duck fire y | (Any) | (Number) | character 3 fire y + 12 | Works like the other fire x and y commands, except that you are able to select a specific character ID. This example will lower the standing fire y position by 12 for the character with an ID of 3. |
| character (ID) looping | | staggered, constant, default | character 7 looping = constant | This changes the looping speed of the looping command prompt for the character with the specified ID. You can choose to have it loop “constant” which would be every frame of the game, or “staggered” which would be 6 times per second (and is easier on the PC). Set this to “default” to make it take on whatever setting you have for looping in general (see the command “loop/loop speed”). The example causes the character with an ID of 7 to run its looping command prompt every frame of the game. |
| player (1 or 2) looping | | staggered, constant, default | player 1 looping = default | This changes the looping speed of the looping command prompt for the chosen player. You can choose to have it loop “constant” which would be every frame of the game, or “staggered” which would be 6 times per second (and is easier on the PC). Set this to “default” to make it take on whatever setting you have for looping in general (see the command “loop/loop speed”). The example causes the player 1 to run its looping command prompt at the same pace as your default looping settings. |
| sfx, sound, sound effect | | (Number from “Item SFX” in item settings) | sfx = 5 | Plays a sound effect from the list of sound effects in custom item settings of Game Setup. If you go to your item settings, you can give the item a sound effect. These sound effects are numbered, and you use the same number here for your value. The example plays sound effect #5, which is the sound of a whistle. |
| sfx | | (Sound effect name from “Sound Effects” of Game Setup) | sfx = P2 Jump | Plays the sound effect with the chosen name from “Sound Effects” of Game Setup. Do not include the sound effect category. For instance, the value of the example is not “Character: P2 Jump.” It is only “P2 Jump.” This example plays the sound effect for when Player 2 jumps. |
| extra sfx, extra sound, extra sound effect, import sfx, import sound, import sound effect | | (ID of uploaded sound effect) | extra sfx = 4 | Plays the sound effect of the specified ID that you have uploaded in game setup. The ID of the sound effect is displayed in your sound effect box when you select it from the manager in Game Setup > Sound Effects. The example plays the uploaded sound effect with an ID of 4. |
| music | | (music name, shown in music selection settings, or “import” with the music ID) | music = happy 4 | Changes the area music to the specified music name. The example plays “Happy 4” which is the Platform Builder theme music. An example for uploaded music would be “music = upload 4”. |
| pause music | (N/A) | (N/A) | pause music | Pauses the music currently playing for the area. |
| stop music, end music, quit music, no music | (N/A) | (N/A) | quit music | Stops the music from playing. Unlike pausing, this will reset the music track to the beginning if you choose to resume it. |
| loop music, looping music | | true, false | | This lets you determine if the music to be played should loop, or if it should stop playing once the track has ended. By fault, music will loop. If you wish to change this, it is important that you call this command before playing the music. The example sets looping music to false, and then plays the music. Once “happy 4” has ended, the music will stop. |
| resume music, unpause music | (N/A) | (N/A) | ReSuME muSIC | If the music was paused, this will resume the music from where it paused. If the music was stopped, this causes the default area music to start playing from the beginning of the music track. The command prompt is not case-sensitive, so the example will not cause any problems. |
| music volume | (Any) | (Number from 0 to 100) | music volume / 2 | Changes the volume of the music that is playing, where 100 is the (default) full volume, and 0 is completely silent. The example turns the music to half its volume. |
| fade out music, music fade out | (N/A) | (N/A) | fade out music | Causes the music to fade out. |
| fade in music, music fade in | (N/A) | (N/A) | music fade in | Causes the music to fade in. |
| background | | (Background name, shown in background selection settings, or “upload” with the background ID) | background = upload 3 | Changes the background image of the area to a background with the given name. The example causes the area to use the uploaded background with an ID of 3. An example for an included background would be “background = forest 2”. |
| background scroll speed | (Any) | (Number between -100 and 100) | background scroll speed = -50 | Sets the scroll speed of the background with 100 as full moving speed, 0 is no speed, and -100 is full speed in reverse. The example causes the background image to scroll at half speed in the backwards direction. |
| background scroll direction | | (Any of the 8 numpad directional numbers, like 2 for down, 9 for up-right, etc.) | background scroll direction = 7 | Sets the scroll direction for a background. The example causes the background to scroll up-left, which is the direction of 7 on a numpad. Note that for backgrounds which do not loop vertically, you can only use 4 or 6 for left and right directions. |
| distance, view distance | | (Number between 1 and 9) | view distance = 3 | Changes the view distance, where 1 is the closest and 9 is the farthest. The example causes the view distance to be 3. This is moderately-close, just a little closer than the default distance of your views. |
| view height, camera height, view size, camera size | (Any) | (Number) | view height -= 1 | Changes the size of the view by specifying the height. Platform Builder always displays in the standard 16×9 aspect aspect ratio, so the view width will adjust accordingly with the new height. Because of this aspect ratio, it is recommended that your view height is divisible by 9, but anything between 9 and 2160 will work. The example shrinks the view height by 1. Were this example running in a looping command with constant looping, it would result in a zoom-in effect. |
| fade out, camera fade out | | (Number in seconds) | fade out = 2.5 | Fades the screen out by the specified number of seconds (or don’t include an operator and value to have it fade at a default speed) The example causes the screen to fade out over the course of 2.5 seconds. |
| fade in, camera fade in | | (Number in seconds) | fade in = 1 | Fade the screen in. You can use this command if you have previously faded the screen out. |
| color, fade color, camera fade color | | black, white, gray, red, blue, yellow, green, orange, purple, brown, (or you can input RGB values separated by commas. ) | | Changes the color used for things like effects and camera fades. The default color is black. You also can use this command after “blackout” or “whiteout” with any color to instantly turn the screen to the selected color. You can also set the color manually with RGB values, separated by commas. The example creates a white spark effect and fades the screen out to a color whose RGB value is 51,117, and 64 (which is a forest green color). |
| blackout, black screen, screen black, black view, view black, black camera, camera black | (N/A) | (N/A) | black screen | Instantly turns the screen black. This command also changes the fade color to black. |
| whiteout, white screen, screen white, white view, view white, white camera, camera white | (N/A) | (N/A) | camera white | Instantly turns the screen white. This command also changes the fade color to white. |
| no fade, remove fade | (N/A) | (N/A) | no fade | Instantly removes any black or white covers over the screen. |
| screen shake, shake screen, view shake, shake view, camera shake, shake camera | (Any) | (Whole number in seconds) | screen shake = 3 | Changes the number of seconds for the screen to shake. If you leave out the operator and value, it will cause the screen to shake for 1/2 second. The example causes the screen to shake for three seconds. You can also use other operators to add or subtract the shake time. |
| shake power | | very light, light, medium, strong, very strong | shake power = medium | Changes the intensity of the screen shake. Default value is light, but you can make the screen shake more violently using this command. The example causes the screen to shake with medium power. |
| follow character, view follow character, camera follow character | (N/A) | (Character ID) | view follow character 1 | Causes the view to follow the character with the specified ID. This command works for players or NPCs. See the bottom of this page for how to find the character ID. |
| follow player, view follow player, camera follow player | (N/A) | 1, 2 | follow player = 2 | Causes the view to follow player 1 or player 2. The example causes the view to follow player 2. The operator in the example is not necessary, but it won’t hurt anything. This is often the case when the only operator to use is “=”. |
| follow characters, view follow characters, follow players, view follow players, camera follow characters, camera follow players | (N/A) | (N/A) | view follow characters | Causes the view to follow both players. Technically, the view follows a point which is exactly between both players. If there is only one player active, then the view will follow that one player. |
| follow npc, view follow npc, camera follow npc | (N/A) | (Character ID of the NPC) | follow NPC 4 | Causes the view to follow an NPC with the ID of the character. This command only works if the NPC is already within the view or closely nearby. The example causes the view to follow the NPC with the character ID of 4. The command prompt is not case-sensitive, so the capital “NPC” will not be a problem. |
| follow item, view follow item, camera follow item | (N/A) | (Item ID) | follow item 2 | Causes the view to follow an item with the specified ID. The example causes the view to follow a custom item with the ID of 2. This command only works if the NPC is already within the view or closely nearby. |
| follow enemy, view follow enemy, camera follow enemy | (N/A) | (Enemy ID) | follow enemy 5 | Causes the view to follow an enemy with the specified ID. The example causes the view to follow a custom enemy with the ID of 5. This command only works if the enemy is already within the view or closely nearby. |
| follow block, view follow block, camera follow block | (N/A) | (Block ID) | follow block 3 | Causes the view to follow a block with the specified ID. Blocks don’t move, but the view will still go to them. The example causes the view to follow a custom block with the ID of 3. This command only works if the block is already within the view or closely nearby. |
| follow sprite, view follow sprite, camera follow sprite | (N/A) | (Sprite ID) | camera follow sprite 1 | Causes the view to follow a sprite with the specified ID. Sprites don’t move, but the view will still go to them. The example causes the view to follow an uploaded sprite with the ID of 1. This command only works if the sprite is already within the view or closely nearby. |
| follow spawn, view follow spawn, camera follow spawn | (N/A) | (Spawn ID of the spawning point to move the view to) | follow spawn, hi | Causes the view to follow an invisible spawn point with the specified spawn ID separated by a comma. Spawn points are invisible blocks which are usually used to create stuff, but you can also move a view to it. The example causes the view to go to a spawn point with the spawn ID of “hi”. This command only works if the spawn point is already within the view or closely nearby. |
| view jump, camera jump | (N/A) | (N/A) | view jump | Causes the view to jump to whatever it may be following. Without this command, the view will pan (move) toward what it is following. This command can be useful to call if you just changed what the view is following, and you want the view to go there right away. |
| view center, camera center | (N/A) | (N/A) | camera center | If your view is following something, then this command will center the view on whatever it is following. The example does just that. |
| travel, view travel, camera travel | | slow, medium, fast, none | travel = medium | Causes the view to travel at the selected speed. The example causes the view to travel at a medium speed. You can also use “none” as a value to cause the view to stop completely. |
| direction, view direction, camera direction | | up, down, left, right | view direction = up | Changes the traveling direction of the view. For this to make any effect, make sure that the view travel speed is slow, medium, or fast. The example causes the travel direction of the view to go up. |
| fixed movement, view fixed movement, camera fixed movement | (N/A) | (N/A) | fixed movement | This gives fixed movement for the view when it is traveling. It will only move in the direction specified. |
| loose movement, view loose movement, camera loose movement | (N/A) | (N/A) | view loose movement | This causes loose movement for the view when it is traveling. For instance, if the view is traveling to the right, it will still follow the vertical position of whatever it is following. |
| stop view, stop camera | (N/A) | (N/A) | stop view | Causes the view to stop moving. This is an alternative to “view travel = none.” You could also do “view follow = none” for the same result. |
| view x, camera x | (Any) | (Number) | view x = 32 | Changes the x position of the view, where 0 is the far left of the area. Keep in mind that you may need to disable whatever the view is following for this to properly work. The example sets the view to 32, which is one block’s width from the very left side of the area. |
| view y, camera y | (Any) | (Number) | view y -= 500 | Changes the y position of the view, where 0 is the top of the area, and 7899 is the bottom of the area. Keep in mind that you may need to disable whatever the view is following for this to work properly. The example sets moves the view up 500 pixels. |
| rain | | true, false | rain = true | Changes the rain setting of the area. The example causes rain to start falling in the area. |
| snow | | true, false | snow = false | Changes the snow setting of the area. The example causes snow to stop falling in the area. |
| storm, thunder, lightning | | true, false | thunder = true | Changes the storm setting of the area. The example causes the area to behave like a storm, with flashing of lightning and thunder sounds. |
| lighting, dark, darkness | | true, false | lighting = false | Toggles the lighting settings of the area. The example turns off lighting. |
| hazardous, hazard | | true, false | hazardous = true | Changes the hazard setting of the area. The example causes the area to use hazardous settings (The character will slowly take damage). |
| bonus | | true, false | bonus = false | Changes the bonus setting of the area. The example causes the bonus setting to be turned off. |
| free restarts | | true, false | free restarts | Changes whether or not you can exit an area without spending a life. The example makes this possible. It can be useful for casual games or bonus areas. |
| endless pit | | true, false | Endless PIT = False | Changes whether the bottom of the area functions as an endless pit. (The command prompt is not case-sensitive, so capital letters will make no difference to the result of your commands.) |
| enable time, enable time limit | | true, false | enable time = true | Changes where or not the area has a time limit. The example makes the area to have a time limit. |
| disable time, disable time limit | | true, false | disable time = false | An alternative to the command “enable time” except that it is opposite language. The example makes false the disabling of time. In other words, it enables the time limit for the area. |
| time | (Any) | (Number in seconds) | time + 60 | Changes the time limit of the area. The example adds 60 seconds to the time limit of the area. |
| setting | | land, underwater | setting = underwater | Changes the setting of the area between land or underwater. The example makes the area behave like everything is underwater. |
| gravity | | normal, low, very low | gravity = low | Changes the gravity of the area. Lower gravity means that things jump higher and fall slower. |
| wind | | light left, strong left, light right, strong right, none | wind = light right | Changes the wind setting of the area. The example causes the area to have a wind lightly pushing the character to the right. |
| area speed | (Any) | (Number) | area speed = 2 | Changes the target fps (frames per second) which the game will attempt to run at for the area. The default fps is 30. Anything higher than that will make the game faster, and anything lower than that will make the game go slower. Keep in mind that a faster fps means the computer has to think faster, which might be difficult for older computers. The example causes the game to run at only 2 frames per second, which is extremely slow. However, this speed can be useful when you are running tests to fine-tune a cut-scene. |
| area looping | | staggered, constant, default | area looping = constant | This changes the looping speed of the looping command prompt in your area settings. You can choose to have it loop “constant” which would be every frame of the game, or “staggered” which would be 6 times per second (and is easier on the PC). Set this to “default” to make it take on whatever setting you have for looping in general (see the command “loop/loop speed”). The example causes the current area to run its looping command prompt every frame of the game. |
| every area looping | | staggered, constant, default | every area looping = staggered | This changes the default looping speed of the looping command prompt in your area settings for all areas. You can choose to have it loop “constant” which would be every frame of the game, or “staggered” which would be 6 times per second (and is easier on the PC). Set this to “default” to make it take on whatever setting you have for looping in general (see the command “loop/loop speed”). The example causes every area looping command prompt to default with staggered looping speed. |
| area, change area | | (Area ID, then a comma, then the Spawn ID) | area = 3, Start1 | Changes the current area to the area with the specified ID, and creates the character at the specified Spawn ID. These two values must be separated by a comma. The area ID can be found by visiting the area settings of your desired area and hovering your mouse over the small button at the top which says “ID.” See below for more details. The example changes the area to the area with an ID of 3, and the the character will start at the Spawn ID “Start1”. |
| world, change world | | (Area ID, then a comma, then the Spawn ID) | world = 2, 1 | Goes to the overworld with the specified ID, starting at the character with the specified Spawn ID. If you wish to change the world after completing the course, see the commands below. The example causes the game to go to the world with the ID of 2, starting with the character of the Spawn ID of “1”. |
| complete course, finish course | (If not using overworlds. Optional if using overworlds.) | (new Area ID if not using overworlds. Optional comma then new World ID if using overworlds.) | complete course = 2, 1 | Completes the course. If you are not using overworlds, then you must also specify the new area and spawn ID. If you are using overworlds, then the operator and values are only needed if you plan to change the overworld. These two values must be separated by a comma. The area ID can be found by visiting the area settings of your desired area and hovering your mouse over the small button at the top which says “ID.” See below for more details. The example works differently depending if you are using overworlds. If you are using overworlds, it completes the course and changes to the overworld with an ID of 2, starting with the character of a spawn ID of “1”. If you are not using overworlds, the example completes the overworld and changes the area to the area with an ID of 2 and creates the character with the Spawn ID of “1”. |
| secret exit | (If not using overworlds) | (new Area ID if not using overworlds. Optional new World ID if using overworlds. Then a comma and the Spawn ID of new area if not using overworlds. Optional Spawn ID of new world if changing overworlds) | secret exit | Completes the course with the secret exit. The operator and values work the same for the previous command. The example completes the course with a secret exit for a games that uses overworlds. |
| instant complete course, instant finish course | (If not using overworlds) | (If you are using overworlds you can keep this blank and you will return to overworld. But you can also specify a new world ID followed by a command and then a new spawn ID if you want to change the overworld. If you are not using overworlds, you will need to specify a new area ID and a spawn ID.) | instant complete course | Works similar to the “complete course” command, but the transition is instant. There is no music or character victory animation. The example instantly completes the course. The example retuns you to the overworld. If you are not using overworlds, then you will need to say something such as “instant complete course = 4, spawn” so that Platform Builder knows the ID of the new area and the spawn ID to use in that new area. |
| instant secret exit | (If not using overworlds) | (new Area ID if not using overworlds. Optional new World ID if using overworlds. Then a comma and Spawn ID of new area if not using overworlds. Optional Spawn ID of new world if changing overworlds) | instant secret exit | Works similar to the “secret exit” command, but the transition is instant. The example completes the course and instantly returns to the overworld to activate the secret exit. |
| current world, current overworld | | (World ID) | current world = 5 | In games which used overworlds, this changes the world that the character will return to after completing the course. The example will cause the character to go to the overworld with the ID of 5 after completing the course. |
| complete game, finish game, win game, victory screen | (N/A) | (N/A) | complete game | This command causes the game to be completed, and goes to the victory screen. |
| game over, lose game, game over screen | (N/A) | (N/A) | lose game | This commands triggers a “game over” and goes to the game over screen. |
| title screen, main menu | (N/A) | (N/A) | title screen | This command takes you back to the title screen of your game. |
| splash screen | (N/A) | (N/A) | splash screen | This command takes you to the splash screen of your game. |
| enemy (ID) | | left, right, up, down, run down, stop | enemy 5 = stop | Causes the enemy with the specified ID to move in the specified way. The enemy will continually move in the specified direction until the direction is changed or the value “stop” is called. (You can adjust the speed with the enemy speed command.) Any value that includes “up” or “down” is only valid for flying enemies. You can also cause a flying enemy to move diagonally by using two directions in the value. (E.g., “Enemy 5 = up right”) The example causes the enemy with the ID of 5 to stop moving in any direction. See the bottom of this page for how to find the enemy ID. |
| enemy (ID) | | jump low, jump medium, jump high | enemy 2 jump low | Causes the enemy with the specified ID to jump with the specified height. This command will work even if the enemy is not touching the ground. The example will cause the enemy with the ID of 2 to make a small “low” jump. |
| enemy (ID) | | face left, face right, turn left, turn right | enemy 3 = face right | Causes the enemy with the specified ID to face in the chosen direction. The example causes the enemy with the ID of 3 to face right. |
| enemy (ID) | | projectile, fire, fire projectile | enemy 1 = fire | Causes the enemy with the specified ID to fire a projectile according to its projectile settings. This will work even if you have made the enemy to stop firing projectiles (see below). The different values all do the same thing. The example causes the enemy with an ID of 1 to fire a projectile. |
| enemy (ID) | | stop projectile, stop fire, cease fire | enemy 1 = stop projectile | Causes the enemy to stop firing projectiles according to its projectile settings. |
| enemy (ID) | | resume projectile, resume fire | enemy 1 = resume fire | Causes the enemy to resume firing projectiles according to its projectile settings. |
| enemy (ID) | | move | enemy 5 = move | Causes the enemy with the specified ID to resume its normal movements as if it were just created, according to the enemy’s settings. This is useful when you are done forcing the enemy to move in a particular direction for things like cutscenes. The example causes the enemy with the ID of 5 to resume normal movements. |
| enemy (ID) | | continue | enemy 5 = continue | Works similar to the “enemy move” command, but instead of resetting the enemy as if it were just created, this removes and forced movement controls and releases the enemy to continue on in whatever direction it was going. |
| enemy (ID) | | face | enemy 3 = face | Causes the enemy with the specified ID to resume its normal facing settings, according to the enemy’s settings. This is useful when you are done forcing the enemy to face a certain way for things like cutscenes. The example causes the enemy with the ID of 3 to resume normal facing settings. |
| create enemy, spawn enemy | (N/A) | (Enemy ID, then a comma, then Spawn ID of the spawning point to create the enemy from) | spawn enemy 3, player 1 | Creates a custom enemy with the specified ID at every spawning point with the specified Spawn ID. (See also the alternative spawn locations in the notes of the command “create item” above.) These two values must be separated by a comma. The example creates an enemy with the ID of 3 over player 1. |
| change enemy | (N/A) | (Enemy ID to change, then a comma, then New Enemy ID) | change enemy 1, 58 | Changes custom enemies with the specified ID to a different enemy. This only works with enemies that are nearby. The example changes enemies with the ID of 1 to enemies with the ID of 58. |
| remove enemy, delete enemy, clear enemy | (N/A) | (Enemy ID) | clear enemy 1 | Removes custom enemies with the specified ID. This only works with enemies that are nearby. The example removes enemies with the ID of 1. |
| kill enemy, destroy enemy | (N/A) | (Enemy ID) | kill enemy 13 | Causes custom enemies with the specified ID to be automatically killed. This means that any destroy animation and settings will happen for the enemy. This only works with enemies that are nearby. The example destroys enemies with the ID of 13. |
| harm enemy | (N/A) | (Enemy ID) | harm enemy 9 | Causes custom enemies with the specified ID to be automatically harmed, or killed if they have only 1 health point. This only works with enemies that are nearby. The example causes enemies with the ID of 9 to be harmed. |
| enemy | | item (ID), enemy (ID), block (ID), npc (ID), projectile (ID), sprite (ID) | enemy 5 = item 2 | Changes the enemy into an item, block, NPC, etc. with the specified ID. The Example causes enemies with an ID of 5 to transform into the item with an ID of 2. |
| enemy (ID) sprite, change enemy (ID) sprite | | (Sprite ID) | enemy 2 sprite = 2 | Changes the sprite for the specified enemy to the uploaded sprite with the specified sprite ID. The example changes the sprite for enemy 3 to sprite 2. |
| enemy (ID) visible | | true, false | enemy 5 visible = false | Makes a custom enemy with the specified ID to become visible or invisible. Note that the enemy is still active and can harm the character while invisible. The example causes the enemy with an ID of 5 to become invisible. |
| for other/with other | (N/A) | (N/A) | for other | Some commands prompts in Platform Builder involve the interaction of two things. For example, custom enemies have a command prompt for “touching character.” While commands in that command prompt will apply to the enemy by default, you can use “for other” to make commands apply to the “other” thing involved (in the case, the character it touches.) Other command prompts which can use “with other” would commands for characters, enemies, or projectiles attacking something else, or when they are harmed or defeated by something else, and the “step on” and “triggered” and “destroyed,” commands for custom blocks. |
| for self/with self | (N/A) | (N/A) | with self | This causes commands to be applied to whatever is calling the command. This is true by default, but if you change this with a with/for command, you can change it back using this command. |
| enemy (ID) alpha | (Any) | (Number) | enemy 23 alpha = 75 | Changes the transparency of an enemy with the chosen ID. The number should be between 0 (invisible) and 100 (fully visible). The example changes the enemy with an ID of 23 to an alpha value of 75, which is mostly visible. |
| enemy (ID) | | ignore environment, use environment | enemy 5 = ignore environment | Causes the custom enemy of the specified ID to ignore its environment or start using it again. When a custom enemy is ignoring its environment, then it will ignore all interactions with character, projectiles, other enemies, and explosions. But it will still interact with walls and floors. The example causes the enemy with an ID of 5 to ignore its environment. |
| enemy (ID) visible to projectiles | (N/A) | (N/A) | enemy 3 = visible to projectiles | Causes a custom enemy with the chosen ID to be “visible” to projectiles. In other words, homing projectiles will be able to see this enemy, as well as settings like “approximate enemy” for projectile directions. This is already enabled by default. |
| enemy (ID) invisible to projectiles | (N/A) | (N/A) | enemy 3 = invisible to projectiles | Causes a custom enemy with the chosen ID to be “invisible” to projectiles. In other words, homing projectiles will not be able to see this enemy, as well as settings like “approximate enemy” for projectile directions. |
| activate boss, activate bosses | (N/A) | (N/A) | activate bosses | You can use this command to activate any bosses in the view. You will need to call this command if your boss’s start distance is set to “none.” |
| enemy (ID) looping | | staggered, constant, default | enemy 7 looping = constant | This changes the looping speed of the looping command prompt for the enemy with the specified ID. You can choose to have it loop “constant” which would be every frame of the game, or “staggered” which would be 6 times per second (and is easier on the PC). Set this to “default” to make it take on whatever setting you have for looping in general (see the command “loop/loop speed”). The example causes the enemy with an ID of 7 to run its looping command prompt every frame of the game. |
| enemy (ID) face | | left, right, player, travel dir | enemy 5 face = player | Enemy face commands for left and right have already existed in previous versions of PB, but now you have all of the options available. |
| enemy (ID) animation, enemy (ID) animate | | (Number between 0 and 12) | enemy 2 animation = 6 | Changes the enemy animation speed. The example sets the animation speed for enemies with an ID of 2 to 6. |
| enemy (ID) death | | none, fall, fade, pop, fireball, explode, detonate, crumble | enemy 3 death = crumble | Changes the animation that the enemy of the specified ID will use when defeated. The examples causes the enemy with an ID of 3 to crumble when it is destroyed. |
| enemy (ID) health bar | | true, false | enemy 1 health bar = true | Toggles the display of the health bar above the enemy of the specified ID. The example causes the enemy with an ID of 1 to show its health bar. |
| enemy (ID) primary projectile | | (Projectile ID), none | enemy 5 primary projectile = 6 | Changes the primary projectile to be fired by the enemy with the specified ID. This can also be set to “none” to have the enemy not use a projectile. The examples causes the enemy with an ID of 5 to start using the projectile with an ID of 6 for firing. |
| enemy (ID) secondary projectile | | (Projectile ID), none | enemy 5 secondary projectile = 7 | Changes the secondary projectile to be fired by the enemy with the specified ID. This can also be set to “none” to have the enemy not use a secondary projectile. The examples causes the enemy with an ID of 5 to start using the projectile with an ID of 7 for firing. |
| enemy (ID) primary projectile frequency | | slow, medium, fast, very fast | enemy 2 primary projectile frequency = slow | Changes the firing speed for the primary projectile of the enemy with the specified ID. The example causes the enemy with an ID of 2 to fire its primary projectile at a slow speed. (Note: due to the complex nature of secondary projectile frequencies, there is no equivalent command for the secondary projectile at this time. But this can still be manually controlled using other commands.) |
| enemy (ID) primary projectile dir, enemy (ID) primary projectile direction | | facing, approximate character, exact character, select | enemy 3 primary projectile dir = select | Changes the direction to fire the primary projectile for the enemy of the specified ID. The example sets the direction to “select,” i.e., it causes the enemy to fire projectiles in the direction(s) selected from the enemy settings in game setup. |
| enemy (ID) secondary projectile dir, enemy (ID) primary projectile direction | | facing, approximate character, exact character, select | enemy 3 secondary projectile dir = exact character | Changes the direction to fire the secondary projectile for the enemy of the specified ID. The example sets the direction to “exact character,” i.e., it causes the enemy with an ID of 3 to fire in the precise direction of the nearest character. |
| enemy (ID) seismic pound | | none, light, medium, strong | enemy 4 seismic pound = light | Changes the seismic pound settings for the enemy of the specified ID. The example causes the enemy with an ID of 4 to have a light seismic pound whenever it lands on the ground. |
| enemy (ID) | | move across ground, follow player, avoid player, short movements, simple random movement, moderate random movement, crazy random movement | enemy 1 = avoid player | Changes the movement style for a land-type enemy of the specified ID. The example causes the enemy with an ID of 1 to avoid the player. This will only work if the enemy is a land type. |
| enemy (ID) | | follow character x, follow character y, follow character, avoid character x, avoid character y, avoid character | enemy 2 = follow character x | Changes the movement style for a air-type enemy of the specified ID. The example causes the enemy with an ID of 2 to follow the character’s x position. This will only work if the enemy is an air type. |
| enemy (ID) | | fall off ledges, reverse at ledges | enemy 7 = fall off ledges | Changes what a land-type enemy of the specified ID does when it approaches a ledge. The example causes the enemy with an ID of 7 to fall off ledges. This will only work if the enemy is a land type. |
| enemy (ID) | | reverse at walls, pass through walls | enemy 8 = pass through walls | Changes what an air-type enemy of the specified ID does when it approaches a wall. The example causes the enemy with an ID of 8 to pass through walls. This will only work if the enemy is an air type. |
| enemy (ID) special | | none, jump, bounce, hop | enemy 1 special = hop | Changes jump/bounce/hop movement for a land-type enemy of the specified ID. The example caused the enemy with an ID of 1 to begin hopping around like a frog. This will only work if the enemy is a land type. |
| enemy (ID) style | | low, medium, high, low medium, low high, medium high, random, ledges (for jump only) | enemy 1 style = medium high | Changes the jump/bounce/hop height of a land-type enemy of the specified ID. The example causes the enemy with an ID of 1 to go at a medium height and then a high height (provided that it is a land-type enemy with jump, bounce, or hop enabled). |
| enemy (ID) turning pause | | none, very short, short, medium, long, very long | enemy 5 turning pause = short | Changes the pause time between directional arrows for air-type enemies of the specified ID. The example causes enemies with the ID of 5 to have a short pause between turns. This will only work if the enemy is an air type. |
| enemy (ID) type | | land, air | enemy 3 type = air | Changes the type of an enemy of the specified ID between land or air. The example changes the enemy with an ID of 3 to become an air type. |
| enemy (ID) max hp | (Any) | (Number) | enemy 3 max hp + 1 | Changes the maximum HP of an enemy with the specified ID. The example increases the max HP of the enemy with an ID of 3 by 1. |
| enemy (ID) hp | (Any) | (Number) | enemy 2 hp + 3 | Changes the HP of an enemy with the specified ID. The example increases the HP of the enemy with an ID of 2 by 3 (provided that it does not exceed the enemy’s maximum HP). |
| enemy (ID) frame | (Any) | (Number) | enemy 6 frame = 2 | Changes the animation frame of the enemy with the specified ID. This can be useful when the animation speed is 0 and you wish to adjust the frames yourself. The example causes the enemy with an ID of 6 to change to its second frame. |
| enemy (ID) | | vulnerable to jumps, jump proof | enemy 1 = jump proof | Changes the defense of the enemy with the specified ID when the character jumps on it. The example causes the enemy with an ID of 1 to harm the character when the character tries to jump on it. |
| enemy (ID) weakness | | none, fire, earth, water, ice, wind, electric, poison, darkness, light, other | enemy 3 weakness = wind | Changes the weakness setting of the enemy with the specified ID. The example causes the enemy with an ID of 3 to have a weakness for wind attacks |
| enemy (ID) attack blocks | | true, false | enemy 1 attack blocks = true | Change the “attack blocks” setting of the enemy with the specified ID. The example causes the enemy with an ID of 1 to attack/activate blocks that are vulnerable to enemies. |
| enemy (ID) attack other enemies | | true, false | enemy 2 attack other enemies = false | Changes what happens when the enemy of the specified ID touches another enemy. The example causes the enemy with an ID of 2 to harm enemies that it touches. |
| enemy (ID) harm character | | true, false | enemy 3 harm character = true | Changes what happens to the character when the enemy of the specified ID touches the character. The example causes the enemy with an ID of 3 to not harm characters that it touches. |
| enemy (ID) harmed by character | | true, false | enemy 4 harmed by character = false | Changes what happens to the enemy of the specified ID when it touches the character. The example causes the enemy with an ID of 4 to not be harmed by characters that it touches. |
| enemy (ID) harmed by enemies | | true, false | enemy 5 harmed by enemies = true | Changes what happens to the enemy of the specified ID when it touches other enemies. The example causes the enemy with an ID of 5 to be harmed by other enemies. |
| enemy (ID) speed | (Any) | (Number) | enemy 1 speed = 10 | Changes the speed of the enemy of the specified ID from it’s custom physics setting (between 0 and 100). The example causes the enemy with an ID of 1 to have a speed of 10. |
| enemy (ID) acceleration | (Any) | (Number) | enemy 6 acceleration + 5 | Changes the acceleration of the enemy of the specified ID from it’s custom physics setting (between 0 and 100). The example adds 5 to the acceleration of the enemy with an ID 6. |
| enemy (ID) low jump | (Any) | (Number) | enemy 4 low jump = 30 | Changes the low jump power of the enemy of the specified ID from it’s custom physics setting (between 0 and 100). The example causes the low jump to be 30 for the enemy with an ID of 4. |
| enemy (ID) low jump delay | (Any) | (Number) | enemy 1 low jump delay = 5 | Changes the low jump delay of the enemy of the specified ID from it’s custom physics setting (between 0 and 100). The example causes the low jump delay to be 5 for the enemy with an ID of 1. |
| enemy (ID) medium jump | (Any) | (Number) | enemy 2 medium jump = 60 | Changes the medium jump power of the enemy of the specified ID from it’s custom physics setting (between 0 and 100). The example causes the low jump to be 60 for the enemy with an ID of 2. |
| enemy (ID) medium jump delay | (Any) | (Number) | enemy 8 medium jump delay *= 3 | Changes the medium jump delay of the enemy of the specified ID from it’s custom physics setting (between 0 and 100). The example causes the medium jump delay for the enemy with an ID of 8 to be tripled. |
| enemy (ID) high jump | (Any) | (Number) | enemy 7 high jump – 20 | Changes the high jump power of the enemy of the specified ID from it’s custom physics setting (between 0 and 100). The example removes 20 from the high jump power of the enemy with the ID of 7. |
| enemy (ID) high jump delay | (Any) | (Number) | enemy 4 high jump delay = 15 | Changes the high jump delay of the enemy of the specified ID from it’s custom physics setting (between 0 and 100). The example causes the low jump delay to be 15 for the enemy with an ID of 4. |
| enemy (ID) gravity | (Any) | (Number) | enemy 3 gravity = 12 | Changes the gravity of the enemy of the specified ID from it’s custom physics setting (between 0 and 100). The example causes the gravity to be 12 for the enemy with an ID of 3. |
| enemy (ID) max fall speed | (Any) | (Number) | enemy 6 max fall speed = 75 | Changes the maximum fall speed of the enemy of the specified ID from it’s custom physics setting (between 0 and 100). The example causes the maximum fall speed to be 75 for the enemy with an ID of 6. |
| enemy (ID) vertical knockback | (Any) | (Number) | enemy 3 vertical knockback = 10 | Changes the vertical knockback of the enemy of the specified ID from it’s custom physics setting (between 0 and 100). The example causes the vertical knockback to be 10 for the enemy with an ID of 3. |
| enemy (ID) horizontal knockback | (Any) | (Number) | enemy 9 horizontal knockback /= 2 | Changes the horizontal knockback of the enemy of the specified ID from it’s custom physics setting (between 0 and 100). The example divides in half the horizontal knockback of the enemy with an ID of 9. |
| enemy (ID) knockback recovery | (Any) | (Number) | enemy 2 knockback recovery = 18 | Changes the knockback recovery of the enemy of the specified ID from it’s custom physics setting (between 0 and 100). The example causes the knockback recovery to be 18 for the enemy with an ID of 3. |
| enemy (ID) damage recovery | (Any) | (Number) | enemy 6 damage recovery = 40 | Changes the damage recovery of the enemy of the specified ID from it’s custom physics setting (between 0 and 100). The example causes the damage recovery to be 40 for the enemy with an ID of 6. |
| enemy (ID) invincible hit | | killed, harmed, no difference, do nothing | enemy 1 invincible hit = no difference | Changes what happens when a character with invincibility touches the enemy. The example set the enemy to respond with “no difference” when it is touched by an invincible character. In other words, it will respond as if the character did not have invincibility at all. |
| item (ID) x | (Any) | (Number) | item 6 x -= 5 | Changes the x-position of the item with the specified ID. The example causes item 6 to move left five pixels. |
| item (ID) y | (Any) | (Number) | item 6 y + 5 | Changes the y position of the item with the specified ID. The example causes item 6 to move 5 pixels to down. |
| item (ID) x | | random view, smart random view | item 4 x = random view | This will set the x-position of an item to a randomly-selected new position within the view. Choose “random view” for a completely random position. Choose “smart random view” to find a random position while avoiding solid objects. The example finds a new random x-position for the custom item with an ID of 4. (It’s y-position will stay the same.) |
| item (ID) y | | random view, smart random view | item 4 y = random view | This will set the y-position of an item to a randomly-selected new position within the view. Choose “random view” for a completely random position. Choose “smart random view” to find a random position while avoiding solid objects. The example finds a new random y-position for the custom item with an ID of 4. (It’s x-position will stay the same.) |
| item (ID) position | | random view, smart random view | item 3 position = random view | This will set both the x- and y-position of an item to a randomly-selected new position within the view. Choose “random view” for a completely random position. Choose “smart random view” to find a random position while avoiding solid objects. The example finds a new random position for the custom item with an ID of 3. |
| item (ID) x snap | | (Number) | item 1 x snap = 16 | This will set the x-position of an item to the nearest position on a specified grid size (similar to how your work box by default snaps to a grid when you place things down, except that this works only with the x-value rather than both). The example moves an item with an ID of 1 to the nearest x position divisible by 16. |
| item (ID) y snap | | (Number) | item 1 y snap = 32 | This will set the y-position of an item to the nearest position on a specified grid size (similar to how your work box by default snaps to a grid when you place things down, except that this works only with the y-value rather than both). The example moves an item with an ID of 1 to the nearest y position divisible by 32. |
| item (ID) position snap | | (Number) | item 2 position snap = 48 | This sets both the x- and y-position of an item to the nearest position on a specified grid (similar to how your work box by default snaps to a grid when you place things down). The example moves the item with an ID of 2 to the nearest position on a 48 x 48 grid. |
| create item, spawn item | (N/A) | (Item ID, then a comma, then Spawn ID of the spawning point to create the item from) | create item 4, Spawn 1 | Creates a custom item with the specified ID at every spawning point with the specified Spawn ID. (“player 1” and “player 2” can also be used as spawn points to create over the chosen player, or you can spawn in the middle of the view with “view” or “camera”, or spawn over whatever is running the command with “self”, or spawn over the cursor with “mouse” or “cursor”. To create from the closest spawn block, use “closest spawn” or “nearest spawn”. To create from the farthest spawn block, use “farthest spawn”. To create at a randomly chosen spawn block, use “random spawn”.) These two values must be separated by a comma. The example creates an item with the ID of 4 over the invisible spawning point(s) with the Spawn ID of “Spawn 1”. See the bottom of this page for how to find the item ID. |
| change item | (N/A) | (Item ID to change, then a comma, then New Item ID) | change item 2, 3 | Changes custom items with the specified ID to a different item. This only works with items that are nearby. The example changes items with the ID of 2 to items with the ID of 3. |
| item | | item (ID), enemy (ID), block (ID), npc (ID), projectile (ID), sprite (ID) | item 5 = enemy 2 | Changes the item into an item, block, NPC, etc. with the specified ID. The Example causes items with an ID of 5 to transform into the enemy with an ID of 2. |
| remove item, kill item, destroy item, delete item, clear item | (N/A) | (Item ID) | remove item 6 | Removes custom items with the specified ID. This only works with items that are nearby. The example removes items with the ID of 6. |
| item (ID) sprite, change item (ID) sprite | | (Sprite ID) | item 5 sprite = 1 | Changes the sprite for the specified item to the uploaded sprite with the specified sprite ID. The example changes the sprite for item 5 to sprite 1. |
| item (ID) visible | | true, false | item 7 visible = false | Makes a custom item with the specified ID to become visible or invisible. Note that the item is still active and can still be collected while invisible. The example makes items with an ID of 7 become invisible. |
| item (ID) alpha | (Any) | (Number) | item 5 alpha = 50 | Changes the transparency of an item with the chosen ID. The number should be between 0 (invisible) and 100 (fully visible). The example changes the item with an ID of 5 to an alpha value of 50, which is 50% opaque, or half visible. |
| item (ID) looping | | staggered, constant, default | item 7 looping = constant | This changes the looping speed of the looping command prompt for the item with the specified ID. You can choose to have it loop “constant” which would be every frame of the game, or “staggered” which would be 6 times per second (and is easier on the PC). Set this to “default” to make it take on whatever setting you have for looping in general (see the command “loop/loop speed”). The example causes the item with an ID of 7 to run its looping command prompt every frame of the game. |
| item (ID) gravity | | off, on, levitate | item 6 gravity = on | Changes the gravity for the item with the specified ID. The example turns on gravity for the item with the ID of 6. |
| item (ID) speed | | none, slow, medium, fast | item 4 speed = medium | Changing the moving speed of the item with the specified ID. The example causes the item with an ID of 4 to have a medium speed. |
| item (ID) attract | | none, toward character, away from character | item 2 attract = none | Changes if the item with the specified ID is drawn to or away from the character. The example causes item 2 to not attract or repel from the character. |
| item (ID) points | (Any) | (Number) | item 4 points += 10 | Changes the points awarded when the item is attained. The example increases the current point amount by 5 for item 4. |
| item (ID) animation, item (ID) animate | (Any) | (Number between 0 and 12) | item 1 animation + 3 | Changes the animation speed of the item’s sprite with 0 for no animation, 1 as the slowest animation, and 12 the fastest animation (Similar to animation settings in Game Setup for custom items). The example causes item 1 animation to increase by 3 (or become 12 if the result is greater than 12). |
| item (ID) frame | (Any) | (Number) | item 2 frame = 3 | Changes the animation frame of the item with the specified ID. This can be useful when the animation speed is 0 and you wish to adjust the frames yourself. The example causes the item with an ID of 2 to change to its third frame. |
| item (ID) jump | | none, low, medium, high, low medium, low high, medium high, random | item 2 jump = random | Changes the jump settings for the custom item of the chosen ID. Note that this also turns on gravity for the item if it is not already enabled. The example causes item 2 to jump at random heights. |
| item (ID) bounce | | none, low, medium, high, low medium, low high, medium high, random | item 6 jump = low high | Changes the bounce settings for the custom item of the chosen ID. Note that this also turns on gravity for the item if it is not already enabled. The example causes item 2 to bounce between low and high heights. |
| item (ID) price | (Any) | (Number), free | item 1 price = 30 | When the item is used in a store, you can change the item’s price with this command. If you want to make the item free, then instead of inputing a number, you can use the “=” operator and then put “free.” The example causes item 1 to cost $30. |
| item (ID) apply | | collecting player, both players, player 1, player 2 | item 8 apply = both players | Changes which player the effects of the item apply to after it is received. The example causes item 8 effects to apply to both players after it is received. |
| item (ID) life | (Any) | (Number) seconds | item 5 life – 2 seconds | Changes how long an uncollected item with the chosen ID will remain visible in the area before it disappears. The example causes item 5 to last 2 seconds less than what is currently remaining. If the item already has less than 2 seconds, then it will disappear. |
| item (ID) life | | no limit | item 3 life = no limit | Causes the uncollected item of the chosen ID to not disappear after a period of time in the area. The example causes item 3 to remain in the area indefinitely or until a player collects it. |
| block (ID) x | (Any) | (Number) | block 6 x -= 5 | Changes the x-position of the block with the specified ID. The example causes block 6 to move left five pixels. |
| block (ID) y | (Any) | (Number) | block 6 y + 5 | Changes the y position of the block with the specified ID. The example causes block 6 to move 5 pixels to down. |
| block (ID) x | | random view, smart random view | block 4 x = random view | This will set the x-position of a block to a randomly-selected new position within the view. Choose “random view” for a completely random position. Choose “smart random view” to find a random position while avoiding solid objects. The example finds a new random x-position for the custom block with an ID of 4. (It’s y-position will stay the same.) |
| block (ID) y | | random view, smart random view | block 4 y = random view | This will set the y-position of a block to a randomly-selected new position within the view. Choose “random view” for a completely random position. Choose “smart random view” to find a random position while avoiding solid objects. The example finds a new random y-position for the custom block with an ID of 4. (It’s x-position will stay the same.) |
| block (ID) position | | random view, smart random view | block 3 position = random view | This will set both the x- and y-position of a block to a randomly-selected new position within the view. Choose “random view” for a completely random position. Choose “smart random view” to find a random position while avoiding solid objects. The example finds a new random position for the custom block with an ID of 3. |
| block (ID) x snap | | (Number) | block 1 x snap = 16 | This will set the x-position of a block to the nearest position on a specified grid size (similar to how your work box by default snaps to a grid when you place things down, except that this works only with the x-value rather than both). The example moves the block with an ID of 1 to the nearest x position divisible by 16. |
| block (ID) y snap | | (Number) | block 1 y snap = 32 | This will set the y-position of a block to the nearest position on a specified grid size (similar to how your work box by default snaps to a grid when you place things down, except that this works only with the y-value rather than both). The example moves the block with an ID of 1 to the nearest y position divisible by 32. |
| block (ID) position snap | | (Number) | block 2 position snap = 48 | This sets both the x- and y-position of a block to the nearest position on a specified grid (similar to how your work box by default snaps to a grid when you place things down). The example moves the block with an ID of 2 to the nearest position on a 48 x 48 grid. |
| create block, spawn block | (N/A) | (Block ID, then a comma, then Spawn ID of the spawning point to create the block from) | create block 2, Derp! | Creates a custom block with the specified ID at every spawning point with the specified Spawn ID. (See also the alternative spawn locations in the notes of the command “create item” above.) These two values must be separated by a comma. The example creates an enemy with the ID of 2 over the invisible spawning point(s) with the Spawn ID of “Derp!”. |
| change block | (N/A) | (Block ID to change, then a comma, then New Block ID) | change block 10, 4 | Changes custom block with the specified ID to a different block. This only works with block that are nearby. The example changes block with the ID of 10 to blocks with the ID of 4. |
| block (ID) | | item (ID), enemy (ID), block (ID), npc (ID), projectile (ID), sprite (ID) | block 5 = item 2 | Changes the block into an item, block, NPC, etc. with the specified ID. The Example causes block with an ID of 5 to transform into the item with an ID of 2. |
| remove block, delete block, clear block | (N/A) | (Block ID) | delete block 3 | Removes custom blocks with the specified ID. This only works with blocks that are nearby. The example removes blocks with the ID of 3. |
| kill block, destroy block | (N/A) | (Block ID) | destroy block 4 | Causes custom blocks with the specified ID to be automatically destroyed. This means that any destroy animation and settings will be activated for the block. This only works with blocks that are nearby. The example destroys blocks with the ID of 4. |
| activate block, trigger block | (N/A) | (Block ID) | trigger block 2 | Causes a custom block with the specified ID to be triggered, as if the character bumped it from below. The example triggers a custom block with the ID of 2. |
| block (ID) sprite, change block (ID) sprite | | (Sprite ID) | block 1 sprite = 6 | Changes the sprite for the specified block to the uploaded sprite with the specified sprite ID. The example changes the sprite for block 1 to sprite 6. |
| block (ID) visible | | true, false | block 1 visible = true | Makes a custom block with the specified ID to become visible or invisible. Note that the block is still active and responsive while invisible. The example causes the block with an ID of 1 to become visible. |
| block (ID) alpha | (Any) | (Number) | block 2 alpha = 0 | Changes the transparency of a block with the chosen ID. The number should be between 0 (invisible) and 100 (fully visible). The example changes the block with an ID of 2 to an alpha value of 0, which is completely see-through or invisible. |
| block (ID) looping | | staggered, constant, default | block 7 looping = constant | This changes the looping speed of the looping command prompt for the block with the specified ID. You can choose to have it loop “constant” which would be every frame of the game, or “staggered” which would be 6 times per second (and is easier on the PC). Set this to “default” to make it take on whatever setting you have for looping in general (see the command “loop/loop speed”). The example causes the block with an ID of 7 to run its looping command prompt every frame of the game. |
| block (ID) animation, block (ID) animate | (Any) | (Number between 0 and 12) | block 1 animation + 3 | Changes the animation speed of the block’s sprite with 0 for no animation, 1 as the slowest animation, and 12 the fastest animation (Similar to animation settings in Game Setup for custom blocks). The example causes block 1 animation to increase by 3 (or become 12 if the result is greater than 12). |
| block (ID) frame | (Any) | (Number) | block 2 frame = 3 | Changes the animation frame of the block with the specified ID. This can be useful when the animation speed is 0 and you wish to adjust the frames yourself. The example causes the block with an ID of 2 to change to its third frame. |
| block (ID) destroy | | none, crumble, fall, fade, pop, fireball, explode, detonate | block 2 hit = fade | Changes what happens to the block of the chosen ID when it is destroyed. The example causes block 2 to fade out after it is destroyed. |
| block (ID) destroy top | | no weakness, ground pound, walk over, run over, step on | block 6 destroy top = walk over | Changes the weakness setting for the top of the block with the chosen ID. The example causes block 6 to be destroyed shortly after it is walked over. |
| block (ID) destroy bottom | | no weakness, bump | block 8 destroy bottom = bump | Changes the weakness setting for the bottom of the block with the chosen ID. The example causes block 8 to be destroyed when it is bumped from the bottom. |
| block (ID) destroy defense | (Any) | (Number), [or] invincible | block 8 destroy defense = 2 | Changes the destroy defense of the block with the specified ID. The example sets the destroy defense to 2 for the block with an ID of 8. |
| block (ID) destroy weakness | | none, fire, earth, water, ice, wind, electric, poison, darkness, light, other, enemy, explosion, invincibility | block 1 destroy weakness = explosion | Changes the weakness setting of a block with the chosen ID when attacked from the side. The example causes block 1 to have a weakness to explosions. |
| block (ID) destroy with | | characters, enemies, anyone | block 3 destroy with = anyone | Changes whether characters, enemies, or both can be the cause of destroying the block with the chosen ID according to its various destroy settings on the top, bottom, or sides. The example causes block 3 to be destroyed by either characters or enemies. |
| block (ID) trigger top | | no weakness, ground pound, walk over, run over, step on | block 6 destroy top = walk over | Changes the weakness setting for the top of the block with the chosen ID. The example causes block 6 to be destroyed shortly after it is walked over. |
| block (ID) trigger bottom | | no weakness, bump | block 8 trigger bottom = bump | Changes the trigger setting for the bottom of the block with the chosen ID. The example causes block 8 to be triggered when it is bumped from the bottom. |
| block (ID) trigger defense | (Any) | (Number), [or] invincible | block 8 trigger defense = 2 | Changes the trigger defense of the block with the specified ID. The example sets the trigger defense to 2 for the block with an ID of 8. |
| block (ID) trigger weakness | | none, fire, earth, water, ice, wind, electric, poison, darkness, light, other, enemy, explosion, invincibility | block 1 trigger weakness = explosion | Changes the trigger setting of a block with the chosen ID when attacked from the side. The example causes block 1 to have a trigger weakness to explosions. |
| block (ID) trigger with | | characters, enemies, anyone | block 3 trigger with = anyone | Changes whether characters, enemies, or both can be the cause of triggering the block with the chosen ID according to its various trigger settings on the top, bottom, or sides. The example causes block 3 to be triggered by either characters or enemies. |
| block (ID) type | | visible, invisible, secret | block 5 type = secret | Changes the type of the block with the chosen ID. The example causes block 5 to be a secret block. |
| block (ID) destroy setting | | none, leave item, trigger, change (new block ID) | block 3 destroy setting = change 5 | Changes what happens to a block with the chosen ID when it is destroyed. If you tell it to “leave item,” then it will drop whatever item was set in the block settings of Game Setup. The example causes block 3 to become block 5 when it is destroyed. |
| block (ID) spawn | | standard, auto, none | block 1 spawn = auto | Changes the spawn settings of the block with the chosen ID. The example causes block 1 to automatically give a spawned item when it is triggered. |
| block (ID) give item | | none, (item ID) | block 3 give item = 7 | Causes a block with the chosen ID to give a custom item when it is triggered. The example causes block 3 to give item 7 when it is triggered. |
| block (ID) limit | (Any) | (Number), unlimited | block 4 limit * 3 | Changes the number of items that can be spawned from the block with the chosen ID. You can also make the number of items unlimited by using the “=” operator and then “unlimited.” The example causes block 4 to triple the number of items that it can give. |
| block (ID) timer | (Any) | (Number in seconds. Decimals are okay), none | block 4 timer = 5 | Changes the number of seconds that a block with the chosen ID has for it to be continuously triggered once it is triggered the first time. To not use a timer, you can use the “=” operator and then “none.” Note that the number works differently if the timer is currently running. If it’s running, the number affects the running timer. If not, the number affects what the timer will start at once it’s triggered. The example causes block 4 to have 5 seconds on its timer. |
| block (ID) timer | | start, stop | block 3 timer = start | Starts or stops the countdown on the timer of a block with the chosen ID. Normally the timer begins when the block is first trigger, but it can begin using this command as well. Likewise, you can use this command to stop the timer on a block. If it is triggered again, the timer will resume where it left off. The example causes block 3 to begin its timer. |
| block (ID) finish | | nothing, destroy | block 4 finish = destroy | Changes what happens when a block has expired all of its items (either by running out of items, or the timer has run out). The example causes block 4 to be destroyed after it is finished spawning items. |
| projectile (ID) x | (Any) | (Number) | projectile 6 x -= 5 | Changes the x-position of the projectile with the specified ID. The example causes projectile 6 to move left five pixels. |
| projectile (ID) y | (Any) | (Number) | projectile 6 y + 5 | Changes the y position of the projectile with the specified ID. The example causes projectile 6 to move 5 pixels to down. |
| projectile (ID) x | | random view, smart random view | projectile 4 x = random view | This will set the x-position of a projectile to a randomly-selected new position within the view. Choose “random view” for a completely random position. Choose “smart random view” to find a random position while avoiding solid objects. The example finds a new random x-position for the projectile with an ID of 4. (It’s y-position will stay the same.) |
| projectile (ID) y | | random view, smart random view | projectile 4 y = random view | This will set the y-position of a projectile to a randomly-selected new position within the view. Choose “random view” for a completely random position. Choose “smart random view” to find a random position while avoiding solid objects. The example finds a new random y-position for the projectile with an ID of 4. (It’s x-position will stay the same.) |
| projectile (ID) position | | random view, smart random view | projectile 3 position = random view | This will set both the x- and y-position of a projectile to a randomly-selected new position within the view. Choose “random view” for a completely random position. Choose “smart random view” to find a random position while avoiding solid objects. The example finds a new random position for the projectile with an ID of 3. |
| projectile (ID) x snap | | (Number) | projectile 1 x snap = 16 | This will set the x-position of a projectile to the nearest position on a specified grid size (similar to how your work box by default snaps to a grid when you place things down, except that this works only with the x-value rather than both). The example moves the projectile with an ID of 1 to the nearest x position divisible by 16. |
| projectile (ID) y snap | | (Number) | projectile 1 y snap = 32 | This will set the y-position of an projectile to the nearest position on a specified grid size (similar to how your work box by default snaps to a grid when you place things down, except that this works only with the y-value rather than both). The example moves the projectile with an ID of 1 to the nearest y position divisible by 32. |
| projectile (ID) position snap | | (Number) | projectile 2 position snap = 48 | This sets both the x- and y-position of a projectile to the nearest position on a specified grid (similar to how your work box by default snaps to a grid when you place things down). The example moves the projectile with an ID of 2 to the nearest position on a 48 x 48 grid. |
| create char projectile, create character projectile, spawn char projectile, spawn character projectile | (N/A) | (Projectile ID, then a comma, then Spawn ID of the spawning point to create the projectile from) | spawn char projectile 1, A | Creates a custom projectile with the specified ID at every spawning point with the specified Spawn ID. (See also the alternative spawn locations in the notes of the command “create item” above.) The projectile will work as it if was fired from the character. These two values must be separated by a comma. The example creates a character projectile with the ID of 1 over the invisible spawning point(s) with the Spawn ID of “A”. |
| create projectile, create enemy projectile, spawn projectile, spawn enemy projectile | (N/A) | (Projectile ID, then a comma, then Spawn ID of the spawning point to create the projectile from) | create projectile 2, atk | Creates a custom projectile with the specified ID at every spawning point with the specified Spawn ID. (See also the alternative spawn locations in the notes of the command “create item” above.) The projectile will work as it if was fired from an enemy. These two values must be separated by a comma. The example creates an enemy projectile with the ID of 2 over the invisible spawning point(s) with the Spawn ID of “atk”. |
| projectile (ID) | | item (ID), enemy (ID), block (ID), npc (ID), projectile (ID), sprite (ID) | projectile 5 = item 2 | Changes the projectile into an item, block, NPC, etc. with the specified ID. The Example causes projectiles with an ID of 5 to transform into the item with an ID of 2. |
| projectile direction | | up, down, left, right, up right, up left, down right, down left, approximate, exact, (or a number representing a direction on a keyboard numpad) | projectile direction = 7 | By default, spawned projectiles will start traveling in the exact direction of its target (a character projectile to the nearest enemy, or an enemy projectile to the nearest character). But you can change that with this command. Many different values can be given like “left” or “up” or “approximate” or “user” (as described in projectile settings of custom enemies and characters) or a number that relates to a directional value on a keyboard numpad. The example sets the spawning projectile direction to 7, which is up-left on a numpad. |
| projectile direction | (Any) | (Number in degrees) | projectile direction + 90 degrees | This sets a specific direction for spawned projectiles to go, with 0 degrees being to the right, increasing counterclockwise (90 degrees is up, 180 is to the left, 270 is down, and so forth. The example add 90 degrees to whatever the starting angle is for projectiles, so if the direction is set for straight up, it will change to the left. |
| remove projectile, kill projectile, destroy projectile, delete projectile, clear projectile | (N/A) | (Projectile ID) | clear projectile 5 | Removes projectiles with the specified ID. This only works with projectiles that are nearby. The example removes projectiles with the ID of 5. |
| projectile (ID) sprite, change projectile (ID) sprite | | (Sprite ID) | projectile 3 = sprite = 1 | Changes the sprite for the specified projectile to the uploaded sprite with the specified sprite ID. The example changes the sprite for projectile 3 to sprite 1. |
| projectile (ID) visible | | true, false | projectile 10 visible = false | Makes a projectile with the specified ID to become visible or invisible. Note that projectiles are still active when they are invisible. The example causes the projectile with an ID of 10 to become invisible. |
| projectile (ID) alpha | (Any) | (Number) | projectile 14 alpha = 50 | Changes the transparency of a projectile with the chosen ID. The number should be between 0 (invisible) and 100 (fully visible). The example changes the projectile with an ID of 14 to an alpha value of 50, which is half-transparent. |
| projectile (ID) looping | | staggered, constant, default | projectile 7 looping = constant | This changes the looping speed of the looping command prompt for the projectile with the specified ID. You can choose to have it loop “constant” which would be every frame of the game, or “staggered” which would be 6 times per second (and is easier on the PC). Set this to “default” to make it take on whatever setting you have for looping in general (see the command “loop/loop speed”). The example causes the projectile with an ID of 7 to run its looping command prompt every frame of the game. |
| projectile (ID) face | | no change, travel, horizontal travel, vertical travel, cursor | projectile 4 face = cursor | Changes the settings that the projectile sprite should face of the chosen ID. The options are the same as in Game Setup of a projectile. The example causes the projectile to face the mouse cursor. |
| projectile (ID) animate, projectile (ID) animation | (Any) | (Number between 0 and 12) | projectile 1 animation + 3 | Changes the animation speed of the projectile’s sprite with 0 for no animation, 1 as the slowest animation, and 12 the fastest animation (Similar to animation settings in Game Setup for custom projectiles). The example causes projectile 1 animation to increase by 3 (or become 12 if the result is greater than 12). |
| projectile (ID) frame | (Any) | (Number) | projectile 2 frame = 3 | Changes the animation frame of the projectile with the specified ID. This can be useful when the animation speed is 0 and you wish to adjust the frames yourself. The example causes the projectile with an ID of 2 to change to its third frame. |
| projectile (ID) hit | | none, fade, pop, fireball, explode, detonate | projectile 2 hit = fade | Changes what happens to the projectile of the chosen ID when it is removed after it hits a target. The example causes projectile 2 to fade out after it hits a target. |
| projectile (ID) life out | | none, fade, pop, fireball, explode, detonate | projectile 2 life out = pop | Changes what happens to the projectile of the chosen ID when it is removed after it times out in the area. The example causes projectile 2 to pop after it times out. |
| projectile (ID) speed | (Any) | (Number) | projectile 6 speed + 30 | Changes the speed of a moving projectile of the chosen ID. The numbers are the same for the moving speed slider in custom projectile settings. Note that if you go higher then 100, there may be issues with the projectile passing through objects for games with slower frame rates. The example causes the projectile with an ID of 6 to go 30 units faster. |
| projectile (ID) thrust | normal, accelerate, decelerate | projectile 2 thrust = accelerate | Changes the thrust type of the projectile with the chosen ID. The command sets projectile 2 to have an acceleration. | |
| projectile (ID) accelerate, projectile (ID) decelerate | (Any) | (Number) | projectile 6 decelerate = 80 | Changes the power of the acceleration or deceleration of the projectile with the chosen ID. The number corresponds to the slider in the custom projectile settings. The example sets the accelerate/decelerate power to be 80, which is quite high. |
| projectile (ID) path | straight, homing, fall | projectile 8 path = homing | Changing the type of path that the projectile with the chosen ID will take. Note that reverse, boomerang, and return paths are not available and must be set in the projectile settings of Game Setup. The example causes projectile 8 to take a homing path. | |
| projectile (ID) homing, projectile (ID) reverse, projectile (ID) boomerang, projectile (ID) fall, projectile (ID) return | (Any) | (Number) | projectile (4) reverse = 10 | Changes the strength of the homing, reverse, boomerang, etc., path of the projectile. The number corresponds to the number of the slider in the custom projectile settings. The example changes the projectile path strength of projectile 4 to be 10, which is quite low. |
| projectile (ID) | | stop at walls targets, pass through walls, pass through targets, pass through everything, bounce stop at targets, bounce pass through targets | projectile 3 = bounce pass through targets | Changes how the projectile with the chosen ID will respond when striking walls and targets. The example causes projectile 3 to bounce against walls and pass through targets. |
| projectile (ID) hp, projectile (ID) health | (Any) | (Number) | projectile 2 hp = 8 | Allows you to change the HP of a projectile with the chosen ID. The example causes projectile 2 to have 8 health points. |
| projectile (ID) max hp, projectile (ID) max health | (Any) | (Number) | projectile 3 max hp *= 1 | Changes the amount of maximum hp that the projectile with the chosen ID will have. The example causes projectile 3 to multiply its max hp by w. |
| projectile (ID) | | jump proof, vulnerable to jumps | projectile 6 = jump proof | Changes whether or not the projectile with the chosen ID is vulnerable to jumps. The example makes projectile 6 not vulnerable to jumps. |
| projectile (ID) weakness | | none, fire, earth, water, ice, wind, electric, poison, darkness, light, other | projectile 3 weakness = wind | Changes the weakness setting of the projectile with the specified ID. The example causes the projectile with an ID of 3 to have a weakness for wind attacks. |
| projectile (ID) harmful | | true, false | projectile 9 harmful = false | Changes whether or not a projectile with the specified ID is harmful to characters. The example causes projectile 9 to not be harmful to characters. |
| projectile (ID) grab items | | true, false | projectile 5 grab items = true | Changes whether or not a projectile with the specified ID will collect items that it touches. The example causes projectile 5 to collect items. |
| projectile (ID) friendly fire | | true, false | projectile 4 friendly fire = true | Changes if a projectile with the chosen ID has friendly fire turned on (that is, enemy projectiles harm other enemies, and character projectiles harm other characters). The example causes projectile 4 to have friendly fire. |
| projectile (ID) affect item blocks | | true, false | projectile 7 affect item blocks = false | Changes if a projectile of the specified ID will affect item blocks that is touches. The example causes projectile 7 to affect item blocks. |
| projectile (ID) attack type | | none, fire, earth, water, ice, wind, electric, poison, darkness, light, other, enemy | projectile 5 type = fire | Changes the type of the projectile of the specified ID, which may come in handy for character projectiles against enemies that have a certain weakness. The example changes the projectile with an ID of 5 to become a fire type. |
| projectile (ID) life | (Any) | (Number, then “seconds”) | projectile 8 life + 5 seconds | Changes the number of seconds that a projectile with the chosen ID will remain active in an area before it disappears. The example causes projectile 8 to have 5 more seconds to its life. |
| sprite (ID) x | (Any) | (Number) | sprite 6 x -= 5 | Changes the x-position of the sprite with the specified ID. The example causes sprite 6 to move left five pixels. |
| sprite (ID) y | (Any) | (Number) | sprite 6 y + 5 | Changes the y position of the sprite with the specified ID. The example causes sprite 6 to move 5 pixels to down. |
| sprite (ID) x | | random view, smart random view | sprite 4 x = random view | This will set the x-position of a sprite to a randomly-selected new position within the view. Choose “random view” for a completely random position. Choose “smart random view” to find a random position while avoiding solid objects. The example finds a new random x-position for the custom sprite with an ID of 4. (It’s y-position will stay the same.) |
| sprite (ID) y | | random view, smart random view | sprite 4 y = random view | This will set the y-position of a sprite to a randomly-selected new position within the view. Choose “random view” for a completely random position. Choose “smart random view” to find a random position while avoiding solid objects. The example finds a new random y-position for the custom sprite with an ID of 4. (It’s x-position will stay the same.) |
| sprite (ID) position | | random view, smart random view | sprite 3 position = random view | This will set both the x- and y-position of a sprite to a randomly-selected new position within the view. Choose “random view” for a completely random position. Choose “smart random view” to find a random position while avoiding solid objects. The example finds a new random position for the imported sprite with an ID of 3. |
| sprite (ID) x snap | | (Number) | sprite 1 x snap = 16 | This will set the x-position of a block to the nearest position on a specified grid size (similar to how your work box by default snaps to a grid when you place things down, except that this works only with the x-value rather than both). The example moves the block with an ID of 1 to the nearest x position divisible by 16. |
| sprite (ID) y snap | | (Number) | sprite 1 y snap = 32 | This will set the y-position of a sprite to the nearest position on a specified grid size (similar to how your work box by default snaps to a grid when you place things down, except that this works only with the y-value rather than both). The example moves the sprite with an ID of 1 to the nearest y position divisible by 32. |
| sprite (ID) position snap | | (Number) | sprite 2 position snap = 48 | This sets both the x- and y-position of a block to the nearest position on a specified grid (similar to how your work box by default snaps to a grid when you place things down). The example moves the block with an ID of 2 to the nearest position on a 48 x 48 grid. |
| create sprite, spawn sprite, create background sprite, spawn background sprite | | (Sprite ID, then a comma, then Spawn ID of the spawning point to create the sprite from) | spawn sprite 3, spwn | Creates a custom sprite behind objects with the specified ID at every spawning point with the specified Spawn ID. (See also the alternative spawn locations in the notes of the command “create item” above.) These two values must be separated by a comma. The example creates a sprite with the ID of 3 over the invisible spawning point(s) with the Spawn ID of “spwn”. |
| create foreground sprite, spawn foreground sprite | | (Sprite ID, then a comma, then Spawn ID of the spawning point to create the sprite from) | create foreground sprite 3, spwn | Works the same as creating a background sprite, only this time the sprite will appear in the foreground. |
| change sprite | (N/A) | (Sprite ID to change, then a comma, then new sprite ID) | change sprite 5, 4 | Changes custom sprites with the specified ID to a different sprite. This only works with sprites that are nearby. The example changes sprites with the ID of 5 to sprites with the ID of 4. |
| sprite (ID) | | item (ID), enemy (ID), block (ID), npc (ID), projectile (ID), sprite (ID) | sprite 5 = item 2 | Changes the sprite into an item, block, NPC, etc. with the specified ID. The Example causes sprites with an ID of 5 to transform into the item with an ID of 2. |
| remove sprite, kill sprite, destroy sprite, delete sprite, clear sprite | (N/A) | (Sprite ID) | remove sprite 4 | Removes uploaded sprites with the specified ID. This only works with sprites that are nearby. The example removes sprites with the ID of 4. |
| sprite (ID) visible | | true, false | sprite 12 visible = false | Makes a custom sprite with the specified ID to become visible or invisible. The example makes the sprite with an ID of 12 to become invisible. |
| sprite (ID) alpha | (Any) | (Number) | sprite 6 alpha = 25 | Changes the transparency of a sprite with the chosen ID. The number should be between 0 (invisible) and 100 (fully visible). The example changes the sprite with an ID of 6 to an alpha value of 25, which is mostly see-through. |
| npc (ID) | | left, right, run left, run right, stop | npc 3 = run left | Causes the NPC with the specified character ID to move in the specified way. The NPC will continually move in the specified direction until the direction is changed or the value “stop” is called. The example causes the NPC with the character ID of 3 to “run left.” This is faster than normal “left.” See the bottom of this page for how to find the NPC ID. |
| npc (ID) | | jump | NPC 2 = jump | Causes the NPC with the specified character ID to jump. This command will work even if the NPC is not touching the ground. The example will cause the NPC with the character ID of 2 to jump. (The command prompt is not case-sensitive, so the capital “NPC” will not cause any problems.) |
| npc (ID) | | face left, face right, turn left, turn right | npc 1 = face left | Causes the NPC with the specified character ID to face in the chosen direction. The example causes the NPC with the character ID of 1 to face left. |
| npc (ID) | | move | npc 3 = move | Causes the NPC with the specified character ID to resume its normal movements, according to the NPC’s settings. This is useful when you are done forcing the NPC to move in a particular direction for things like cutscenes. The example causes the NPC with the character ID of 3 to resume normal movements. |
| npc (ID) | | face | npc 1 = face | Causes the NPC with the specified character ID to resume its normal facing settings, according to the NPC’s settings. This is useful when you are done foring the NPC to face a certain way for things like cutscenes. The example causes the NPC with the character ID of 1 to resume normal facing settings. |
| npc (ID) x | (Any) | (Number) | npc 6 x -= 5 | Changes the x-position of the npc with the specified ID. The example causes npc 6 to move left five pixels. |
| npc (ID) y | (Any) | (Number) | npc 6 y + 5 | Changes the y position of the npc with the specified ID. The example causes item 6 to move 5 pixels to down. |
| npc (ID) x | | random view, smart random view | npc 4 x = random view | This will set the x-position of a npc to a randomly-selected new position within the view. Choose “random view” for a completely random position. Choose “smart random view” to find a random position while avoiding solid objects. The example finds a new random x-position for the npc with an ID of 4. (It’s y-position will stay the same.) |
| npc (ID) y | | random view, smart random view | npc 4 y = random view | This will set the y-position of a npc to a randomly-selected new position within the view. Choose “random view” for a completely random position. Choose “smart random view” to find a random position while avoiding solid objects. The example finds a new random y-position for the npc with an ID of 4. (It’s x-position will stay the same.) |
| npc (ID) position | | random view, smart random view | npc 3 position = random view | This will set both the x- and y-position of an npc to a randomly-selected new position within the view. Choose “random view” for a completely random position. Choose “smart random view” to find a random position while avoiding solid objects. The example finds a new random position for the npc with an ID of 3. |
| npc (ID) x snap | | (Number) | npc 1 x snap = 16 | This will set the x-position of a npc to the nearest position on a specified grid size (similar to how your work box by default snaps to a grid when you place things down, except that this works only with the x-value rather than both). The example moves the npc with an ID of 1 to the nearest x position divisible by 16. |
| npc (ID) y snap | | (Number) | npc 1 y snap = 32 | This will set the y-position of a npc to the nearest position on a specified grid size (similar to how your work box by default snaps to a grid when you place things down, except that this works only with the y-value rather than both). The example moves the npc with an ID of 1 to the nearest y position divisible by 32. |
| npc (ID) position snap | | (Number) | npc 2 position snap = 48 | This sets both the x- and y-position of a npc to the nearest position on a specified grid (similar to how your work box by default snaps to a grid when you place things down). The example moves the npc with an ID of 2 to the nearest position on a 48 x 48 grid. |
| create npc, spawn npc | (N/A) | (NPC ID, then a comma, then Spawn ID of the spawning point to create the NPC from) | create npc 3, place4 | Creates an NPC item with the specified character ID at every spawning point with the specified Spawn ID. (See also the alternative spawn locations in the notes of the command “create item” above.) These two values must be separated by a comma. The example creates an NPC with the Character ID of 3 over the invisible spawning point(s) with the Spawn ID of “place4”. Note: the top of the NPC will be the top of the spawning point. Make sure that there is room below so that the NPC does appear stuck in the ground! |
| change npc | (N/A) | (NPC ID to change, then a comma, then New NPC ID) | change NPC 5, 6 | Changes custom NPCs with the specified ID to a different NPC. This only works with NPCs that are nearby. The example changes NPCs with the ID of 5 to NPCs with the ID of 6. |
| npc (ID) | | item (ID), enemy (ID), block (ID), npc (ID), projectile (ID), sprite (ID) | enemy 5 = item 2 | Changes the enemy into an item, block, NPC, etc. with the specified ID. The Example causes enemies with an ID of 5 to transform into the item with an ID of 2. |
| remove npc, kill npc, destroy npc, delete npc, clear npc | (N/A) | (NPC ID) | destroy npc 12 | Removes NPCs with the specified ID. This only works with NPCs that are nearby. The example removes NPCs with the ID of 12. |
| npc (ID) visible | | true, false | npc 4 visible = true | Makes an NPC with the specified ID to become visible or invisible. Note that an NPC is still active if it is invisible, and it can still be interacted with. The examples causes the NPC with an ID of 4 to become visible. |
| npc (ID) alpha | (Any) | (Number) | npc 4 alpha = 100 | Changes the transparency of an NPC with the chosen ID. The number should be between 0 (invisible) and 100 (fully visible). The example changes the NPC with an ID of 4 to an alpha value of 100, which is completely visible. |
| timeline, start timeline, begin timeline | | (Timeline ID) | timeline = 3 | Begins running a timeline of the specified ID. See the bottom of this page for how to find the timeline ID. |
| timeline (ID) location | | (Number in seconds) | timeline 3 location = 65.5 | Changes the position of the running timeline with the specified ID to the value in seconds. If any commands are in that new position, they will also be run. Since Platform Builder can run multiple timelines at the same time, you will need to specify which timeline to change, even if only one timeline is active. The example will cause the timeline with an ID of 3 to jump to 65.5 seconds, or 1 minute and 5.5 seconds. This command can be useful to create timelines which loop themselves. |
| stop timeline, end timeline, quit timeline | | (Timeline ID) | stop timeline = 3 | Stops a timeline from running. This can be useful if you need to end a looping timeline. The example causes a timeline with the ID of 3 to stop running. |
| menu, show menu | | (Menu ID) | show menu 5 | Pauses the game to display a custom menu with the specified ID. The example puts up a menu with the ID of 5 (Many commands with only = as the operator may not require the operator.) |
| pause menu | | (Menu ID), 0 (with an optional comma and menu name) | pause menu = 3, Special | Adds a menu of the specified ID as an option to the regular pause menu. This allows the user to access a custom menu at any point in the game when the pause menu is enabled. By default, the menu will be displayed as “More…”, but this can be changed by adding a comma with a new name (under 20 characters) after the command. Set the value to 0 to remove the custom menu from the pause menu. The example adds “Special” as a selection in the pause menu, which open up menu 3. |
| replace pause menu | | (Menu ID), default | replace pause menu = 3 | Changes the standard pause menu of Platform Builder to a custom menu with the specified ID. To return to using a the standard pause menu, set this to “default.” The example causes your Platform Builder game to open the custom menu with an ID of 3 whenever you pause the game. |
| map player 1 jumpmap player 2 attacketc. | N/A | (Text for when you are mapping the control) | (Click here to see an example of this command) | This is a special type of command that only works in custom menus, and you will use it to create your own custom key mapping (that is, your own custom ability for the user of your game to set his/her own control keys). From the custom menu, within the sideways carats, you put “map player” and then 1 or 2 (for which player you are key mapping), and then the control name (up, down, left, right, jump, attack, pick, use, button a, button b, button c, button d). After that, enter the text to display when the menu item is selected. The text should say something like “Press a Key.” At that point, Platform Builder will wait for the user to select a key, and that key will be mapped onto the selected control. If you make a custom menu with a menu item for each control key, you can have your own way to map keys. The example lets the user set a key for player 1 jump and player 1 attack. The menu selection uses brackets to show what the keys are currently set at. |
| spawn pause sprite, spawn pausing sprite, create pause sprite, create pausing sprite | | (Sprite ID) | spawn pause sprite = 8 | Spawns a custom sprite in the center of the view and pauses the game after the rest of the command prompt has finished running. This command does not use a spawn ID, but the sprite can be repositioned with the “sprite x” and “sprite y” commands. After a pausing sprite is created, you can left-click or right-click on the sprite. When you do this, the sprite will run its left/right click commands (if any) and then unpause the game. The purpose of this command is so you can build your own sprite-based menus. The example spawns a custom sprite with the ID of 8 and then pauses the game. (If any other pausing sprites are spawned after this one, they will appear on top.) |
| key | | (any key color) | key = blue | Gives the character the ability to unlock a door or chest of the given color. Note that yellow keys unlocks all chests except for black, gray, and white ones. The example allows the character to unlock blue doors and chests. |
| key | | all, all colors, all colours | key = all colors | Gives the character the ability to unlock all locked doors and chests. |
| unlock | | (any key color) | unlock = gray | Unlocks all doors and chests in the area so that the character can use them without needing a key. The example unlocks all gray doors and chests in the area. |
| unlock | | all, all colors, all colours | unlock = all | Unlocks all doors and chests in the area so that the character does not need a key to use them. |
| #ERROR! | (N/A) | (Your popup message) | #ERROR! | Any command that starts with a + will be used as a popup message which pauses the game. The example will create a popup message that says “Hello World!” |
| _ | (N/A) | (Your real-time message) | _Hello World! | Any command that starts with a _ will be used as a real-time message. This is the kind of message which displays at the bottom of your status box without pausing the game. The example will create a real-time message that says “Hello World!” |
| ^ | (N/A) | (Your large overhead message) | ^Meanwhile… | Any command that starts with a ^ will be used as a large overhead message that will display near the top of the screen. This should only be a few words, and it can be used to provide some narration for cut-scenes. Leave the value blank to remove the text. The example causes the text “Meanwhile…” to be displayed at the top of the screen. |
| overhead, align overhead, overhead align, overhead alignment, overhead display, [or] overhead message | | (Numpad number) | overhead = 3 | Changes the position of the large overhead message (called by the ^ symbol). The position corresponds with a computer numpad, so think of your screen divided into 9 squares with each numpad key representing one of those squares. Just like on a numpad, 1 is bottom-left, 2 is bottom, 3 is bottom-right, 4 if left, 5 is middle, 6 is right, 7 is top-left, 8 is top, and 9 is top-right. The default position is 7. The example causes the overhead message to display in the bottom-right side of the screen. |
| overhead size | | small, medium, large, extra large | overhead size = medium | changes the size of the large overhead message (called by the ^ symbol). The default size is small, but you can increase the size using these commands. The example causes the overhead text to be a medium size. |
| character (ID) | (N/A) | (Your character message) | character 1Hello World! | Creates a text to briefly appear above the head of a character with the specified ID. This will make it seem like the character is talking. This command is only for playable characters. (there is a different command for talking NPCs. See below.) The example will cause the character with an ID of 1 to say “Hello World!” See the bottom of this page for how to find the character ID. |
| player (1 or 2) | (N/A) | (Your player message) | player 1Hello World! | This works like the previous command, but you specify player 1 or player 2 instead of the Character ID. The example causes Player 1 to say “Hello World!” |
| npc (ID) | (N/A) | (Your NPC message) | npc 4TingThing is awesome! | Creates a text to briefly appear above the head of a NPC with the specified character ID. This will make it seem like the NPC is talking. The example will cause the NPC with the character ID of 4 to compliment the developer of Platform Builder. |
| enemy (ID) | (N/A) | (Your enemy message) | enemy 6? | Creates a text to briefly appear above the head of a custom enemy with the specified ID. This will make it seem like the enemy is talking. Or, in the case of this example, the enemy will only have a question mark above its head and it will appear to be confused about something. |
| item (ID) | (N/A) | (Your item message) | item 3Because I can!! | Works the same for when you give messages to characters, NPCs, or enemies. You may wonder why a custom item would want to talk. That’s a good question. You better ask the item. |
| block (ID) | (N/A) | (Your block message) | block 8I’m a talking block! | I think you get it by now… |
| hud [1-20] | (N/A) | (Your HUD text) | hud 14Carrots: [var carrots] | Platform Builder allows displaying up to 20 texts to go over your HUD. With this command, you are able to change what those texts say. The position of the text can be changed using the “hud text [1-20]” command (See Hud Controls). The example uses [var carrots] to display the value of a custom variable named “carrots.” (See Other Syntax to learn about custom variables) So, if the variable “carrots” is equal to 5, the example will cause the HUD text #14 to say “Carrots: 5” (For variables which change around a lot, you will likely want to put this in a looping command, so that the HUD text stays updated.) |
| very slow jump,slow jump,medium jump,fast jump, [or] very fast jump | (N/A) | (Your jumping text message) | fast jump$10! | Creates a text that jumps upward and disappears. This would be quick, although you can use the different commands to determine how quick. This would typically be used for very short messages, like for showing the number of points or money collected from an item. |
| jump [steps] | (N/A) | (Your jumping text message) | jump 601,000 points! | This is similar to the other jump commands, but you can set the amount of time that the message stays visible. 30 steps is one second, regardless of your fps settings. So, the example creates a jumping text that will last for 60 steps, or two seconds. |
| area name | (N/A) | (Your new area name) | area nameThe Ruins | This changes the area name which is displayed at the top of the screen for the current area. The example causes the current area to be named “The Ruins.” |
| reveal items, unhide items, show items | (N/A) | (N/A) | show items | This will reveal any items which may be hidden by an invisible hide block (hidden enemies will stay hidden). |
| hide items | (N/A) | (N/A) | hide items | If hidden items (not including enemies) have been revealed, you can re-hide them using this command. |
| reveal enemies, unhide enemies, show enemies | (N/A) | (N/A) | reveal enemies | This will reveal any enemies which may be hidden by an invisible hide block. |
| hide enemies | (N/A) | (N/A) | hide enemies | If hidden enemies have been revealed, you can re-hide them using this command. |
| reveal all, unhide all, show all, reveal everything, unhide everything, show everything | (N/A) | (N/A) | unhide everything | This will reveal any items and enemies which may be hidden by an invisible hide block. |
| hide all, hide everything | (N/A) | (N/A) | hide all | If hidden items or enemies have been revealed, you can re-hide them using this command. This does not include characters. |
| hide characters hide players | (N/A) | (N/A) | hide characters | This makes the characters invisible. This can be useful for cut-scenes where you don’t want to see the characters. Keep in mind that the characters can still be controlled unless you disable them using the command “disable characters”. |
| hide player | (N/A) | 1, 2 | hide player 2 | This works the same way as “hide characters” except that you specify specifically whether to hide player 1 or player 2. The example causes player 2 to be invisible. |
| unhide characters, unhide players, reveal characters, reveal players, show characters, show players | (N/A) | (N/A) | show players | This makes the characters visible after they have been hidden. |
| unhide player, reveal player, show player | (N/A) | 1, 2 | show player 1 | This works the same way as “unhide characters” except that you specify specifically whether or unhide player 1 or player 2. The example reveals player 1 after being hidden. |
| effect [or] fx | | (effect name or ID) | | Creates an effect with the effect name (from custom items) or the effect ID, which is the number next to the effect name in custom items. The effect will appear over the character or whatever is calling the command (like an enemy or item). The effect color is determined by the color command (see View Settings and Movements). In the example, the color is set to red, and then a red “diamond out” effect is created. |
| spawn effect, spawn fx, create effect, [or] create fx | (N/A) | (effect ID, then a comma, then Spawn ID of the spawning point to create the item from) | spawn effect 26, spwn | Creates an effect at the specified spawn block. This command does not take effect names, but only the effect ID (the number next to the effect name in custom item settings). Make sure to include a comma between the effect and the spawn ID. The example creates effect 26, which is the firework, at spawn blocks with a spawn ID of “spwn”. |
| enemy [ID] effect [or] enemy [ID] fx | | (effect name or effect ID) | enemy 2 effect = sparkle | Creates an effect over enemies with the specified ID. The example creates a sparkle effect over enemies with the ID of 2. |
| projectile [ID] effect [or] projectile [ID] fx | | (effect name or effect ID) | projectile 4 effect = 6 | Creates an effect over projectiles with the specified ID. The example creates effect 6 (star) over projectiles with the ID of 4. |
| item [ID] effect [or] item [ID] fx | | (effect name or effect ID) | item 3 fx = cannon smoke | Creates an effect over items with the specified ID. The example creates a cannon smoke effect over items with the ID of 3. |
| block [ID] effect [or] block [ID] fx | | (effect name or effect ID) | block 2 effect = 22 | Creates an effect over blocks with the specified ID. The example creates effect 22 (ellipse) over blocks with the ID of 2. |
| npc [ID] effect [or] npc [ID] fx | | (effect name or effect ID) | npc 12 effect = 5 | Creates an effect over NPCs with the specified ID. The example creates effect 5 (circle in) over NPCs with the ID of 12. |
| character [ID] effect [or] character [ID] fx | | (effect name or effect ID) | character 3 effect = explosion | Creates an effect over the character with the specified ID. The example creates an explosion over the character with an ID of 3. |
| player [1 or 2] effect [or] player [1 or 2] fx | | (effect name or effect ID) | player 2 fx = 12 | Creates an effect over player 1 or player 2. The example creates effect 12 (explosion) over player 2. |
| invincible effects [or] invincible effect | | true, false | invincible effects = false | When a character is invincible, by default there is music and flashing colors. These effects and be turned off or back on using this command. The example disables the visual effects of being invincible. |
| fly effects [or] fly effect | | true, false | fly effect = 1 | When a character is flying, by default there are sparkle effects that surround the character. These effects can be turned off or back on using this command. The example turns on the fly effects. (In the command prompt, “True” can be substituted for 1) |
| wind effects [or] wind effect | | true, false | wind effects = true | In windy courses, there are gusts of wind and dust bunnies that fly across the screen. This visual effect can be turned off or back on using this command. The example turns on the wind effect. |
| water effects, underwater effects, water effect, [or] underwater effect | | true, false | underwater effect = 0 | In underwater courses, the screen is blueish to help give the underwater effect. This visual effect can be turned off or back on using this command. The example turns off the blue overlay in underwater courses (In the command prompt, “false” can be substituted with 0.) |
| harm effects, harm effect, hurt effects, [or] hurt effect. | | true, false | harm effects = false | When a character is harmed, there will be a sound effect and the character will “blink.” This command will turn those effects off. The character will still be hurt, will still fly back some, and will still be temporarily invulnerable. The example disables the effects. |
| weak lightning, medium lightning, [or] strong lightning | (N/A) | (N/A) | medium lightning | When you enable thunder in your areas, you will see flashing of lightning happen as part of the effect. But you can create your own lightning strikes manually using these commands. The example creates a lighting strike of medium power. |
| new game | | (Number of game File) | new game = 3 | Creates a new game using the specified save slot. This will take you to the starting world/course that is set in the title screen settings. The example launches a new game with save slot 3. |
| save game | | (Number of game File) | save game | Saves the game with the specified save slot, or do not use a value to save the game to the currently open save slot. This does not save the exact state of everything, but it will save the character’s x and y position, the current area, player stats, etc. |
| load game | | (Number of game File) | | Loads the game with the specified load slot. If the game does not exist, the command will do nothing. The example uses a conditional “if game exists” to check if game slot 3 exists. If it does, it will load from slot 3. |
| delete game | | (Number of game File) | delete game = 3 | Deletes a game of the specified save slot. This command will not work if you try to delete a game which is currently open. The example deletes the save data for the game in slot 3. |
| copy game | | (Game File to Copy From, then a comma, then Game File to Copy to) | copy game 3, 4 | Copies the save data from the first game file to the second game file. This command will not work if you try copying to the game file which is currently open. The example takes the save data from Game 3 and copies it over Game 4. |
| health, hp, hearts | | limited, unlimited, none | hp = unlimited | Changes the limitation settings of health. The example gives the character unlimited health. |
| lives | | limited, unlimited, none | lives = none | Changes the life limitation. The example causes the character to not use lives. So once the character dies, you go straight to the Game Over Screen. |
| ammo, primary ammo | | limited, unlimited | ammo = unlimited | Changes the ammo limitation for the ammo according to the character’s ranged weapon settings. The example causes the character’s primary ammo to be unlimited. |
| air, breath | | limited, unlimited | air = limited | Changes the air limitation for when the character is underwater. The example makes it so that the character cannot spend forever underwater. |
| points, score | (Any) | (Number) | points + 50 | Changes the score in the game. The example adds fifty points to the game’s score. |
| co op | | true, false | co op = true | Use this to enable or disable 2-player co-op mode from your game. The changes will take effect the next time you switch to a different area or overworld. The example enables co-op mode. |
| loop, looping, loop speed, looping speed | | staggered, constant | loop speed = constant | When you are running looping commands, the default looping speed is every 5 frames. This is considered “staggered looping speed.” It is more efficient on the PC and works for most cases. However, you can change this to “constant” if you want the looping commands to be run every frame. This may be useful if you are changing the X and Y position of things, and you want smooth movements every frame. The example changes all looping commands to run in constant looping speed. |
| disable pause, disable pause menu, disable pausing | (N/A) | (N/A) | disable pause menu | Disables the pause menu so that the user can not access it for the rest of the area, typically for cut-scenes in your games. Be careful with this, as the pause menu may be the only way to exit an area if necessary. |
| enable pause, enable pause menu, enable pausing, allow pause, allow pause menu, allow pausing | (N/A) | (N/A) | Enable Pausemenu | Enables the pause menu if it has been previously disabled. The example enables the pause menu. (The command prompt is not case-sensitive or space-sensitive so the example should work fine.) |
| window size [or] screen size | | 1, 1.5, 1.72, 2, full | screen size = 1.5 | Changes the size of the game window to the specified factor. This works similar to changing the window size in the Platform Builder settings, and may be useful if you plan to build out your own custom menu. You can also go full screen by using “full” instead of one of the possible numbers. |
| target fps | | 30, 45, 60, 90, 120 | target fps = 60 | Sets the target FPS for your game to be used the next time there is a change of area. You can learn more about FPS by right-clicking on the fps settings in game setup. (You cannot instantly change the FPS because each area loads with special settings according to the FPS, so the change will only take effect next time you load an area.) |
| Command | Operator(s) | Value(s) | Example | Notes |
| variable (name), var (name), area var (name), area variable (name) | (Any) | (Number) | var myVariable = 25 | Area variables are reset to 0 every time you leave or change an area. The example creates an area variable called “myVariable” and sets is to 25 |
| course var (name), course variable (name) | (Any) | (Number) | course var feature + 1.5 | Course variables are reset to 0 after the course is finished. The example causes course variable “feature” to increase by 1.5. If “feature” does not exist as a variable, it will make “feature” and set it to 0 (the default value) and then add 1.5 to it. |
| game var (name), game variable (name) | (Any) | (Number) | game var Cash * 2 | The value of game variables are never reset. They last for the entire game. The example causes game variable “Cash” to double. |
| local var (name), local variable (name) | (Any) | (Number) | local var myJump += 1 | Local variables are specific to whatever happens to be calling the command. This means that each player, enemy, item, etc. can have a local variable of the same name but have different values. The local variable is removed when whatever hosting the variable is removed, destroyed, killed, etc. For instance, you may put the example in an enemy jump command. This way you can keep track of how many times each enemy has jumped. |
| for player, with player | (N/A) | 1, 2 | for player 2 | All commands below this line will be applied to the new player unless you change the player again. Note that this only works if the desired player is currently present in the game, so you may want to check if a player exists using a conditional before you use it. The example causes any following commands to apply to player 2. |
| for closest enemy, for nearest enemy, with closest enemy, for closest enemy | (N/A) | (Enemy ID or leave blank) | for closest enemy 4 | This allows you to use enemy-based commands so that they apply only to the closest enemy of whatever is calling the command (Basically, it allows enemy commands to work as if they were called from an enemy command prompt). If you include an enemy ID, then the command will search for the closest enemy that matches the enemy ID. If you do not include an ID, then the command will search for the closest custom enemy, whatever it might be. There are three things to keep in mind: (1) This only works if the nearest enemy is within the view or closely nearby. (2) This will only work as long as you do NOT include the enemy ID with the enemy command. (3) This will replace the information for whatever originally called the command. So, if the command is called from a custom block, you will no longer be able to use block-based commands without specifying the block ID. The example causes following enemy-related commands to apply for the closest enemy with an ID of 4. |
| for closest item, for nearest item, with closest item, for closest item | (N/A) | (Item ID or leave blank) | with nearest item | This works similar to “for closet enemy” but it searches for the closet item instead. The example find the closet custom item to whatever is calling the command, and any item-related commands following will apply to it. |
| for closest block, for nearest block, with closest block, for closest block | (N/A) | (Block ID or leave blank) | for closest block 5 | This works similar to “for closet enemy” but it searches for the closet block instead. The example finds the closet custom block with an ID of 5. |
| for closest character projectile, for nearest character projectile, with closest character projectile, for closest character projectile | (N/A) | (Projectile ID or leave blank) | for closest character projectile | This works similar to “for closet enemy” but it searches for the closet projectile fired by the character instead. The example finds the closet character projectile. |
| for closest enemy projectile, for nearest enemy projectile, with closest enemy projectile, for closest enemy projectile | (N/A) | (Projectile ID or leave blank) | with nearest enemy projectile 4 | This works similar to “for closet enemy” but it searches for the closet projectile fired by an enemy instead. The example finds the closet enemy projectile with an ID of 4. |
| for closest sprite, for nearest sprite, with closest sprite, for closest sprite | (N/A) | (Sprite ID or leave bank) | with closest sprite | This works similar to “for closet enemy” but it searches for the closet sprite instead. The example finds the closet custom sprite. |
| for farthest enemy/item/block/character/enemy projectile/sprite/character projectile | (N/A) | (ID) | with farthest enemy | As you can see, the same idea from above can be applied to the farthest item/enemy/sprite etc., just like you can for the closest. |
| for random enemy/item/block/character/enemy projectile/sprite/character projectile | (N/A) | (ID) | for random block 5 | Instead of selecting the closest or farthest item/enemy/block etc., you can select one randomly. The example randomly finds a custom block with an ID of 5 that is within the view or nearby, and causes further commands to come from that block. |
| for spawned, with spawned, for spawn, with spawn | (N/A) | (N/A) | for spawn | This causes the commands to be run from whatever item/enemy/projectile etc. was created most recently. This could mean something which was created using commands, or it could mean an item that just came out of a block, or an enemy projectile that an enemy just launched, etc. |
| if item exists, if character has item, [or] if player has item | , ! | (Item ID) | if item exists = 5 | Checks if the character has an item of the given item ID. Note that this does not check for permanent items that have been collected (you could use a game var instead.) The example checks if the player has an item with the ID of 5. |
| if player exists | , ! | 1, 2 | if player exists = 2 | Checks if the specified player is currently active. The example checks if player 2 is currently in the area. |
| if character exists | , ! | (Character ID) | if character exists != 4 | Checks if the character with the specified ID currently exists as one of the two players. The example checks if character 4 does not exist. |
| if chance percent, if percent chance | | (Number from 1-100) | if percent chance = 25 | Randomly results in “true” according to the percent given. The example is a conditional which will return “true” 25 percent of the time, or 1 in 4 chance. In other words, the command or set of bracketed commands below this conditional have a 25 percent chance to occur. |
| if enemy (ID) number, if enemy (ID)count | (Any) | (Number) | if enemy 2 number < 5 | Checks the number of enemies of the specified ID within the view and nearby. The example checks if there are less than 5 enemies with the ID of 2. |
| if item (ID) number, if item (ID) count | (Any) | (Number) | if item 6 count = 3 | Checks the number of items of the specified ID within the view and nearby. The example checks if there are 6 items with the ID of 3. |
| if projectile (ID) number, if projectile (ID) count | (Any) | (Number) | if projectile 1 number != 0 | Checks the number of projectiles of the specified ID within the view and nearby. The example checks if there are not 0 projectiles with the ID of 1. |
| if block (ID) number, if block (ID) count | (Any) | (Number) | if block 3 count = 4 | Checks the number of blocks of the specified ID within the view and nearby. The example checks if there are 4 blocks with the ID of 3. |
| if key, if keyboard | , ! | up, down, left, right, jump, attack, pick, use | if key = jump | Checks if a movement or action key is pressed down. The example checks if the key for jumping is being pressed. If you want to run commands only once when the key is pressed down, you can use variables. An example is given here on our forums. |
| if key press | , ! | up, down, left, right, jump, attack, pick, use, button a, button b, button c, button d | if key press = jump | Checks if a key has been pressed down on the frame that the command is run. You select any of the standard Platform Builder keys or extra buttons (a-d) if you are using them (see “map” commands). Note that since this conditional is checking for a very specific moment of when a key is being pressed down, you will want to use this in a looping command prompt with a constant looping speed (see “loop” commands). Also, there are a few alternatives to these values. For instance, you could use “grab” or “pickup” instead of “pick” and it will work the same. The example checks if the jump button has been pressed in the current frame of the game. Lastly, “key press” can also be used as a non-conditional to cause the character act as if the key was pressed down. |
| if key release | , ! | up, down, left, right, jump, attack, pick, use, button a, button b, button c, button d | if key release = button a | Checks if a key has been released on the frame that the command is run. You select any of the standard Platform Builder keys or extra buttons (a-d) if you are using them (see “map” commands). Note that since this conditional is checking for a very specific moment of when a key is being released, you will want to use this in a looping command prompt with a constant looping speed (see “loop” commands). Also, there are a few alternatives to these values. For instance, you could use “grab” or “pickup” instead of “pick” and it will work the same. The example checks if button a (one of the four extra keys that you can map in your game) has been released in the current frame of the game. |
| if mouse, if mouse button | , ! | left, right | if mouse button != right | Check if a mouse button is being pressed or not. The example checks if the mouse right button is not being pressed. |
| if standing, walking, running, skidding, full speed, jumping, falling, standing attack, moving attack, jumping attack, hovering, gliding, ducking, defending, defended, pounding, pounded, wall sliding, climbing, hanging, swimming, using pick up gun, using pick up melee | , ! | true, false | if pounded = true | Checks the current action state of the character. Note that “full speed” returns true when the character is running at the maximum running speed. “defending” is when the character is in defensive stance, but has not blocked any attack. “defended” means that the character has blocked an attack while in defensive stance. “pounding” checks if the character is going down into a ground pound. The example checks if the character has “pounded,” that is, when the character has landed a ground pound. |
| if ID | | (Number) | if id = 5 | Checks the ID number of the item, enemy, etc. which is running the command. This may be useful when using invisible command blocks which are triggered by items, enemies, etc. Here, you can check if the item, enemy, etc., is the proper one before continuing. |
| if testing | | true, false | if testing = true | Checks if you are currently testing a level or doing a test run of the game. This can be useful to create your own “debug mode” to help you get around your game more easily as you test. |
| if testing area | | true, false | if testing area = true | Checks if you are currently testing a level (full-game test runs are not checked). |
| if test run, testing run, test game, testing game | | true, false | if test run = true | Check if you are currently doing a test run of the game (testing an area is not checked.) |
| if distance to player (1, 2, or leave blank) | (Any) | (Number) | if distance to player > 64 | Check the distance to a player. You can specify player 1, player 2, or don’t specify (like in the example) to check for whatever player is running the command. The example checks if the distance to the player is greater than 64, which is the length of two blocks. |
| if distance to character (ID) | (Any) | (Number) | if distance to char 2< 50. | Checks the distance to the character of the specified ID. The distance is measured in pixels. The example checks if the object calling the commands is less than 50 pixels away from the character. |
| if distance to enemy (ID) | (Any) | (Number) | if distance to enemy 3 > 50. | Checks the distance to the enemy of the specified ID. The distance is measured in pixels. The example checks if the object calling the commands is more than 50 pixels away from the enemy 3. |
| if distance to projectile (ID) | (Any) | (Number) | if distance to projectile 2< 10 | Checks the distance to the projectile of the specified ID. The distance is measured in pixels. The example checks if the object calling the commands is less than 10 pixels away from the projectile with an ID of 2. |
| if distance to character projectile (ID) | (Any) | (Number) | if distance to character projectile 2< 10 | Checks the distance to the enemy projectile of the specified ID. (It won’t check for that projectile if it was launched from the character) The distance is measured in pixels. The example checks if the object running the commands is less than 10 pixels away from a projectile with an ID of 2 that was launched from an enemy. |
| if distance to enemy projectile (ID) | (Any) | (Number) | if distance to enemy projectile 2< 10 | Checks the distance to the character projectile of the specified ID. (It won’t check for that projectile if it was launched from an enemy) The distance is measured in pixels. The example checks if the object running the commands is less than 10 pixels away from a projectile with an ID of 2 that was launched from the character. |
| if distance to item (ID) | (Any) | (Number) | if distance to item 9> 40 | Checks the distance to the item of the specified ID. The distance is measured in pixels. The example checks if the object running the commands is more than 40 pixels away from item 9. |
| if distance to block (ID) | (Any) | (Number) | if distance to block 6 >= 10 | Checks the distance to the block of the specified ID. The distance is measured in pixels. The example checks if the object running the commands is 10 or more pixels away from block 6. |
| if distance to npc (ID) | (Any) | (Number) | if distance to npc 3 <= 30 | Checks the distance to the NPC of the specified ID. The distance is measured in pixels. The example checks if the object running the commands is 30 or less pixels away from NPC 3. |
| if distance to sprite (ID) | (Any) | (Number) | if distance to sprite 4 < 25 | Checks the distance to the sprite of the specified ID. The distance is measured in pixels. The example checks if the object running the commands is less than 25 pixels away from a sprite with an ID of 4. |
| if collision character, if touching character | (N/A) | (Character ID) | if touching character 2 | Checks if whatever is calling the command is in contact with the specified character. So, if this command comes from an enemy command prompt, the example checks if the enemy is currently touching a character with an ID of 2. |
| if collision player, if touching player | (N/A) | 1, 2 | if collision player 1 | Checks if whatever is calling the command is in contact with the specified player. So, if this command comes from an enemy command prompt, the example checks if the enemy is currently touching player 1. |
| if collision enemy, if touching enemy | (N/A) | (Enemy ID) | if touching enemy 5 | Checks if whatever is calling the command is in contact with the specified enemy. So, if this command comes from an enemy command prompt, the example checks if the enemy is currently touching a custom enemy with an ID of 5. |
| if collision item, if touching item | (N/A) | (Item ID) | if collision item 7 | Checks if whatever is calling the command is in contact with the specified item. So, if this command comes from an enemy command prompt, the example checks if the enemy is currently touching a custom item with an ID of 7. |
| if collision block, if touching block | (N/A) | (Block ID) | if collision block 1 | Checks if whatever is calling the command is in contact with the specified block. So, if this command comes from an enemy command prompt, the example checks if the enemy is currently touching a custom block with an ID of 1. |
| if collision character projectile, if touching character projectile | (N/A) | (Projectile ID) | if collision character projectile 1 | Checks if whatever is calling the command is in contact with the specified character projectile. So, if this command comes from an enemy command prompt, the example checks if the enemy is currently touching a character projectile with an ID of 1. |
| if collision enemy projectile, if touching enemy projectile | (N/A) | (Projectile ID) | if touching enemy projectile 9 | Checks if whatever is calling the command is in contact with the specified enemy projectile. So, if this command comes from an enemy command prompt, the example checks if the enemy is currently touching an enemy projectile with an ID of 9. |
| if collision sprite, if touching sprite | (N/A) | (Sprite ID) | if touching sprite 6 | Checks if whatever is calling the command is in contact with the specified sprite. So, if this command comes from an enemy command prompt, the example checks if the enemy is currently touching an imported sprite with an ID of 6. |
| vibrate light | | (Seconds. decimals are okay) | vibrate light = 1.5 | When using a gamepad controller with rumble support, you can cause the controller to rumble lightly with this command. If you don’t specify the number of seconds, then it will default to 1 second. The example causes the controller to rumble lightly for 1.5 seconds. |
| vibrate medium | | (Seconds. decimals are okay) | vibrate medium | When using a gamepad controller with rumble support, you can cause the controller to rumble with medium power with this command. If you don’t specify the number of seconds, then it will default to 1 second. The example causes the controller to rumble with medium power for 1 second. |
| vibrate strong | | (Seconds. decimals are okay) | vibrate strong = 2 | When using a gamepad controller with rumble support, you can cause the controller to rumble strongly with this command. If you don’t specify the number of seconds, then it will default to 1 second. The example causes the controller to rumble strongly for 2 seconds. |
| give character (ID) item | (N/A) | (Item ID) | give character 2 item 5 | Gives an item with the specified ID to the character of the specified ID. (See Below for how to find IDs of characters and items) The example gives an item with the ID of 5 to the character with an ID of 2. |
| give player (1 or 2) item | (N/A) | (Item ID) | give player 2 item 1 | Works the same as the previous command except that you specify the player number (1 or 2) instead of the Character ID. The example gives an item with the ID of 1 to player 2. |
| take player (1 or 2) item, remove player (1 or 2) item | (N/A) | (Item ID) | take player 1 item 3 | Removes an item of the specified ID from the player’s inventory. The example causes player 1 to no longer have possession of the item with the ID of 3. |
| options, open options, display options, show options | (N/A) | (N/A) | display options | This opens the options of the pause menu for your game. |
| go to checkpoint, jump to checkpoint, return to checkpoint | (N/A) | (N/A) | jump to checkpoint | If you have a checkpoint active, you can use this command to return back to the checkpoint. Note: This command does not remove any lives. Also, this command does not work when testing an area. |
| checkpoint, set checkpoint, make checkpoint | | (Area ID, then a comma, then Spawn ID) | checkpoint = 3, spwn | Creates and sets a checkpoint using an area ID and spawn ID of characters in the area. In this example, if the character dies, the character will return to the area with an ID of 3, and the spawn ID will be spwn. |
| freeze game, pause game | | (Number In frames) | freeze game = 30 | Completely freezes the game. The number you put is the time for the game to be frozen in frames. So if your game is set to 60 frames per second (see “Other Settings” in Game Setup) then the example will freeze the game for half a second (30 frames at 60 frames per second). |
| trigger goal, area goal, finish goal, complete goal | | 1, 2 | finish goal = 2 | Causes the area goal 1 or goal 2 to be completed, and the goal reward to be awarded. The example completes the second area goal. |
| permanent | | true, false | permanent = true | Some commands (such as max health) can be applied permanently for the entire game. By enabling “permanent,” you can cause all further commands in the command prompt to be treated as permanent unless you disable it again. The default value is 0 (false) unless the commands are being run from an item with a permanent duration. |
| exit, stop, exit commands, stop commands, exit command prompt, stop command prompt | (N/A) | (N/A) | exit | If this command is run, then the command prompt stops running and no more commands following will occur. This can be useful with conditionals when you wish to stop running commands if certain conditionals are or are not met. |
| delay | | (Number in 1/10th seconds) | delay = 5 | This command will make the next command delayed, saving you the hassle creating a timeline to accomplish the same thing. The number is in 1/10th seconds, the same as for timelines. In this example, whatever command is written after “delay = 5” will happen 1/2 second after the command was initially run. If you want multiple commands delayed, you can group them inside straight brackets [ ] on their own separate lines. |
| delay seconds | (N/A) | (Number in seconds) | delay 2.5 seconds | This works like the regular “delay” command, except your number is now in full seconds. The example also shows something else you can do with delays. If you want multiple commands delayed, you can group them inside straight brackets [ ] on their own separate lines. |
| seed | | (Number), random | seed = 113 | In programming, a “seed” is a reference point for generating “randomness.” So, if a seed is set to 123, and then 10 random numbers are generated, and then the seed it reset to 123, and ten more random numbers are generated, the first batch of 10 numbers will be the same batch the second time because the seed was the same. Some commands in Platform Builder use randomness, so using them alongside a seed can give more control if you want to repeat random events. Just realize that the sequence of random events may still get out of sync because of other functions which utilize the seed, so don’t expect that the random outcomes will be the same over longer periods of gameplay when you reset the seed. If you want to randomize the seed itself, you can say “seed = random” as a command instead of using a number. |
| brightness effect [or] brightness fx | (Any) | (Number) | brightness fx – 10 | Changes the brightness of an area. The minimum value is -50 and the maximum value is 50. The example reduces the overall brightness by 10, or 10% of the total range available. |
| visibility effect [or] visibility fx | no effect [or] none, blur, edge blur, mirror, noise, heat haze, water [or] underwater | visibility fx = water | Changes the visibility effect as seen in the area settings. The example enables an underwater effect. | |
| visibility effect strength [or] visibility fx strength | (Any) | (Number) | visibility fx strength = 50 | Changes the effect strength of the effect applied for visibility in the area settings. The value must be between 0 and 100, where 0 is no effect power (and not noticed), and 100 is full effect power. The example causes the visibility effect to have a strength of 50, which is at half power. |
| color effect [or] color fx | | no effect [or] none, saturation, sepia, night vision, thermal | color effect = none | Changes the color effect as seen in the area settings. The example disables any color effect that may have been applied. |
| color effect strength [or] color fx strength | (Any) | (Number) | color fx strength = 10 | Changes the effect strength of the effect applied for color in the area settings. The value must be between 0 and 100, where 0 is no effect power (and not noticed), and 100 is full effect power. The example causes the color effect to have a strength of 10, which which give a subtle effect. |
| special effect [or] special fx | | no effect [or] none, vignette, fog, old movie, chalkboard, sketch | special fx = vignette | Changes the “special” effect as seen in the area settings. The example enables the vignette effect, which darkens the edges of the view. |
| special effect strength [or] special fx strength | (Any) | (Number) | special fx strength * 2 | Changes the effect strength of the effect applied for “special” in the area settings. The value must be between 0 and 100, where 0 is no effect power (and not noticed), and 100 is full effect power. The example doubles whatever value the special effect strength was at. If the result is over 100, it will be brought down to 100. |
| lens | | Lens settings have been replaced by “Effects” in Platform Builder 10.2. They will still mostly work in your games, but please refer to the “effects” and use the effect commands from now on. | ||
| spawn layer, spawning layer, create layer, creating layer | | (Layer ID or “auto” or “default”) | spawn layer = auto | This changes the layer that items, enemies, etc. are created on with commands. You can enter a layer ID. You can also cause the spawning go on default layers by using “auto” or “default.” The example causes all spawned things to go on their default or auto layer. |
| layer (ID) visible | | true, false | layer 5 visible = false | This changes the visibility of a layer in the area with the chosen ID. The example causes the layer with an ID of 5 to go invisible (making everything on that layer invisible.) |
| layer (ID) active | | true, false | layer 4 active = true | This changes whether an area’s layer with the chosen ID is active. The example causes the layer with an ID of 4 to go active. |
| item (ID) active | | true, false | item 54 active = false | Changes if an item with the chosen ID is active. This works the same as disabling the layer of the item. Note that this command only works if the layer is active. You cannot activate items on inactive layers with this command. The example deactivates the item with an ID of 54. |
| item (ID) layer | | (Number) | item 3 layer = 17 | Changes the layer of the item with the chosen ID. This only works if the item is already active. The example causes items with an ID of 3 to go to the layer with an ID of 17. |
| block (ID) active | | true, false | block 4 active = false | Changes if a block with the chosen ID is active. This works the same as disabling the layer of the block. Note that this command only works if the layer is active. You cannot activate blocks on inactive layers with this command. The example deactivates the item with an ID of 4. |
| block (ID) layer | | (Number) | block 3 layer = 12 | Changes the layer of the block with the chosen ID. This only works if the block is already active. The example causes blocks with an ID of 3 to go to the layer with an ID of 12. |
| enemy (ID) | reverse at walls, pass through walls | enemy 4 = reverse at walls | For flying enemies, this changes the setting whether the enemy of the chosen ID will reverse at walls or pass through them. The example causes enemy 4 to reverse at walls. | |
| enemy (ID) active | | true, false | enemy 4 active = false | Changes if an enemy with the chosen ID is active. This works the same as disabling the layer of the enemy. Note that this command only works if the layer is active. You cannot activate enemies on inactive layers with this command. The example deactivates the enemy with an ID of 4. |
| enemy (ID) layer | | (Number) | enemy 3 layer = 12 | Changes the layer of the enemy with the chosen ID. This only works if the enemy is already active. The example causes enemies with an ID of 3 to go to the layer with an ID of 12. |
| projectile (ID) active | | true, false | projectile 14 active = true | Changes if a projectile with the chosen ID is active. This works the same as disabling the layer of the projectile. Note that this command only works if the layer is active. You cannot activate projectiles on inactive layers with this command. The example activates the projectile with an ID of 14. |
| projectile (ID) layer | | (Number) | projectile 4 layer = 6 | Changes the layer of the projectile with the chosen ID. This only works if the projectile is already active. The example causes projectiles with an ID of 4 to go to the layer with an ID of 6. |
| NPC (ID) active | | true, false | NCP 1 active = true | Changes if a NPC with the chosen ID is active. This works the same as disabling the layer of the NPC. Note that this command only works if the layer is active. You cannot activate NPCs on inactive layers with this command. The example activates the NPC with an ID of 1. |
| NPC (ID) layer | | (Number) | NPC 4 layer = 6 | Changes the layer of the NPC with the chosen ID. This only works if the NPC is already active. The example causes NPCs with an ID of 4 to go to the layer with an ID of 6. |
| sprite (ID) active | | true, false | sprite 1 active = true | Changes if a sprite with the chosen ID is active. This works the same as disabling the layer of the sprite. Note that this command only works if the layer is active. You cannot activate sprites on inactive layers with this command. The example activates the sprite with an ID of 1. |
| sprite (ID) layer | | (Number) | sprite 4 layer = 6 | Changes the layer of the sprite with the chosen ID. This only works if the sprite is already active. The example causes sprites with an ID of 4 to go to the layer with an ID of 6. |
| character (ID) layer | | (Number) | character 3 layer = 12 | Changes the layer of the character with the chosen ID. This only works if the character is already active. The example causes characters with an ID of 3 to go to the layer with an ID of 12. |
| player (1 or 2) layer | | (Number) | player 1 layer = 4 | Changes the layer of the specified player. This only works if the player is already active. The example causes player 1 to go to the layer with an ID of 4. |
| air acceleration | (Any) | (Number) | air acceleration = 20 | Changes the acceleration for the character while in the air. The example changes the character’s air acceleration amount to 20. |
| air traction | (Any) | (Number) | air traction = 0 | Changes the traction that the character experiences in the air. The example sets the traction to 0, making it impossible for the character to reverse direction while in the air. |
| air cooldown | (Any) | (Number) | air cooldown = 25 | Changes the cooldown value for the character while in the air. The example adds 25 to the cooldown, making the character to slow down after in the air when the left and right keys are not pressed. |
| ice acceleration | (Any) | (Number) | ice acceleration = 20 | Changes the character’s ability to speed up while walking on ice. The example sets the ice acceleration to 20. |
| ice cooldown | (Any) | (Number) | ice cooldown -15 | Changes how quickly the character naturally slows down from ice when the left and right keys are not are pressed. The example decreases the character’s ice cooldown by 15. |
| sprite (ID) animate, sprite (ID) animation | (Any) | (Number) | sprite 3 animate = 0 | Changes the animation speed of the custom sprite with 0 for no animation, 1 as the slowest animation, and 12 the fastest animation (Similar to animation settings in Game Setup for imported sprites). The example causes sprite 3 animation to become 0, stopping all animation. |
| sprite (ID) frame, sprite (ID) image | (Any) | (Number) | sprite 3 image = 12 | Changes the animation frame of the custom sprite with the specified ID. This can be useful when the animation speed is 0 and you wish to adjust the frames yourself. The example causes the sprite with an ID of 3 to change to its twelfth frame. |
| instant fail course | (N/A) | (N/A) | instant fail course | This causes all of the events for when the character dies, only the transition is instant. There is no music or character death animation. For example, if your game uses overworld, you will instantly return back to the overworld with one less life. |
| return to world, return to overworld | (N/A) | (N/A) | return to world | For games with overworlds, this will cause you to instantly return back to the overworld. The level will not be considered complete, but neither will a life be lost. |
| remove checkpoint | (N/A) | (N/A) | remove checkpoint | If a checkpoint is set inside an area, it will be unset. |
| stand attack power vs enemies | (Any) | (Number) | stand attack power vs enemies = 3 | Changes the character’s stand attack power against enemies. The example makes the stand attack power vs enemies to be 3. |
| stand attack power vs blocks | (Any) | (Number) | stand attack power vs blocks + 1 | Changes the character’s stand attack power against blocks (the attack power needed to trigger or destroy them from the side). The example adds 1 to the stand attack power. |
| stand attack power vs characters | (Any) | (Number) | stand attack power vs characters -= 2 | Changes the character’s stand attack power against other characters. The example removes 2 from the character’s stand attack power vs. characters. |
| move attack power vs enemies | (Any) | (Number) | move attack power vs enemies = 3 | Changes the character’s move attack power against enemies. The example makes the move attack power vs enemies to be 3. |
| move attack power vs blocks | (Any) | (Number) | move attack power vs blocks + 1 | Changes the character’s stand move power against blocks (the attack power needed to trigger or destroy them from the side). The example adds 1 to the move attack power. |
| move attack power vs characters | (Any) | (Number) | move attack power vs characters -= 2 | Changes the character’s move attack power against other characters. The example removes 2 from the character’s move attack power vs. characters. |
| jump attack power vs enemies | (Any) | (Number) | jump attack power vs enemies = 3 | Changes the character’s jump attack power against enemies. The example makes the jump attack power vs enemies to be 3. |
| jump attack power vs blocks | (Any) | (Number) | jump attack power vs blocks + 1 | Changes the character’s stand jump power against blocks (the attack power needed to trigger or destroy them from the side). The example adds 1 to the jump attack power. |
| jump attack power vs characters | (Any) | (Number) | jump attack power vs characters -= 2 | Changes the character’s jump attack power against other characters. The example removes 2 from the character’s jump attack power vs. characters. |
| defense | (Any) | (Number), [or] invincible | defense + 2 | Changes the defense of the character. The example increases the character’s defense by 2. |
| weakness | | none, fire, earth, water, ice, wind, electric, poison, darkness, light, other | weakness = wind | Changes the weakness setting of the character. The example causes the character to have a weakness for wind attacks |
| stomp attack power vs enemies | (Any) | (Number) | stomp attack power vs enemies = 3 | Changes the character’s stomp attack power when jumping on enemies. The example makes the stomp attack power vs enemies to be 3. |
| stomp attack power vs characters | (Any) | (Number) | stomp attack power vs characters -= 2 | Changes the character’s stomp attack power when jumping on other characters. The example removes 2 from the character’s stomp attack power vs. characters. |
| stomp attack type | | (any of the attack types under character settings) | stomp attack type = electric | Changes the character’s stomp attack type. The example makes the character’s stomp attack to be an electric type. |
| attack other chars/attack other characters | | true, false | attack other chars = true | Changes the character’s ability to attack other characters (useful in 2-player mode). The example enables this feature. Play nice, everyone. |
| enemy (ID) attack power vs characters | (Any) | (Number) | enemy 2 attack power vs characters = 4 | changes the attack power of the enemy with the specified ID against characters. The example makes the enemy with an ID of 2 to have an attack power vs characters to become 4. |
| enemy (ID) attack power vs enemies | (Any) | (Number) | enemy 9 attack power vs enemies +1 | changes the attack power of the enemy with the specified ID against other enemies. The example makes the enemy with an ID of 9 to increase its attack power verses enemies by 1. |
| enemy (ID) attack power vs blocks | (Any) | (Number) | enemy 1 attack power vs blocks = 2 | changes the attack power of the enemy with the specified ID against blocks (for activating or destroying blocks from the side). The example makes the enemy with an ID of 1 to have an attack power vs blocks to become 2. |
| enemy (ID) defense | (Any) | (Number), [or] invincible | enemy 2 defense * 2 | changes the defense of the enemy with the specified ID. You can set this to a number or “invincible.” The example causes enemies with an ID of 2 to double their defensive power. |
| enemy (ID) attack type | none, fire, earth, water, ice, wind, electric, poison, darkness, light, other | enemy 7 attack type = none | changes the attack type of the enemy with the specified ID. The example changes the attack type to “none,” which is default. | |
| projectile (ID) defense | (Any) | (Number), [or] invincible | projectile 8 defense = 2 | Changes the defense of the projectile with the specified ID. The example sets the defense to 2 for the projectile with an ID of 8. |
| projectile (ID) attack power vs target | (Any) | (Number) | projectile 5 attack power vs target = 6 | Changes the attack power vs targets of the projectile with the specified ID. For a projectile fired by the character, the “target” would be enemies, and visa versa. The example sets the projectile attack power to 6. |
| projectile (ID) attack power vs friend | (Any) | (Number) | projectile 1 attack power vs friend = 3 | Changes the attack power vs friends of the projectile with the specified ID. For a projectile fired by the character, the “friend” would be other characters. If fired by an enemy, the “friend” woudl be other enemies. The example sets the projectile attack power to 3. |
| if game (Number of game file) exists | (N/A) | (N/A) | if game 3 exists | Checks if a game exists with the specified game number. The example check if game 3 exists. |
| sprite (ID) looping | | staggered, constant, default | sprite 7 looping = constant | This changes the looping speed of the looping command prompt for the sprite with the specified ID. You can choose to have it loop “constant” which would be every frame of the game, or “staggered” which would be 6 times per second (and is easier on the PC). Set this to “default” to make it take on whatever setting you have for looping in general (see the command “loop/loop speed”). The example causes the sprite with an ID of 7 to run its looping command prompt every frame of the game. |
| delay frames, delay steps | (N/A) | (Number in game frames) | delay 60 frames | This works like the regular “delay” command, except your number is now in game frames or steps. So if you game is running at 60 fps (frames per second), then the example will cause the delay to last for one second. This is the most precise way to work with delays, but the result will change if you change the game’s frame rate! |
| cancel my delays | (N/A) | (N/A) | cancel my delays | Cancels any active delays for the item, enemy, etc., that called them. So, if you have a custom enemy that works with delays, but you want to prevent those delays from happening if the enemy is killed, you can put “cancel my delays” in the “defeated” command prompt of the enemy. |
| cancel my timelines | (N/A) | (N/A) | cancel my timelines | Cancels any active timelines for the item, enemy, etc., that called them. So, if you have a custom enemy that works with timelines, but you want to prevent those timelines from finishing if the enemy is killed, you can put “cancel my timelines” in the “defeated” command prompt of the enemy. |
| if character (ID) | , ! | inside view, in view, outside view, out view | if character 2 = in view | Checks if the character with the specified ID is inside or outside the current view. The example checks if the character with an ID of 2 is inside the view. |
| if player (1 or 2) | , ! | inside view, in view, outside view, out view | if player 2 = inside view | Checks if the player 1 or payer 2 is inside or outside the current view. The example checks if player 2 is inside the view. |
| if enemy (ID) | , ! | inside view, in view, outside view, out view | if enemy 6 = inside view | Checks if the enemy with the specified ID is inside or outside the current view. The example checks if the enemy with an ID of 6 is inside the view. |
| if item (ID) | , ! | inside view, in view, outside view, out view | if item 2 != out view | Checks if the item with the specified ID is inside or outside the current view. The example checks if the item with an ID of 2 is not outside the view (in other words, if it’s inside the view) |
| if npc (ID) | , ! | inside view, in view, outside view, out view | if npc 10 = in view | Checks if the NPC with the specified ID is inside or outside the current view. The example checks if the NPC with an ID of 10 is inside the view. |
| if projectile (ID) | , ! | inside view, in view, outside view, out view | if projectile 6 = in view | Checks if the projectile with the specified ID is inside or outside the current view. The example checks if the projectile with an ID of 6 is inside the view |
| if block (ID) | , ! | inside view, in view, outside view, out view | if block 1 = outside view | Checks if the block with the specified ID is inside or outside the current view. Check example checks if the block with an ID of 1 is outside the view. |
| if random (number) | (Any) | (Number) | if random 9 < 3 | The conditional starts with a random whole number between 0 and what you specify. Then is checks that number with the rest of your command. The example generates a random whole number between 0 and 9, and then checks if that number is less than 3. The conditional passes if the random number is 0, 1, or 2, which means that this conditional will have a 3 in 10 (30%) chance of passing. |
| graphics | | standard, no outlines, legacy, palette 1, palette 2, [or] palette 3 | graphics = palette 1 | Changes the graphics setting of the game. Note that this will only work on 1x game size, and it is a huge performance hit, so we recommend you only use it during a level transition. Also, this change will be permanent for your game unless you change it again later. The example changes the game graphics to palette 1. |
| stop all sounds, stop all sfx, stop all sound effects | (N/A) | (N/A) | stop all sfx | Causes all actively playing sound effects to stop. Note that does does not affect background music, and you should use “stop music” to handle that if you wish. |
| stop sfx | | (Any sound effect name from sound effects section in game setup, excluding the category name) | stop sfx = splash | Stops a sound effect of your choosing from the sound effects list in game setup. You can use any name, but be sure to exclude the category (So, instead of “Character: P1 Jump”, just say, “P1 Jump”.) The example causes the Character: Splash sound to stop playing. |
| stop sfx, stop sound, stop sound effect | | (Number) | stop sfx = 5 | Stops an item sound effect of your choice. The number corresponds with the sound effect number in custom items. The example stops sound effect 5 from playing, which is a whistle sound. |
| stop import sfx, stop sfx import, stop import sound, stop sound import, stop extra sound, stop extra sfx, stop extra sound effect | | (Sound effect ID) | stop sfx import = 3 | Stops the playing of an imported sound effect with the chosen ID. The example stops an imported sound effect with the ID of 3 to stop playing. |
| create hud, spawn hud | (N/A) | (HUD ID) | create hud 2 | Adds a HUD with the chosen ID to the screen. Note that you can not have more than one HUD with the same ID in use, but you can use multiple different HUDs at the same time. The example adds HUD 2 to the screen. |
| hide hud, remove hud | (N/A) | (HUD ID) | hide hud 3 | Prevents the HUD with the chosen ID from displaying. This can be useful when you don’t need to see the HUD during cutscenes. |
| unhide hud, reveal hud, show hud | (N/A) | (HUD ID) | show HUD 2 | If you hide the HUD, you can unhide it using this command. The command prompt is not case-sensitive, so this example will work fine. |
| Hide huds, hide all huds, remove huds, remove all huds | (N/A) | (N/A) | hide all huds | Causes all of the HUDs to no longer display on the screen. This may be useful for cut-scenes. |
| unhide huds, reveal huds, show huds, unhide all huds, reveal all huds, show all huds | (N/A) | (N/A) | show huds | If you hide one or more HUDs, this command will reveal all of the HUDs. |
| hud text (then 1-20) | | (x position, then a comma, then y position) | hud text 18 = 10, 25 | Sets the position for a hud text, relative to the top-left corner of your view. Platform Builder allows 20 different texts to display over your screen for the HUD, and you can change them with the command (see Displaying Text and Messages). The example causes HUD text # 18 to be positioned 10 pixels over and 25 pixels down from the top-left corner of your screen. Note that this command does not modify the text of any particular HUD, so no ID is needed. |
| hud (ID) sprite | | dynamic, none, (sprite ID) | hud 1 sprite = 3 | Changes the HUD sprite to either dynamic, none, or an imported sprite of your choosing. The example causes the HUD sprite to become the imported sprite with an ID of 3. Other elements of the HUD will then appear on top of that sprite. |
| hud (ID) lives | | visible, invisible, dynamic | hud 5 lives = invisible | Changes life visibility settings on the HUD with the chosen ID. The example prevents the lives from displaying in the HUD. |
| hud (ID) health | | visible, invisible, dynamic | hud 4 health = dynamic | Changes health visibility settings on the HUD with the chosen ID. The example makes the lives display to be dynamic. |
| hud (ID) stars | | visible, invisible, dynamic | hud 2 stars = visible | Changes star visibility settings on the HUD with the chosen ID. The example makes stars display to always display. |
| hud (ID) money | | visible, invisible, dynamic | hud 1 money = dynamic | Changes money visibility settings on the HUD with the chosen ID. The example makes the money display to be dynamic. |
| hud (ID) pick up | | visible, invisible, dynamic | hud 2 pick up = invisible | Changes pick up item visibility settings on the HUD with the chosen ID. The example makes the pick up display to never display. |
| hud (ID) air | | visible, invisible, dynamic | hud 6 air = visible | Changes remaining air visibility settings on the HUD with the chosen ID. The example makes the air display to always be visible. |
| hud (ID) ammo | | visible, invisible, dynamic | hud 1 ammo = visible | Changes ammo visibility settings on the HUD with the chosen ID. The example makes the ammo display to always be visible. |
| spawn hud sprite, create hud sprite, spawn background hud sprite, create background hud sprite | | (sprite ID) | spawn hud sprite = 2 | Creates a sprite for the HUD which will appear behind other elements of your HUD. The sprite is created in the left-left corner of the view. You can use sprite x and sprite y controls to move the sprite around where it needs to go in respect to that corner. Note that hiding the HUD will also hide the sprite, and disable any mouse commands of that sprite. Also note that the sprite is not linked to any particular HUD, so no HUD ID is necessary. |
| spawn foreground hud (ID) sprite, spawn background hud (ID) sprite | | (sprite ID) | spawn foreground hud 1 sprite = 5 | Creates a sprite for the HUD which will appear in front of other elements of your HUD. The sprite is created in the left-left corner of the view. You can use sprite x and sprite y controls to move the sprite around where it needs to go in respect to that corner. Note that hiding the hud will also hide the sprite, and disable any mouse commands of that sprite. |
| hud (ID) position | | edge, center, custom | hud 2 position = center | Changes the position setting of the HUD with the chosen ID. If you change it to “custom,” you can use “hud position x” and “hud position y” to for further controls. The example changes the HUD position to the center of the screen. |
| hud (ID) position x, hud (ID) x | (Any) | (Number) | hud 3 position x + 5 | When a HUD’s position is set to “custom,” you can change the x position using this command. The example causes the HUD with an ID of 3 to move 5 pixels to the right. |
| hud (ID) position y, hud (ID) y | (Any) | (Number) | hud 1 position y = 20 | When a HUD’s position is set to “custom,” you can change the y position using this command (from the top of the screen). The example causes the HUD with an ID of 1 to become 20, which is 20 pixels from the top of the screen. |
| hud (ID) player (1 or 2) lives | | (x position, then a comma, then y position) | hud 3 player 1 lives = 5, 8 | Changes the x and y position of the lives display for player 1 or player 2 over the HUD sprite. This is relative to the top-left corner of the HUD sprite. The example causes the player 1 lives of the HUD to display 5 pixels to the right and 8 pixels down from the top-left corner of your custom HUD sprite. |
| hud hp (ID) display | | icons, health bar, number | hud hp 3 display = number | Changes how the HUD with the chosen ID displays health. The example causes the HUD to display the player’s health with numbers. |
| hud (ID) player (1 or 2) health | | (x position, then a comma, then y position) | hud 1 player 2 health = 50, 40 | Changes the x and y position of the health display for player 1 or player 2 over the HUD sprite. This is relative to the top-left corner of the HUD sprite. The example causes the player 2 health of the HUD to display 50 pixels to the right and 40 pixels down from the top-left corner of your custom HUD sprite. |
| hud (ID) stars, hud player stars | | (x position, then a comma, then y position) | hud 1 player stars = 12, 15 | Changes the x and y position of the stars display for the players over the HUD sprite. This is relative to the top-left corner of the HUD. The example causes the stars of the HUD to display 12 pixels to the right and 15 pixels down from the top-left corner of your custom HUD sprite. |
| hud (ID) player (1 or 2) money | | (x position, then a comma, then y position) | hud 3 player 1 money = 0, 0 | Changes the x and y position of the money display for player 1 or player 2 over the HUD sprite. This is relative to the top-left corner of the HUD sprite. The example causes the player 1 money of the HUD to display in the top-left corner of the HUD sprite. |
| hud (ID) player (1 or 2) ammo | | (x position, then a comma, then y position) | hud 2 player 2 ammo = 40, 40 | Changes the x and y position of the ammo display for player 1 or player 2 over the HUD sprite. This is relative to the top-left corner of the HUD sprite. The example causes the player 2 ammo of the HUD to display 40 pixels to the right and down from the top-left corner of the HUD sprite. |
| hud (ID) player (1 or 2) pick up | | (x position, then a comma, then y position) | hud 1 player 1 pick up = 1, 5 | Changes the x and y position of the pick up item displayed for player 1 or player 2 over the HUD sprite. This is relative to the top-left corner of the HUD sprite. The example causes the player 1 pick up item in the HUD to display 1 pixel to the right and 5 pixels down from the top-left corner of the HUD sprite. |
| hud (ID) player (1 or 2) air, hud player (1 or 2) breath | | (x position, then a comma, then y position) | hud 2 player breath = 23, 41 | Changes the x and y position of the air remaining for player 1 or player 2 over the HUD sprite, when the player is underwater. This is relative to the top-left corner of the HUD sprite. The example causes the player 1 air bar in the HUD to display 23 pixels to the right and 41 pixels down from the top-left corner of the HUD sprite. |
| split hud controls | | true, false | split hud controls = true | Changes whether player 1 and player 2 HUDs use split controls. When controls are split, then use the “with player 1” and “with player 2” commands with these HUD commands to select which player’s HUD you wish to change. |
| if hud exists | , ! | (HUD ID) | if hud exists = 3 | Checks if a HUD with the chosen ID exists, or has been created to display on the screen. The example checks if the HUD with an ID of 3 exists. |